


Check the docs before asking a question: https://abp.io/docs/latest
Check the samples to see the basic tasks: https://abp.io/docs/latest/samples
The exact solution to your question may have been answered before, and please first use the search on the homepage.
Provide us with the following info:
🧐 Hint: If you are using the ABP Studio, you can see all the information about your solution from the configuration window, which opens when you right-click on the solution and click on the Solution Configuration button.
Template: app
- Created ABP Studio Version: 0.8.2
- Current ABP Studio Version: 0.9.23
- Tiered: Yes
- UI Framework: angular
- Theme: leptonx
- Theme Style: system
- Progressive Web App: Yes
- Database Provider: ef
- Database Management System: mysql
- Separate Tenant Schema: Yes
- Mobile Framework: none
- Public Website: No
- Optional Modules:
- LanguageManagement
- AuditLogging
- SaaS
- OpenIddictAdmin
- Steps to reproduce the issue: I know that to be able to modify existing abp angular ui you would need to replace the existing component. I need guidance to be able to add lets say a BHFNumber for a tenant on maybe a seperate tab on the saas tenant create screen. I know that migrations need to run for the db to be created first and that seeding will kick off next and that an event is fired whereby the tenant created event is fired. At that point to maybe navigate to the settings tab where a parameters node will be activated where the user could enter the bhfnumber and save the settings or can you share the code with me to make changes to the tenant create ui to add a tab where the bhf number can be entered and the create shared tenant db checkbox can be removed or disabled.
- Your assistance would be much appreciated.
3 Answer(s)
-
0
Hi @richardf
Our angular team will help you on this issue.
Until the you can check this documentation if it helps: https://abp.io/docs/latest/framework/ui/angular/component-replacement
-
0
I have looked at replacing a component. found article that I needed https://abp.io/support/questions/7925/How-to-Add-extended-property-of-tenant-and-view-it-in-another-tab-in-create-tenant-Modal
Curious:
for replacing the createTenantModal what will my replacecomponent key be
this.replaceableComponents.add({ component: TenantSettingsComponent, key: ?? });
Please advise
-
0
Hello, You can use Dynamic form extensions or Entity action extensions to extend the settings. I will provide examples for both approaches.
Dynamic Form Extensions
1. Create Form Prop Contributors
Create form-prop-contributors.ts file in the angular > src > app directory then add the following code to the file.
import { eSaasComponents, SaasCreateFormPropContributors } from '@volo/abp.ng.saas';
import { SaasTenantDto } from '@volo/abp.ng.saas/proxy';
import { ePropType, FormProp, FormPropList } from '@abp/ng.components/extensible';
import { Validators } from '@angular/forms';

const bhfNumberProp = new FormProp<SaasTenantDto>({
  type: ePropType.String,
  name: 'BHFNumber',
  displayName: 'BHFNumber',
  validators: () => [Validators.required],
});

export function tenantPropContributor(propList: FormPropList<SaasTenantDto>) {
  propList.addTail(bhfNumberProp);
}

export const saasCreateFormPropContributors: SaasCreateFormPropContributors = {
  // enum indicates the page to add contributors to
  [eSaasComponents.Tenants]: [
    tenantPropContributor,
    // You can add more contributors here
  ],
};

export const saasEditFormPropContributors = saasCreateFormPropContributors;
2. Use Form Prop Contributors
Import
saasCreateFormPropContributorsandsaasEditFormPropContributorsin your app-routing module and pass it to the static forLazy method of IdentityModule as seen below://other imports import { saasCreateFormPropContributors, saasEditFormPropContributors, } from './form-prop-contributors'; const routes: Routes = [ // other routes { path: 'saas', loadChildren: () => import('@volo/abp.ng.saas').then(m => m.SaasModule.forLazy({ createFormPropContributors: saasCreateFormPropContributors, editFormPropContributors: saasEditFormPropContributors, }) ), }, // other routes ];After completing these steps
BHFNumberfield should appear in your tenant form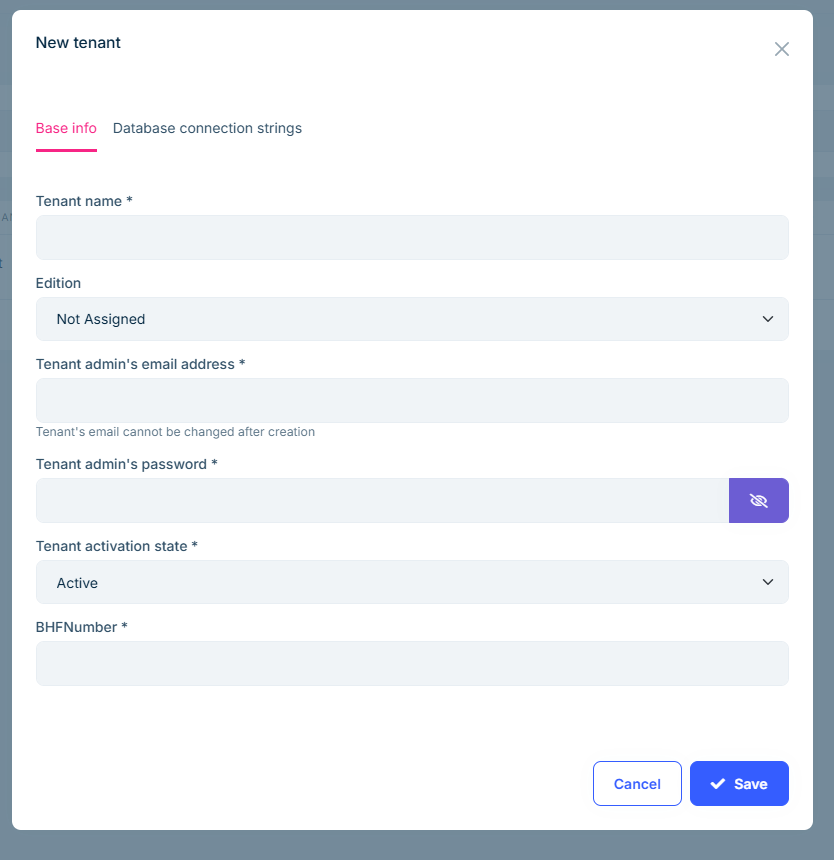
Entity Action Extensions
The
Entity Action Extensionsystem allows you to add a new action to an entity's action menu. In your project, we can add a new action to the tenant calledExtended Settings. When the user clicksExtended Settings, a custom modal will open, allowing them to enter theBHFNumbervalueThe folder structure will be as follows;
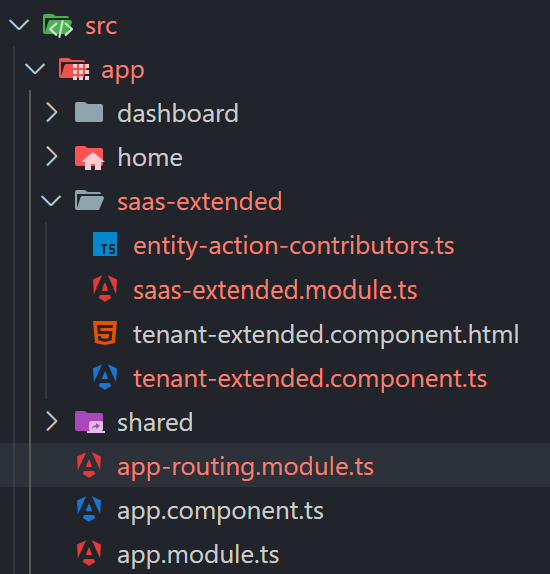
1. Create a Saas Extended Folder
Create a new folder at the following path:
src/app/saas-extended.2. Create an entity action
Add an
entity-action-contributors.tsfile inside thesaas-extendedfolder// src/app/saas-extended/entity-action-contributors.ts import { eSaasComponents, SaasEntityActionContributors } from '@volo/abp.ng.saas'; import { SaasTenantDto } from '@volo/abp.ng.saas/proxy'; import { EntityAction, EntityActionList } from '@abp/ng.components/extensible'; import { TenantExtendedComponent } from './tenant-extended.component'; const tenantExtendedSettings = new EntityAction<SaasTenantDto>({ text: 'Extended Settings', action: data => { const component = data.getInjected(TenantExtendedComponent); component.openTenantExtendedSettingsView(data.record); }, }); export function tenantExtendedSettingsContributor(actionList: EntityActionList<SaasTenantDto>) { actionList.addTail(tenantExtendedSettings); } export const saasEntityActionContributors: SaasEntityActionContributors = { // enum indicates the page to add contributors to [eSaasComponents.Tenants]: [ tenantExtendedSettingsContributor, // You can add more contributors here ], };3. Create a modal component to the saas module.
tenant-extended.component.ts
// src/app/saas-extended/tenant-extended.component.ts

import { SaasTenantDto } from '@volo/abp.ng.saas/proxy';
import { Component } from '@angular/core';

@Component({
  selector: 'app-tenant-extended',
  templateUrl: './tenant-extended.component.html',
})
export class TenantExtendedComponent {
  isTenantExtendedViewVisible: boolean;
  tenant: SaasTenantDto;
  BHFNumber: string;

  openTenantExtendedSettingsView(record: SaasTenantDto) {
    this.tenant = new Proxy(record, {
      get: (target, prop) => target[prop] || '—',
    });
    this.isTenantExtendedViewVisible = true;
  }

  save() {
    console.log('Saving BHFNumber:', this.BHFNumber);
  }
}
tenant-extended.component.html
<router-outlet></router-outlet>

<abp-modal [(visible)]="isTenantExtendedViewVisible">
  <ng-template #abpHeader>
    <h3>Tenant Extended Settings</h3>
  </ng-template>

  <ng-template #abpBody>
    <div class="abp-md-form">
      <div class="form-group">
        <label class="form-label">
          Tenant Name
          <span class="ms-1"></span>
        </label>
        <input type="text" [value]="tenant.name" disabled class="form-control"  />
      </div>
      <div class="form-group mt-3">
        <label class="form-label">
          BHFNumber
          <span class="ms-1"></span>
        </label>
        <input type="text" [(ngModel)]="BHFNumber" class="form-control"  />
      </div>
    </div>

  </ng-template>

  <ng-template #abpFooter>
    <button type="button" class="btn btn-secondary" abpClose>
      {{ 'AbpUi::Close' | abpLocalization }}
    </button>
    <button
    id="update-saas-tenantBasedConnStrSettings"
    class="btn btn-primary"
    type="button"
    [disabled]="loading"
    (click)="save()"
  >
  <i class="fa fa-save me-1"></i>
    {{ 'AbpUi::Save' | abpLocalization }}
  </button>
  </ng-template>
</abp-modal>
4. Add a module for the component and load SaasModule as seen below:
// src/app/saas-extended/saas-extended.module.ts

import { CoreModule } from '@abp/ng.core';
import { ThemeSharedModule } from '@abp/ng.theme.shared';
import { NgModule } from '@angular/core';
import { RouterModule } from '@angular/router';
import { saasEntityActionContributors } from './entity-action-contributors';
import { TenantExtendedComponent } from './tenant-extended.component';
import { SaasModule } from '@volo/abp.ng.saas';

@NgModule({
  imports: [
    CoreModule,
    ThemeSharedModule,
    RouterModule.forChild([
      {
        path: '',
        component: TenantExtendedComponent,
        children: [
          {
            path: '',
            loadChildren: () =>
              SaasModule.forLazy({
                entityActionContributors: saasEntityActionContributors,
              }),
          },
        ],
      },
    ]),
  ],
  declarations: [TenantExtendedComponent],
})
export class SaasExtendedModule {}
5. Load SaasExtendedModule instead of SaasModule in your root routing module.
// src/app/app-routing.module.ts

const routes: Routes = [
  // other routes

  {
    path: 'saas',
    loadChildren: () =>
      import('./saas-extended/saas-extended.module')
        .then(m => m.SaasExtendedModule),
  },

  // other routes
];
Now, you should see the
Extended Settingsaction under the actions menu. The final result will be as follows: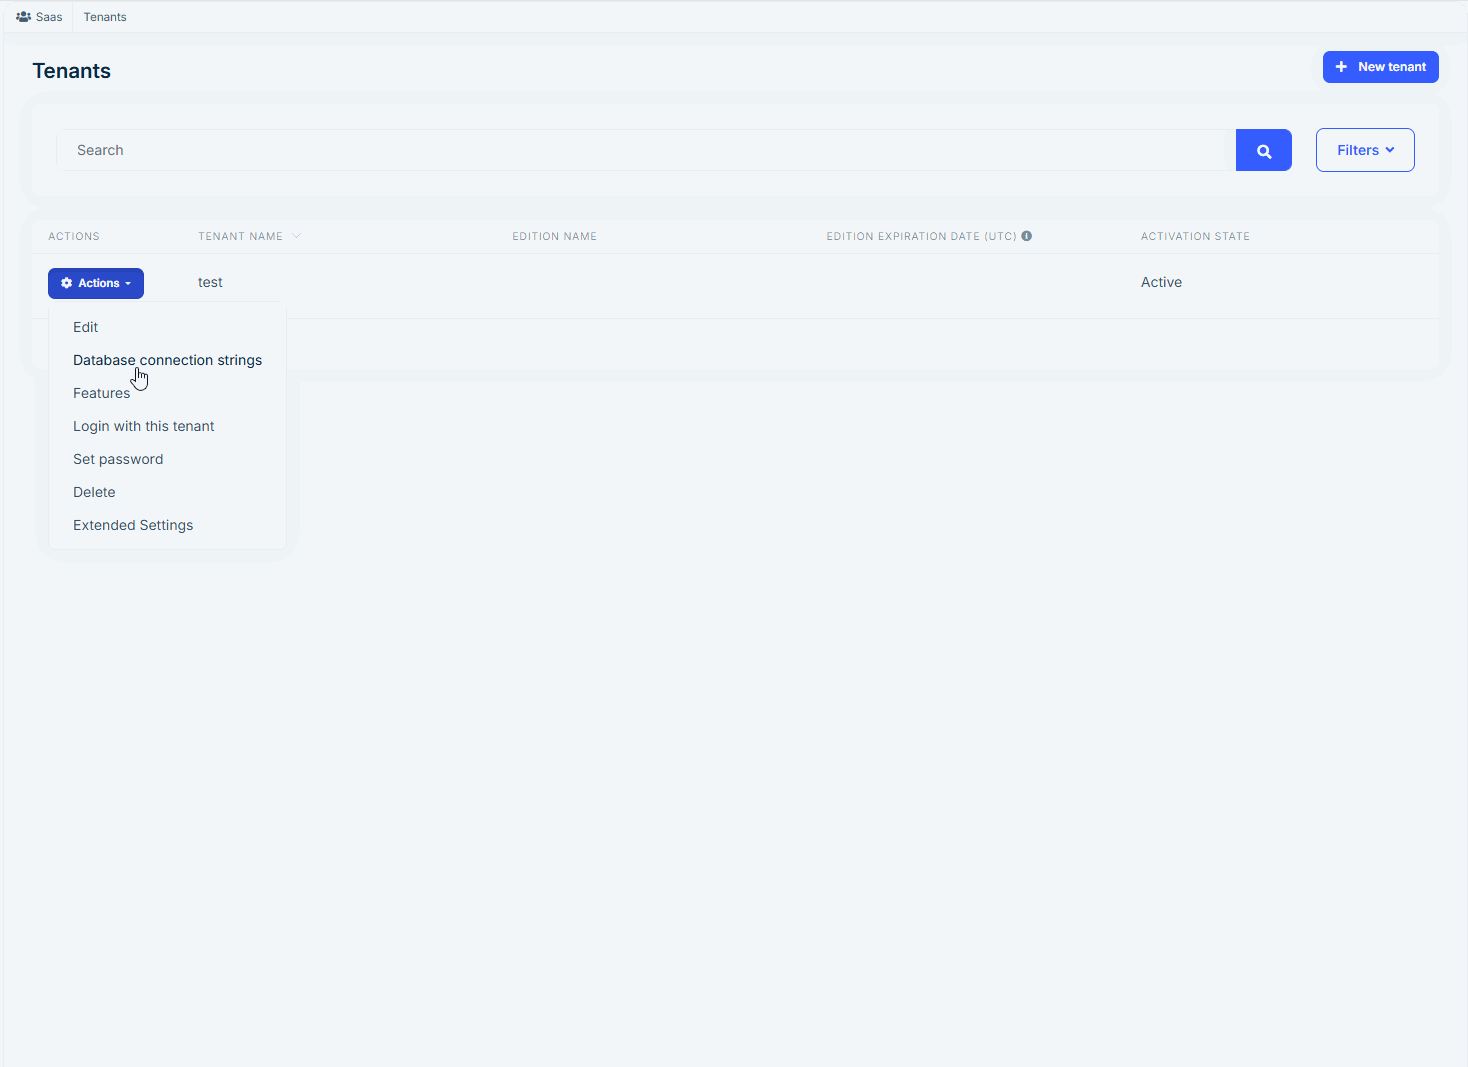
Let us know if we can assist you further


