How to Setup Azure Active Directory and Integrate Abp Angular Application
This guide demonstrates how to register an application to Azure Active Directory and integrate AzureAD to an ABP Angular application that enables users to sign in using OAuth 2.0 with credentials from Azure Active Directory.
Authentication Flow
ABP Angular application uses Authentication Code with PKCE (specs here) which is the most suitable flow for SPA applications by the time this article is written since implicit flow is deprecated.
The most common question is;
Where to put OpenId connection code in the Angular project?
The answer is, you don't. ABP Angular application is integrated with the backend (HttpApi.Host project) where it loads the configurations, permissions etc. For none-tiered angular applications, HttpApi.Host project also has IdentityServer4 embedded; also serving as Authorization Server. Angular application authentication flow is shown below.
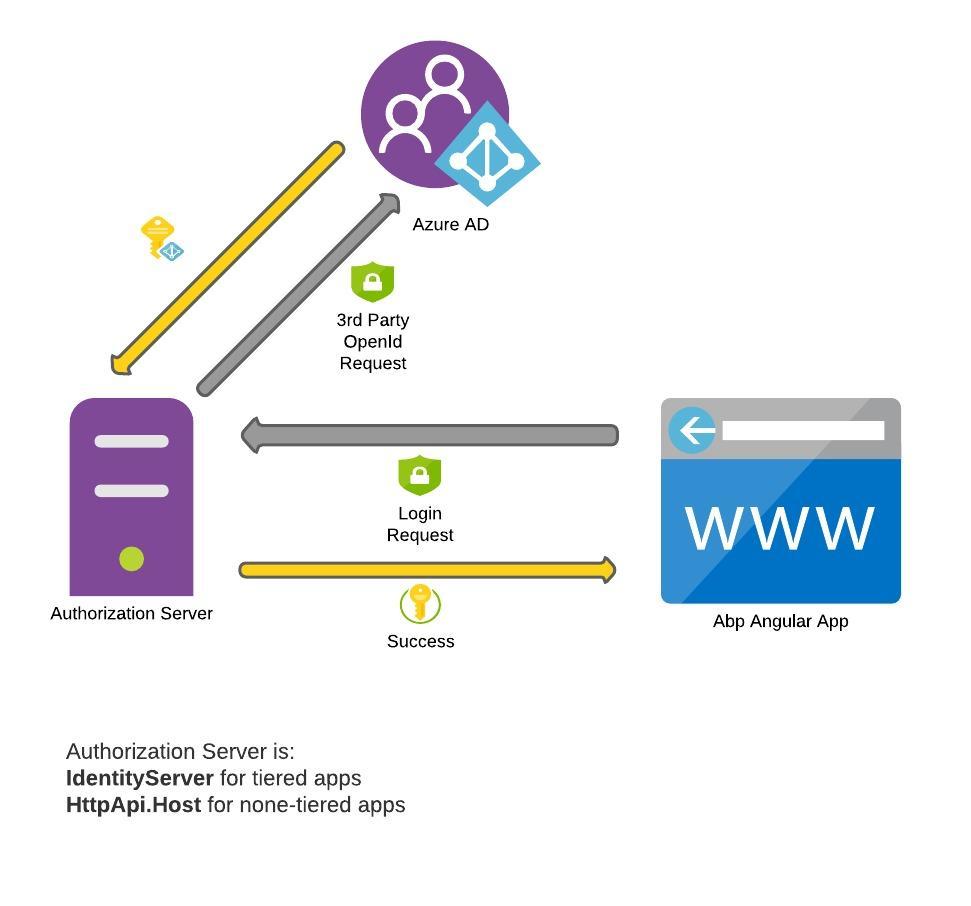
What if I want Azure AD as my authorization server and not IdentityServer?
This means your application will be using AzureAD user store for authentication. By registering both Angular app and HttpApi to AzureAD, authentication might work but authorization won't. Users need to be registered to ABP identity system for auditing, permissions etc. So the flow should be 3rd party registration.
Setting up OpenId Connection
Lets start with adding OpenId connection. Open the HttpApiHostModule.cs and update the ConfigureAuthentication method as below:
context.Services.AddAuthentication()
    ... //Omitted other third party configurations
    .AddOpenIdConnect("AzureOpenId", "Azure AD OpenId", options =>
    {
        options.Authority = "https://login.microsoftonline.com/" + configuration["AzureAd:TenantId"] + "/v2.0/";
        options.ClientId = configuration["AzureAd:ClientId"];
        options.ResponseType = OpenIdConnectResponseType.CodeIdToken;
        options.CallbackPath = configuration["AzureAd:CallbackPath"];
        options.ClientSecret = configuration["AzureAd:ClientSecret"];
        options.RequireHttpsMetadata = false;
        options.SaveTokens = true;
        options.GetClaimsFromUserInfoEndpoint = true;
        options.Scope.Add("email");

        options.ClaimActions.MapJsonKey(ClaimTypes.NameIdentifier, "sub");
    });
If you are using tiered (separate identity server) application, open IdentityServerModule.cs and add the OpenIdConnection manually to ConfigureServices method as following:
public override void ConfigureServices(ServiceConfigurationContext context)
{
    var hostingEnvironment = context.Services.GetHostingEnvironment();
    var configuration = context.Services.GetConfiguration();

    context.Services.AddAuthentication()
        .AddOpenIdConnect("AzureOpenId", "Azure AD OpenId", options =>
        {
            ... // Same configuration above
        });
Now we can add AzureAD settings. Open the appsettings.json located in HttpApi.Host project (or IdentityServer project if you are using tiered application). Add the following;
"AzureAd": {
  "Instance": "https://login.microsoftonline.com/",
  "TenantId": "<azureAd-tenant-id>",
  "ClientId": "<azureAd-client-id>",
  "Domain": "domain.onmicrosoft.com",
  "CallbackPath": "/signin-azuread-oidc",
  "ClientSecret": "<azureAd-client-secret>"
},
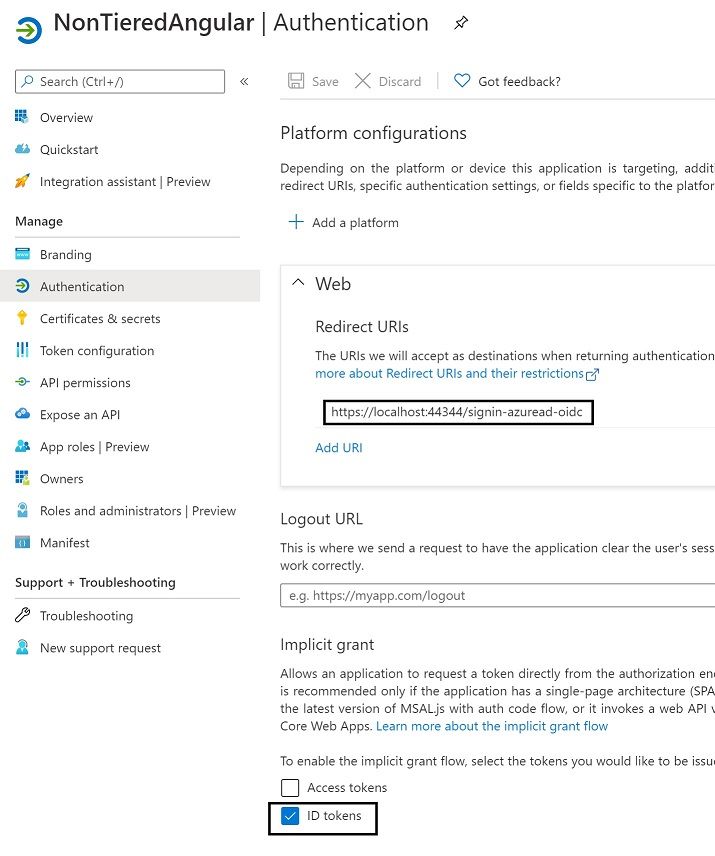
Keep on mind that App.SelfUrl + AzureAd.CallbackPath will be used in AzureAD app registration. We'll update the AzureAd settings after registering the application in Azure Portal.
Setting up Azure Active Directory
Navigate to Manage Azure Active Directory in azure portal. Go to App registrations on left side menu and hit New registration.
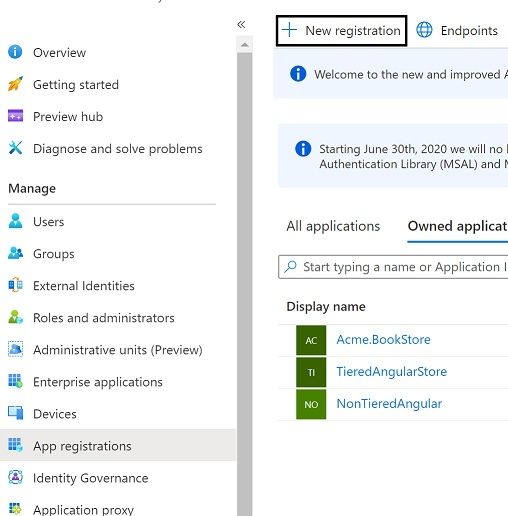
Enter a name for your application and App.SelfUrl + AzureAd.CallbackPath as redirect uri then register.
Now navigate to Authentication on the left menu and enable ID tokens.
We also need to set a client secret. Navigate to Certificates & secrets menu on the left and create a new client secret.
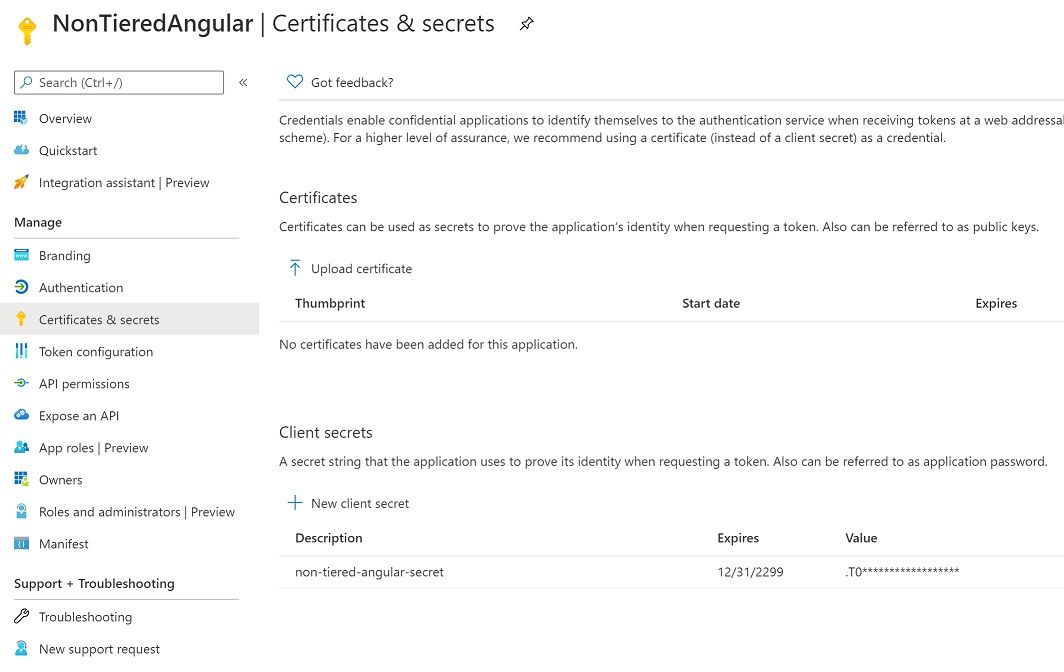
Copy the secret and update your appsettings.json AzureAd.ClientSecret field.
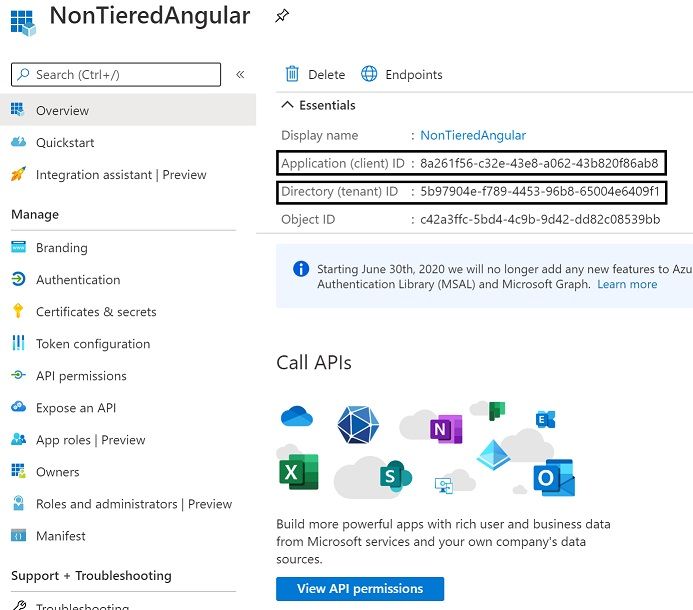
Also update your AzureAd.TenantId and AzureAd.ClientId fields with the information located under Overview menu. And that's all.
Next time you hit login, you should be seeing login screen enabled Azure AD like below.
I am getting errors when trying to login to AzureAD.
- You can check this article FAQ which covers many errors.
But I don't want my users to see default login screen. I want my users to login only from AzureAD.
- You can mimic this behavior by customizing the login page and instantly trigger Azure AD provider click. For more info, you can check this article.
- AddOpenIdConnect: Removed
JwtSecurityTokenHandler.DefaultInboundClaimTypeMap.Clear();and addedsubclaim mapping in ClaimActions rather than global mapping. - Updated OpenIdConnect configurations.


Comments
gvnuysal 281 weeks ago
I did the above code settings and the settings in the azure portal as you said. Clicking the Azure Ad Open Id button redirects me to the microsoft login page, after entering the username, the password screen should appear, but I get the login.live.com page not found error. But if I have logged into the microsoft site before, it will let me in directly. I do not get an error.
Bu login.live.com sayfası bulunamıyor Şu web adresi için web sayfası bulunamadı: https://login.live.com/oauth20_authorize.srf
Galip Tolga ERDEM 280 weeks ago
Hello, if you are getting page not found error; its high probably related with your Azure application registry. Try double checking you set your TenantId and ClientId on appsettings.json correctly.
EL HADI Abdelhalim 277 weeks ago
Hi, I managed to set up your code on a third party architecture (separate IdentityServer). When I log in from IdentityServer it works fine. but when I log in from Blazor I have the following error: Page not found .... https://login.live.com/oauth20_authorize.srf?response_type=code&client_id=51483342-085c-4d86-bf88-cf50c7252078&scope=openid+profile+email+offline_access&response_mode=form_post& Any Idea ?
Dmtuan 254 weeks ago
Hi, has anyone been able to solve the issue that elhadi.abdelhalim@gmail.com mentioned here?
I am experiencing the same problem with Blazor template (separated IdentityServer). Any help would be greatly appreciated.
Galip Tolga ERDEM 248 weeks ago
It is related with your account that is trying to login. Probably you are trying to login with your personal account while AzureAD is expecting a user existing in AzureAD users. You can check https://answers.microsoft.com/en-us/msoffice/forum/msoffice_o365admin-mso_dirservices-mso_o365b/cant-login-in-loginlivecom-with-a-ms-account-valid/6da991e6-9528-461a-9638-9c5680e95888 and https://docs.microsoft.com/en-us/answers/questions/34806/azure-ad-404-error-when-login-with-microsoft-accou.html for more details.
John 280 weeks ago
Excellent article - works nicely in Blazor!
Is there any way to override the Login Page similar to that demonstrated in the MVC project?
Halil İbrahim Kalkan 279 weeks ago
The Blazor UI uses the MVC UI for the login page. So, you can use the same system to override the pages. Do it in the server side (Http API Host) application.
EL HADI Abdelhalim 278 weeks ago
Hi, In my HttpApi.Host, i have : .AddJwtBearer(options => { ......... }; }) shoud i keep it and add the OpenId config or drop it and add your code as it? when i do so i got error. " can't find AddIdentityServerAuthentication in AuthenticationBuilder" i'm using ABP 3.2.1 UI Angular not tiered. Please help. Regards
John Barrett 278 weeks ago
+1 having same issue - new sample for blazor would be great. For me I kept it as the app still needs to get Authorization data from IS4. Have a look at the issue (link below) it has some of my code in the comments. Not 100% working as the username is lost for auditing purposes but it does work well and users can choose either normal login or using AD Azure.
https://github.com/abpframework/abp/issues/5843
John Barrett 278 weeks ago
Be awesome to see a sample using template as follows:
abp new Acme.BookStore --ui blazor --separate-identity-serverbecause a few of us trying to adapt this article are having a few difficulties (https://github.com/abpframework/abp/issues/5843) CheersEL HADI Abdelhalim 277 weeks ago
hello,
i'm getting this error :
[11:20:09 DBG] CORS request made for path: /api/abp/application-configuration from origin: http://localhost:4200 but was ignored because path was not for an allowed IdentityServer CORS endpoint [11:20:09 INF] No CORS policy found for the specified request.
any idea ?
Regards
Saud Almutairi 248 weeks ago
How do I map custom user property (like Group Name ) from Azure AD to ABP Users Table? and then use them in the app
Jake Chu 233 weeks ago
You can login only from AzureAD by disable local login. "Settings": {"Abp.Account.EnableLocalLogin": true}, and Update [IdentityServerClients] set [EnableLocalLogin] = false. I think this doc should be added to "https://docs.abp.io". (https://docs.abp.io/en/abp/2.8/How-To/Azure-Active-Directory-Authentication-MVC)
dkaczor 213 weeks ago
Hi, great article! Would Azure AD B2C integration be similar or does it need additional steps?
oshabani 204 weeks ago
Hi, it is working perfectly , but what if i want to assign a default role to this new registered user?
regards,
oshabani 204 weeks ago
Hi, it is working perfectly , but what if i want to assign a default role to this new registered user?
regards,
Galip Tolga ERDEM 204 weeks ago
@oshabani
You need to override Account/Login.cshtm and override OnGetExternalLoginCallbackAsync method. After a new user is created, you can assign a default new role.
Here is the source code: https://github.com/abpframework/abp/blob/dev/modules/account/src/Volo.Abp.Account.Web/Pages/Account/Login.cshtml.cs#L246
ian.bates@Aecom.com 185 weeks ago
Great article - but it would be awesome if there were a sample project in github for this (like the one for an MVC ABP project). Apologies if this is already available but I couldn't find a link.
tufelchauhan 155 weeks ago
I am able to successfully configure the SSO. But when i tried to login after entering valid credentials it is navigated to register page even if the User with same email address exist in the application.
Dicky.tech@gmail.com 139 weeks ago
Hi,
I have a desktop application that I want to use the azure ad to generate tokens, using the Microsoft Identity toolkit (use will be prompted to log in. How can i configure that ?
Jun ZHOU 125 weeks ago
Regarding the question "But I don't want my users to see default login screen. I want my users to login only from AzureAD."
A straightforward solution is in appsettings.json file, add a setting:
"Settings": { "Abp.Account.EnableLocalLogin": "false" }
It will disable the local login and redirect end user to external (e.g. AzureAD) login page directly.
It's controlled in Account module, Volo.Abp.Account.Web project, Pages -> Account -> Login.cshtml.cs method OnGetAsync()
Mithunpandi1 108 weeks ago
Hi, I am using tiered separate identity server project with angular. What is call back path domain its identity server or Angular app domain. I am cureently given Angular domain(http:localhost:4200/signin-azuread-oidc) as call back path. But post azure ad login, Its redirect me into identity server project domain, not angular domain.