Replacing Email Templates and Sending Emails
Introduction
Hi, in this step by step article, we will send an email by using standard email template and then we will replace the standard email template with our new created template, thanks to Text Templating System and Virtual File System. Let's start by explaining what these systems do.
ABP framework provides a strong and flexible Text Templating System. So, we can use the text templating system to create dynamic email contents on a template and a model.
In this article, we will use
StandardEmailTemplates.Messageas standard email template. Then we will create a new template and replace the standard email template with our new template by using Virtual File System.The
Virtual File Systemmakes it possible to manage files that do not physically exist on the file system. That means we can overrideStandardEmailTemplates.Messagetemplate by changing it's path with our new template's path.
Creating the Solution
ABP Framework offers startup templates to get into the business faster.
In this article, I will create a new startup template and perform the operations on this template. But if you already have a project you don't need to create a new startup template, you can implement the following steps to your existing project. (These steps can be applied to any project. (MVC, Angular etc.))
If you have already a project you can skip this section.
Before starting to development, we will create a solution named TemplateReplace (or whatever you want). We can create a new startup template by using ABP CLI :
abp new TemplateReplace
Our project boilerplate will be ready after the download is finished. Then, open the solution in the Visual Studio (or your favorite IDE).
Run the TemplateReplace.DbMigrator application as below to create the database and seed initial data (which creates the admin user, admin role, permissions etc.).
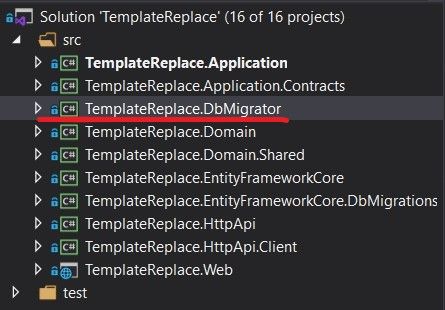
- Right click to
TemplateReplace.DbMigratorand choose theDebug.
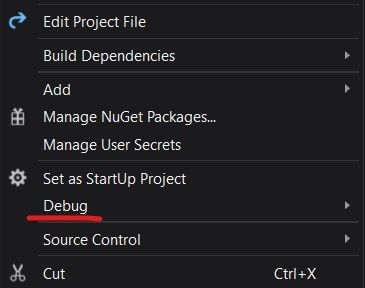
- After that, click the
Start new instanceoption to start the database migrations.

Then we can run the TemplateReplace.Web project to see our application working.
Default login credentials for admin: username is admin and password is 1q2w3E*
Starting the Development
First thing we need to do is, creating a email service to sending emails. ABP Framework provides IEmailSender service that is used to send emails.
Step - 1
Create an Emailing folder in the TemplateReplace.Domain project and add a class named EmailService inside of it.
using System.Threading.Tasks;
using Volo.Abp.DependencyInjection;
using Volo.Abp.Emailing;
using Volo.Abp.Emailing.Templates;
using Volo.Abp.TextTemplating;

namespace TemplateReplace.Emailing
{
    public class EmailService : ITransientDependency
    {
        private readonly IEmailSender _emailSender;
        private readonly ITemplateRenderer _templateRenderer;

        public EmailService(IEmailSender emailSender, ITemplateRenderer templateRenderer)
        {
            _emailSender = emailSender;
            _templateRenderer = templateRenderer;
        }

        public async Task SendAsync(string targetEmail)
        {
            var emailBody = await _templateRenderer.RenderAsync(
                StandardEmailTemplates.Message,
                new
                {
                    message = "ABP Framework provides IEmailSender service that is used to send emails."
                }
            );

            await _emailSender.SendAsync(
                targetEmail,
                "Subject",
                emailBody
            );
        }
    }
}
To create an email content, we need to inject
ITemplateRendererand use theRenderAsyncmethod to render a template.We've used
StandardEmailTemplates.Messageas standart email template. This provides us a standard and simple message template to send mails.The resulting email body should be like shown below:
<!DOCTYPE html>
<html lang="en" xmlns="http://www.w3.org/1999/xhtml">
<head>
    <meta charset="utf-8" />
</head>
<body>
    ABP Framework provides IEmailSender service that is used to send emails.
</body>
</html>
Step - 2 (Configuring Email Settings)
- Now, we need to configure some email settings by following settings documentation. For achieve this, open the
appsettings.jsonfile underTemplateReplace.Weband configure your email settings in settings section like below.

- Here, I used Google's SMTP settings to send emails via Gmail. You can change these setting values by your need.
Note: If you want to use Google's SMTP server settings and send emails via Gmail, you should confirm this.
Step - 3
- After that we need to open
TemplateReplaceDomainModule.csfile and change its contents as below to sending real-time emails.
using Microsoft.Extensions.DependencyInjection;
using Microsoft.Extensions.DependencyInjection.Extensions;
using TemplateReplace.MultiTenancy;
using Volo.Abp.AuditLogging;
using Volo.Abp.BackgroundJobs;
using Volo.Abp.Emailing;
using Volo.Abp.FeatureManagement;
using Volo.Abp.Identity;
using Volo.Abp.IdentityServer;
using Volo.Abp.Modularity;
using Volo.Abp.MultiTenancy;
using Volo.Abp.PermissionManagement.Identity;
using Volo.Abp.PermissionManagement.IdentityServer;
using Volo.Abp.SettingManagement;
using Volo.Abp.TenantManagement;

namespace TemplateReplace
{
    [DependsOn(
        typeof(TemplateReplaceDomainSharedModule),
        typeof(AbpAuditLoggingDomainModule),
        typeof(AbpBackgroundJobsDomainModule),
        typeof(AbpFeatureManagementDomainModule),
        typeof(AbpIdentityDomainModule),
        typeof(AbpPermissionManagementDomainIdentityModule),
        typeof(AbpIdentityServerDomainModule),
        typeof(AbpPermissionManagementDomainIdentityServerModule),
        typeof(AbpSettingManagementDomainModule),
        typeof(AbpTenantManagementDomainModule),
        typeof(AbpEmailingModule)
    )]
    public class TemplateReplaceDomainModule : AbpModule
    {
        public override void OnApplicationInitialization(ApplicationInitializationContext context)
        {
            var settingManager = context.ServiceProvider.GetService<SettingManager>();
            //encrypts the password on set and decrypts on get
            settingManager.SetGlobalAsync(EmailSettingNames.Smtp.Password, "your_password");
        }

        public override void ConfigureServices(ServiceConfigurationContext context)
        {
            Configure<AbpMultiTenancyOptions>(options =>
            {
                options.IsEnabled = MultiTenancyConsts.IsEnabled;
            });

            // #if DEBUG
            //  context.Services.Replace(ServiceDescriptor.Singleton<IEmailSender, NullEmailSender>());
            // #endif
        }
    }
}
NullEmailSenderis a built-in class that implements theIEmailSender, but writes email contents to the standard log system, rather than actually sending the emails. This class can be useful especially in development time where you generally don't want to send real emails. Therefore ABP framework defined this by default. But in our case we want to send real emails, so we must remove these lines or we must take it to the comment line.Abp.Mailing.Smtp.Passwordmust be an encrypted value. Therefore we usedSettingManagerin here to set the password. It internally encrypts the values on set and decrypts on get.After all these steps, whenever we want to send an email, we can do it by using our
EmailServiceclass. We can inject this class and invoke theSendAsyncmethod to sending email where its needed.
After sending the email we should see the template like below.

Step - 4 (Defining New Template)
So far we've sent mail by using standard email template of ABP. But we may want to replace the email template with the new one. We can achieve this by following the
Text Templatingdocumentation.In this article, I will create a email template by using free template generator named Bee. You can reach the free templates from here.
When we find a template for our purpose, we can hover the link and click the get started button to edit the template. (I chose a template named "gdpr".)
Here, you can edit your template as below. (You can delete or add sections, edit texts, and so on.)
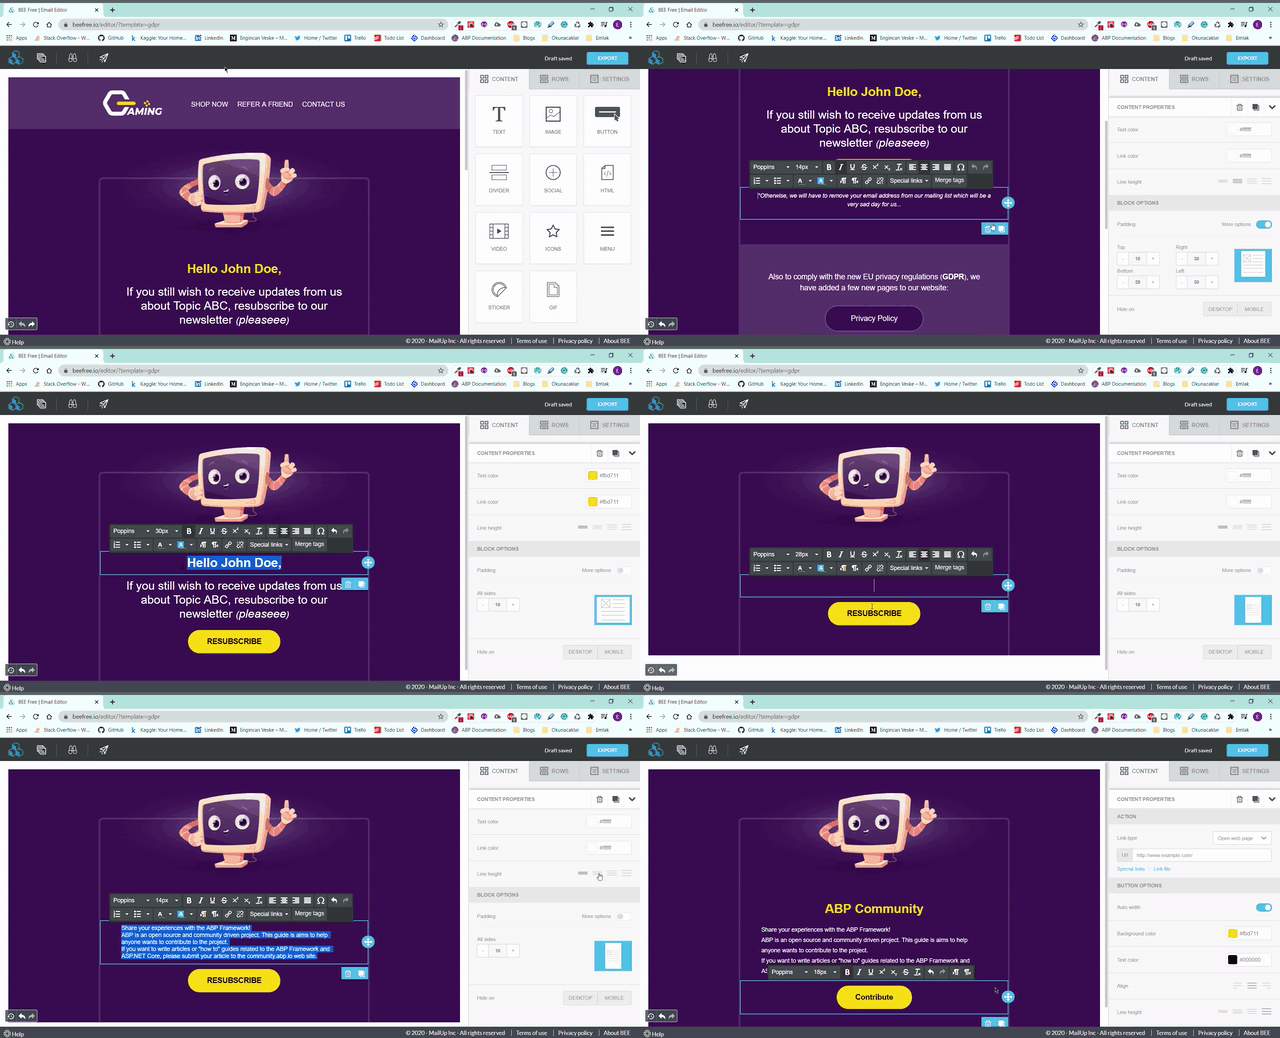
Note: After editing our template, we need to export it to reach our created template's content. You can see the export button top-right of the template editing page.
- After choosing and editing our free template, we can create a new email template in our project. For this, create a folder named
TemplatesunderEmailingfolder inTemplateReplace.Domainand addEmailTemplate.tplfile inside of it. And copy-paste the below content or your template's content.
<!DOCTYPE html PUBLIC "-//W3C//DTD XHTML 1.0 Transitional //EN" "http://www.w3.org/TR/xhtml1/DTD/xhtml1-transitional.dtd">
<html xmlns="http://www.w3.org/1999/xhtml" xmlns:o="urn:schemas-microsoft-com:office:office" xmlns:v="urn:schemas-microsoft-com:vml">
   <head>
      <meta content="text/html; charset=utf-8" http-equiv="Content-Type"/>
      <meta content="width=device-width" name="viewport"/>
      <meta content="IE=edge" http-equiv="X-UA-Compatible"/>
      <style type="text/css">
         body {
         margin: 0;
         padding: 0;
         }
         table,
         td,
         tr {
         vertical-align: top;
         border-collapse: collapse;
         }
         * {
         line-height: inherit;
         }
         a[x-apple-data-detectors=true] {
         color: inherit !important;
         text-decoration: none !important;
         }
      </style>
      <style id="media-query" type="text/css">
         @media (max-width: 670px) {
         .block-grid,
         .col {
         min-width: 320px !important;
         max-width: 100% !important;
         display: block !important;
         }
         .block-grid {
         width: 100% !important;
         }
         .col {
         width: 100% !important;
         }
         .col>div {
         margin: 0 auto;
         }
         img.fullwidth,
         img.fullwidthOnMobile {
         max-width: 100% !important;
         }
         .no-stack .col {
         min-width: 0 !important;
         display: table-cell !important;
         }
         .no-stack.two-up .col {
         width: 50% !important;
         }
         .no-stack .col.num2 {
         width: 16.6% !important;
         }
         .no-stack .col.num3 {
         width: 25% !important;
         }
         .no-stack .col.num4 {
         width: 33% !important;
         }
         .no-stack .col.num5 {
         width: 41.6% !important;
         }
         .no-stack .col.num6 {
         width: 50% !important;
         }
         .no-stack .col.num7 {
         width: 58.3% !important;
         }
         .no-stack .col.num8 {
         width: 66.6% !important;
         }
         .no-stack .col.num9 {
         width: 75% !important;
         }
         .no-stack .col.num10 {
         width: 83.3% !important;
         }
         .video-block {
         max-width: none !important;
         }
         .mobile_hide {
         min-height: 0px;
         max-height: 0px;
         max-width: 0px;
         display: none;
         overflow: hidden;
         font-size: 0px;
         }
         .desktop_hide {
         display: block !important;
         max-height: none !important;
         }
         }
      </style>
   </head>
   <body class="clean-body" style="margin: 0; padding: 0; -webkit-text-size-adjust: 100%; background-color: #3d1554;">
      <table bgcolor="#3d1554" cellpadding="0" cellspacing="0" class="nl-container" role="presentation" style="table-layout: fixed; vertical-align: top; min-width: 320px; border-spacing: 0; border-collapse: collapse; mso-table-lspace: 0pt; mso-table-rspace: 0pt; background-color: #3d1554; width: 100%;" valign="top" width="100%">
         <tbody>
            <tr style="vertical-align: top;" valign="top">
               <td style="word-break: break-word; vertical-align: top;" valign="top">
                  <div style="background-color:transparent;overflow:hidden">
                     <div class="block-grid" style="min-width: 320px; max-width: 650px; overflow-wrap: break-word; word-wrap: break-word; word-break: break-word; Margin: 0 auto; width: 100%; background-color: transparent;">
                        <div style="border-collapse: collapse;display: table;width: 100%;background-color:transparent;">
                           <div class="col num12" style="min-width: 320px; max-width: 650px; display: table-cell; vertical-align: top; width: 650px;">
                              <div style="width:100% !important;">
                                 <div style="border-top:0px solid transparent; border-left:0px solid transparent; border-bottom:0px solid transparent; border-right:0px solid transparent; padding-top:35px; padding-bottom:0px; padding-right: 0px; padding-left: 0px;">
                                    <div align="center" class="img-container center autowidth" style="padding-right: 0px;padding-left: 0px;"></div>
                                 </div>
                              </div>
                           </div>
                        </div>
                     </div>
                  </div>
                  <div style="background-color:transparent;overflow:hidden">
                     <div class="block-grid" style="min-width: 320px; max-width: 650px; overflow-wrap: break-word; word-wrap: break-word; word-break: break-word; Margin: 0 auto; width: 100%; background-color: transparent;">
                        <div style="border-collapse: collapse;display: table;width: 100%;background-color:transparent;">
                           <div class="col num12" style="min-width: 320px; max-width: 650px; display: table-cell; vertical-align: top; width: 642px;">
                              <div style="width:100% !important;">
                                 <div style="border-top:0px solid transparent; border-left:4px solid #57366E; border-bottom:0px solid transparent; border-right:4px solid #57366E; padding-top:55px; padding-bottom:60px; padding-right: 0px; padding-left: 0px;">
                                    <div style="color:#fbd711;font-family:Poppins, Arial, Helvetica, sans-serif;line-height:1.2;padding-top:10px;padding-right:10px;padding-bottom:10px;padding-left:10px;">
                                       <div style="line-height: 1.2; font-size: 12px; color: #fbd711; font-family: Poppins, Arial, Helvetica, sans-serif; mso-line-height-alt: 14px;">
                                          <p style="font-size: 14px; line-height: 1.2; word-break: break-word; text-align: center; mso-line-height-alt: 17px; margin: 0;"><strong><span style="font-size: 30px;">ABP Community </span></strong></p>
                                       </div>
                                    </div>
                                    <div style="color:#ffffff;font-family:Poppins, Arial, Helvetica, sans-serif;line-height:1.8;padding-top:10px;padding-right:50px;padding-bottom:10px;padding-left:50px;">
                                       <div style="line-height: 1.8; font-size: 12px; color: #ffffff; font-family: Poppins, Arial, Helvetica, sans-serif; mso-line-height-alt: 22px;">
                                          <p style="line-height: 1.8; word-break: break-word; font-size: 14px; mso-line-height-alt: 25px; margin: 0;"><span style="font-size: 14px;">Share your experiences with the ABP Framework!</span><br/><span style="font-size: 14px;">ABP is an open source and community driven project. This guide is aimed to help anyone who wants to contribute to the project.</span></p>
                                          <p style="line-height: 1.8; word-break: break-word; font-size: 14px; mso-line-height-alt: 25px; margin: 0;"><span style="font-size: 14px;">If you want to write articles or "how to" guides related to the ABP Framework and ASP.NET Core, please submit your article to the community.abp.io web site.</span></p>
                                       </div>
                                    </div>
                                    <div align="center" class="button-container" style="padding-top:12px;padding-right:10px;padding-bottom:12px;padding-left:10px;">
                                       <a href="http://www.example.com/" style="-webkit-text-size-adjust: none; text-decoration: none; display: inline-block; color: #000000; background-color: #fbd711; border-radius: 30px; -webkit-border-radius: 30px; -moz-border-radius: 30px; width: auto; width: auto; border-top: 1px solid #fbd711; border-right: 1px solid #fbd711; border-bottom: 1px solid #fbd711; border-left: 1px solid #fbd711; padding-top: 10px; padding-bottom: 10px; font-family: Poppins, Arial, Helvetica, sans-serif; text-align: center; mso-border-alt: none; word-break: keep-all;" target="_blank"><span style="padding-left:45px;padding-right:45px;font-size:18px;display:inline-block;"><span style="font-size: 16px; line-height: 2; word-break: break-word; mso-line-height-alt: 32px;"><span data-mce-style="font-size: 18px; line-height: 36px;" style="font-size: 18px; line-height: 36px;"><strong>Contribute</strong></span></span></span></a>
                                    </div>
                                 </div>
                              </div>
                           </div>
                        </div>
                     </div>
                  </div>
               </td>
            </tr>
         </tbody>
      </table>
   </body>
</html>
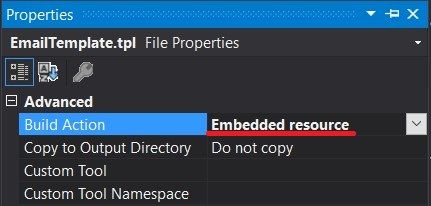
Then we need to make the template file as "Embedded Resource". We can do this as below.
First right click to EmailTemplate.tpl and choose
Properties.
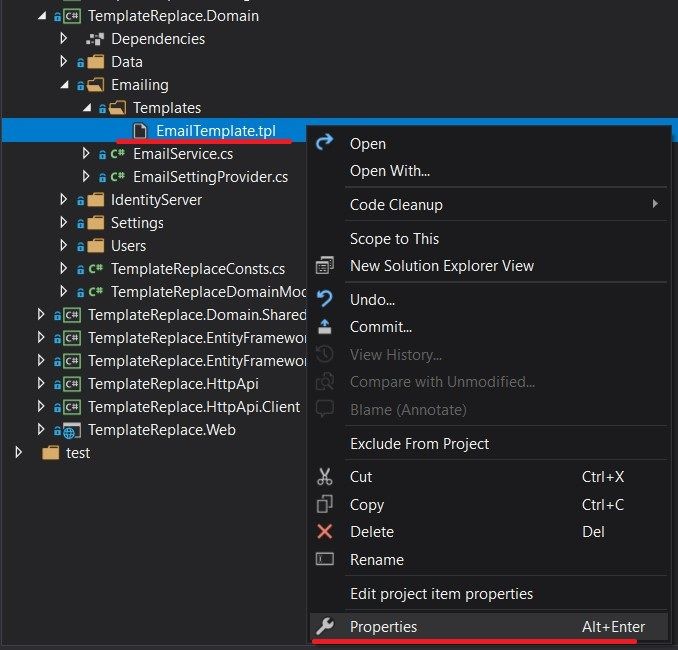
- Then be sure about build action is Embedded resource.
Step - 4 (Replacing the Email Template)
- To replace the current email template with our new email template, we need to override it. To achieve this, create a class named
EmailTemplateDefinitionProviderunderEmailingfolder inTemplateReplace.Domainand fill it with the below content.
using Volo.Abp.DependencyInjection;
using Volo.Abp.Emailing.Templates;
using Volo.Abp.TextTemplating;

namespace TemplateReplace.Emailing
{
    public class EmailTemplateDefinitionProvider : TemplateDefinitionProvider, ITransientDependency
    {
        public override void Define(ITemplateDefinitionContext context)
        {
            var emailLayoutTemplate = context.GetOrNull(StandardEmailTemplates.Message);

            emailLayoutTemplate
                .WithVirtualFilePath(
                    "/Emailing/Templates/EmailTemplate.tpl",
                    isInlineLocalized: true
                );
        }
    }
}
In here we've created a template definition provider class that gets the email layout template and change the virtual file path for the template.
This approach allows us to locate templates in any folder instead of the folder defined by the depended module. For more detail, check the Virtual File System.
Step - 5
- Lastly, we need to configure the Virtual File System. To do this open your
TemplateReplaceDomainModule.csinTemplateReplace.Domainand update the content as below.
using TemplateReplace.MultiTenancy;
using Volo.Abp.AuditLogging;
using Volo.Abp.BackgroundJobs;
using Volo.Abp.Emailing;
using Volo.Abp.FeatureManagement;
using Volo.Abp.Identity;
using Volo.Abp.IdentityServer;
using Volo.Abp.Modularity;
using Volo.Abp.MultiTenancy;
using Volo.Abp.PermissionManagement.Identity;
using Volo.Abp.PermissionManagement.IdentityServer;
using Volo.Abp.SettingManagement;
using Volo.Abp.TenantManagement;
using Volo.Abp.VirtualFileSystem;

namespace TemplateReplace
{
    [DependsOn(
        typeof(TemplateReplaceDomainSharedModule),
        typeof(AbpAuditLoggingDomainModule),
        typeof(AbpBackgroundJobsDomainModule),
        typeof(AbpFeatureManagementDomainModule),
        typeof(AbpIdentityDomainModule),
        typeof(AbpPermissionManagementDomainIdentityModule),
        typeof(AbpIdentityServerDomainModule),
        typeof(AbpPermissionManagementDomainIdentityServerModule),
        typeof(AbpSettingManagementDomainModule),
        typeof(AbpTenantManagementDomainModule),
        typeof(AbpEmailingModule)
    )]
    public class TemplateReplaceDomainModule : AbpModule
    {
        public override void ConfigureServices(ServiceConfigurationContext context)
        {
            Configure<AbpMultiTenancyOptions>(options =>
            {
                options.IsEnabled = MultiTenancyConsts.IsEnabled;
            });

            //Add this configuration
            Configure<AbpVirtualFileSystemOptions>(options =>
            {
                options.FileSets.AddEmbedded<TemplateReplaceDomainModule>();
            });
        }
    }
}
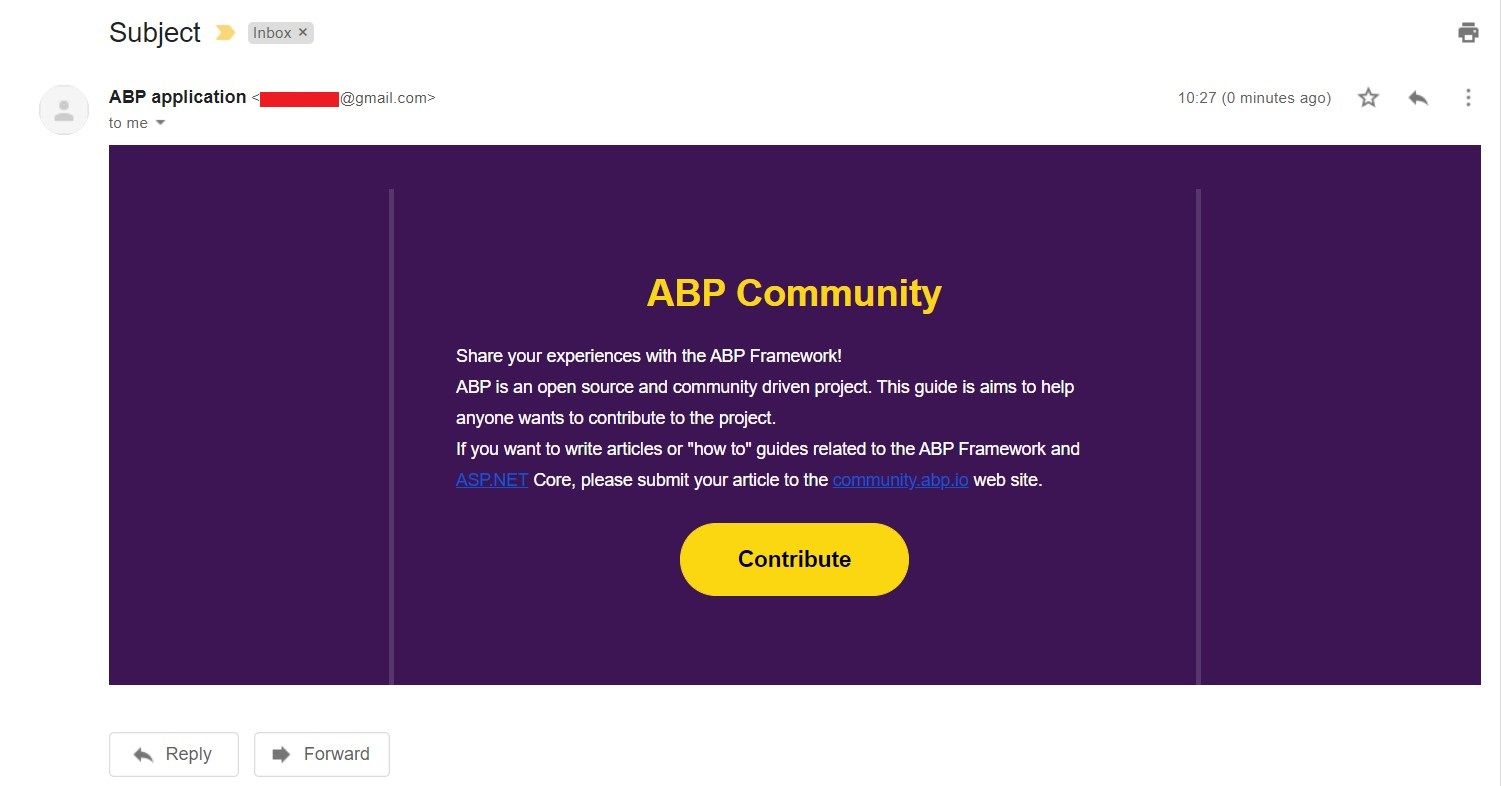
- And now when we send a new email, we should see our newly defined template as the message like below.
Text Template Management
- Generally, more than one e-mail is required in applications. We create email templates for "password changes" or "welcome" etc in our applications. In such cases, it is necessary to create different templates for each mail. ABP Commercial allows us to perform these operations on UI in a simple way. Text Template Management provides UI to easily create and manage email templates.
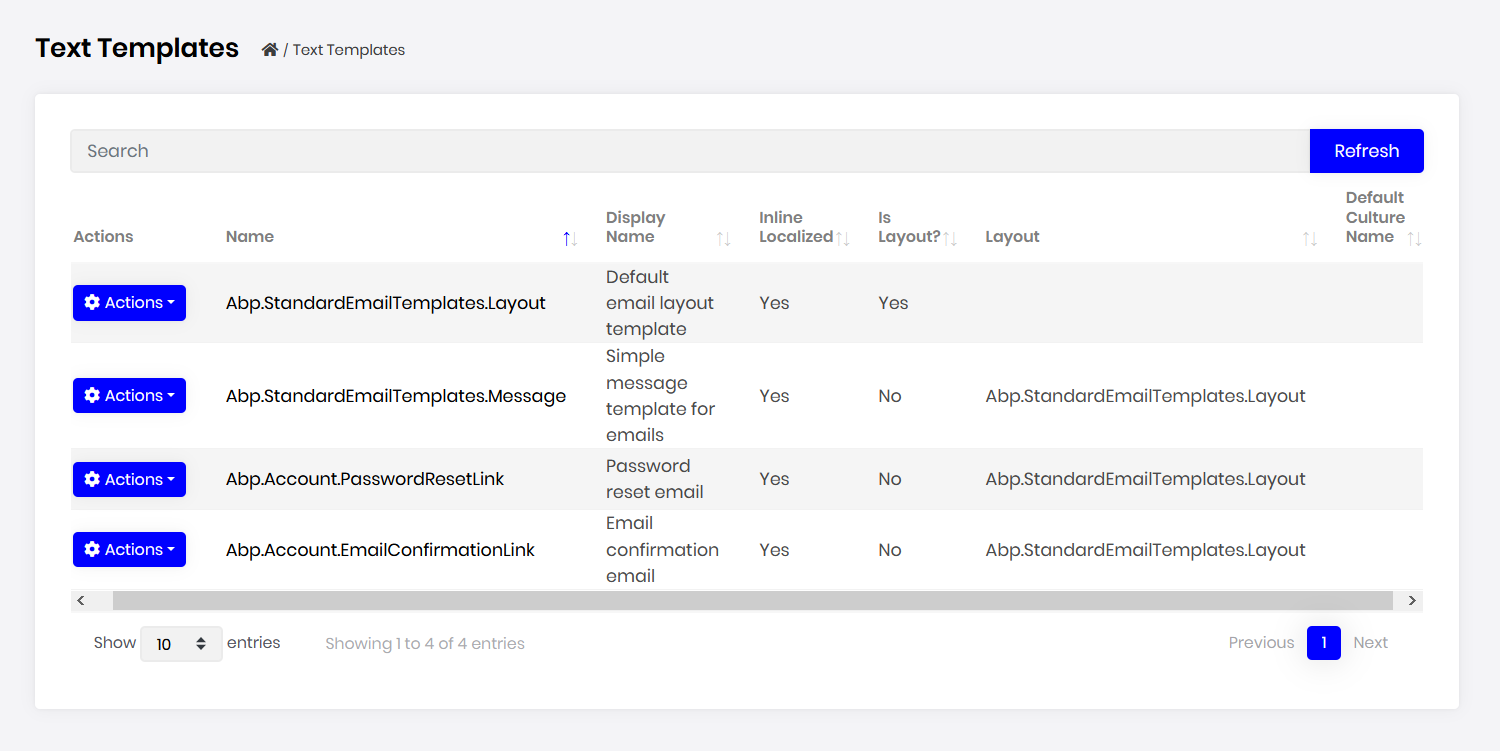
- ABP Commercial's Text Template Management module is really fascinating. It makes it super easy to stores and edits template contents. We can list all templates on a page, editing them, localizing them, and so on.
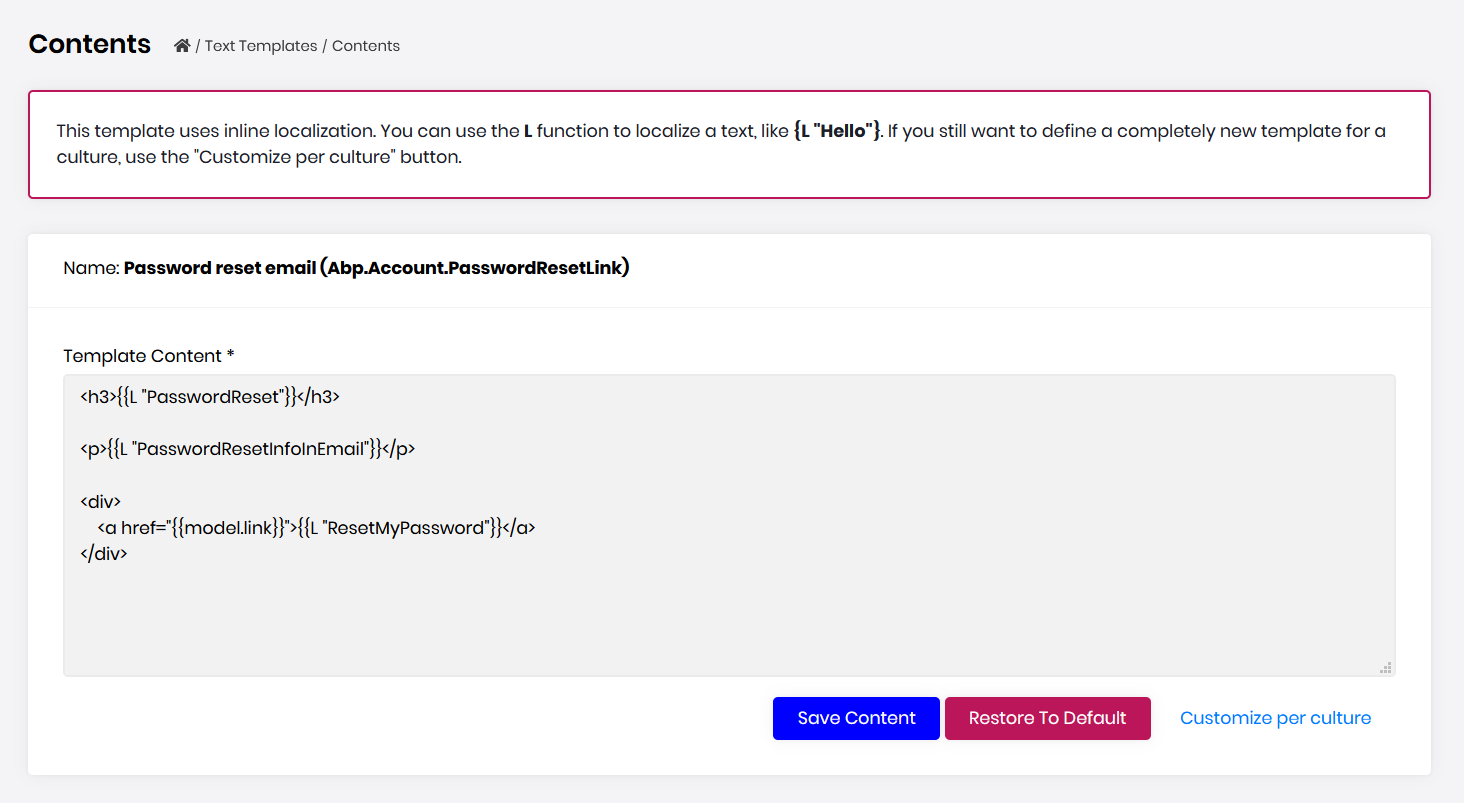
ABP Commercial's text template management module, allows us to modify a template through the UI.
I highly recommend you to check it out.
🛠 Liked this post? I now share all my content on Substack — real-world .NET, AI, and scalable software design.
👉 Subscribe here → engincanveske.substack.com
🎥 Also, check out my YouTube channel for hands-on demos and deep dives: https://www.youtube.com/@engincanv


Comments
denver.searle.ln@gmail.com 265 weeks ago
Hi Engincan
Should the line in Step 4 not be changed from: var emailLayoutTemplate = context.GetOrNull(StandardEmailTemplates.Message); to var emailLayoutTemplate = context.GetOrNull(StandardEmailTemplates.Layout); instead?
Tried it with "StandardEmailTemplates.Message" and it did not work until I changed it to be "StandardEmailTemplates.Layout".
Regards, Denver.
Btw - love the article!!
Engincan Veske 264 weeks ago
Thank you for your kind words Denver. I've tried with "StandardEmailTemplates.Message" just before and it works as expected. Could there be any step that you missed?
balessi75 206 weeks ago
Hi Engincan,
Very informative article, thank you!! Question... we have the Text Template Managment feature of Abp Commercial. It seems to do everything we need, however, the templates are database specific. In our application every tenant will have it's own database, which means we would have to maintain the same html template over many tenants. Should a similar approach in this article be used instead of using the Text Template Management UI?
Bart Van Hoey 186 weeks ago
Hi,
When I used my password google account I got an authentication error.
In my case:
I had to login into my Google account
I searched for App passwords in the search field
I had to enter my Google password again
In Select App I selected Email
In Select Device I selected Windows computer
I clicked Generate and I obtained an app password
I copy/pasted this generated app password in Step3 TemplateReplaceDomainModule => settingManager.SetGlobalAsync(EmailSettingNames.Smtp.Password,"generated_app_password");
I created an EmailAppService with a SendEmailAsync method public class EmailAppService : ApplicationService { private readonly EmailService _emailService;
}
I navigated to the Swagger page and tried out the SendEmailAsync method
I received the email as expected!
Carlos Arauz 157 weeks ago
Hello, I'm starting to develop the tool to send mail, but I still can't receive any mail, just like you I am using the gmail service, smtp, port 587, my password of 16 characters autogenerated by gmail. The question is the encryption, how do I perform the encryption in the DomainModule file?
settingManager.SetGlobalAsync(EmailSettingNames.Smtp.Password, "my password"); thanks for helping!!
EllaCamila58 156 weeks ago
I think this website is very important for them actually who want to get information about real estate license transition. https://www.marketing-lists-direct.com/contact-us/
niamhbaker 148 weeks ago
This is a great tutorial on how to replace email templates using the Text Templating System and Virtual File System in the ABP framework.
The instructions are clear and easy to follow, making it a great resource for developers of all levels.
I use this tool https://thesisstatementmaker.com/thesis-statement-generator.html to create a strong thesis statement.