Using Dapper with the ABP Framework
Dapper is a simple and lightweight object mapper for .NET. A key feature of Dapper is its high performance compared to other ORMs. In this article, I will show how to use it in your ABP projects. But, we'll see when to use it first.
Source Code
You can find the full source code of the demo application here.
When to Use Dapper?
In the ABP Framework, we suggest to use Dapper in combination with Entity Framework Core (EF Core) for the following reasons:
- EF Core is much easier to use (you don't need to manually write SQL queries and work with low level database objects).
- EF Core abstracts different DBMS dialects, so it will be easier to change your DBMS later.
- The EF Core's change tracking system automatically updates the changes in the database.
- EF Core is better compatible with Object Oriented Programming (OOP) practices and is more type safe to work with. So, the EF Core code is more understandable and maintainable.
In most of your use cases, you typically work with one or a few entities and a maintainable codebase can be chosen instead of a slight performance difference. However, there may be certain places in your application where it matters:
- You may work with a lot of entities, so you'd like to query faster (Indeed, EF Core's AsNoTracking() extension can help in most cases).
- You may be performing too many database operations in a single request.
- EF Core may not create an optimized SQL query and you may want to manually write it for better performance.
For such cases, Dapper can be a good choice. You can easily write SQL queries and bind the result to your objects.
Creating a new ABP Solution
To demonstrate the useage of Dapper, I've created an ABP solution. You can find the full source code of the demo application here. If you want to create the same solution from scratch, follow the steps below:
Install the ABP CLI if you haven't installed it before:
dotnet tool install -g Volo.Abp.Cli
Create a new solution with the ABP Framework's non-layered startup template with MVC UI and EF Core database:
abp new DapperDemo -t app-nolayers
The startup template and UI selection don't matter for this article. I selected these options to keep the demo solution simple.
After creating the solution, run the following command to migrate the database (run the command in the folder of the .csproj file:
dotnet run --migrate-database
If you've created a layered solution, then run the
DbMigratorapplication inside the solution. If you have trouble by creating the solution, please refer to the Quick Start document.
Setting Up the Entity Framework Core Part
We will use EF Core with Dapper, so we need to configure EF Core first. I will use the following Book entity as an example:
public class Book : AuditedAggregateRoot<Guid>
{
    public string Name { get; set; }
    public DateTime PublishDate { get; set; }
    public float Price { get; set; }
}
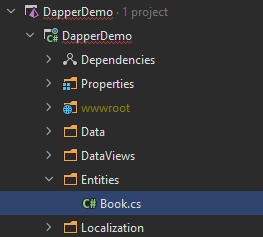
If you are using a layered solution, entities are located in the Domain project. For my demo solution, I just placed it in the Entities folder of the single-layer project:

Once I created the Book entity, I should add it to my DbContext class:
public class DapperDemoDbContext : AbpDbContext<DapperDemoDbContext>
{
    // 1: ADD A DBSET PROPERTY
    public DbSet<Book> Books { get; set; }

    public DapperDemoDbContext(DbContextOptions<DapperDemoDbContext> options)
        : base(options)
    {
    }

    protected override void OnModelCreating(ModelBuilder builder)
    {
        //...other code parts

        // 2: MAP YOUR ENTITY TO A DATABASE TABLE
        builder.Entity<Book>(b =>
        {
            b.ToTable("Books");
            b.Property(x => x.Name).IsRequired().HasMaxLength(128);
        });
    }
}
Now, we can add a new database migration:
dotnet ef migrations add Added_Book
And apply the changes to the database:
dotnet ef database update
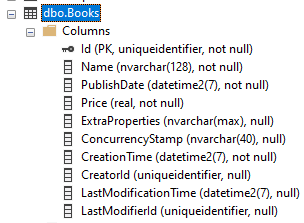
At this point, you should be able to see the Books table if you check your database:

As you see, the
Bookstable contains more fields than theBookentity's property count. Other properties are inherited from theAuditedAggregateRoottable. You could inherit from theBasicAggregateRootclass if you don't want these properties.
Seeding the Database
ABP's data seeding system is a great way to add some test data to the database. The following class inserts two books to the Books table when I migrate the database:
public class DapperDemoDataSeederContributor : IDataSeedContributor, ITransientDependency
{
    private readonly IRepository<Book, Guid> _bookRepository;

    public DapperDemoDataSeederContributor(IRepository<Book, Guid> bookRepository)
    {
        _bookRepository = bookRepository;
    }

    public async Task SeedAsync(DataSeedContext context)
    {
        if (await _bookRepository.GetCountAsync() > 0)
        {
            return;
        }

        await _bookRepository.InsertAsync(
            new Book
            {
                Name = "1984",
                PublishDate = new DateTime(1949, 6, 8),
                Price = 19.84f
            }
        );

        await _bookRepository.InsertAsync(
            new Book
            {
                Name = "The Hitchhiker's Guide to the Galaxy",
                PublishDate = new DateTime(1995, 9, 27),
                Price = 42.0f
            }
        );
    }
}
After creating the DapperDemoDataSeederContributor class, I can re-run the following command:
dotnet run --migrate-database
Now, I can see the records in the database:

Now, everything is ready to try querying from the Books table with Dapper.
Using Dapper Without the Integration Package
ABP provides an integration package for Dapper. However, I first want to demonstrate using Dapper without the integration package.
Installing the Dapper Package
First, install the Dapper package to your project. You can use a command-line terminal, locate the root path of your project (.csproj file that you want to install it in) and run the following command:
dotnet add package Dapper
If your application is layered, then we suggest to add the
Dapperpackage to yourEntityFrameworkCoreintegration project in your solution.
Executing a Dapper Query
I will query from the Books table, but I don't want to use the Book entity to map the result (because I don't need all the properties). So, I am creating a new class for the query result:
public class BookDataView
{
    public Guid Id { get; set; }
    public string Name { get; set; }
    public float Price { get; set; }
}
Now, we can use Dapper's QueryAsync extension method as shown below:
public class DemoService : ITransientDependency
{
    private readonly IRepository<Book, Guid> _bookRepository;

    public DemoService(IRepository<Book, Guid> bookRepository)
    {
        _bookRepository = bookRepository;
    }

    [UnitOfWork]
    public virtual async Task<List<BookDataView>> GetListAsync()
    {
        var database = (await _bookRepository.GetDbContextAsync()).Database;
        var dbConnection = database.GetDbConnection();
        var dbTransaction = database.CurrentTransaction?.GetDbTransaction();

        var queryResult = await dbConnection.QueryAsync<BookDataView>(
            "SELECT Id, Name, Price FROM Books",
            transaction: dbTransaction
        );

        return queryResult.ToList();
    }
}
Let's examine this class:
- I've injected the ABP's standard generic repository service into the
DemoServiceconstructor. _bookRepository.GetDbContextAsync()returns the underlyingDbContextobject of EF Core. We need to have the Volo.Abp.EntityFrameworkCore package reference to be able to access that method. If you have created a single-layer solution, the reference will already have existed. If you have created a layered solution you may need to manually add this package to the project that contains theDemoServiceclass. Because the layered solution isolates the EF Core dependency from the rest of the solution.- Dapper needs a
DbConnectionand aDbTransactionobject (as optional) to execute a query. We are getting them over thedatabaseobject obtained from theDbContext. We suggest to always pass the currentDbTransactionobject while working with Dapper. Because, if there is a database transaction on the same database connection that you execute queries on, and you don't pass the transaction object, you'll get an exception. - Finally, we can use Dapper's
QueryAsyncextension method to execute the database query. - Notice that the
GetListAsyncmethod is made asvirtualand marked with theUnitOfWorkattribute to enable the Unit Of Work for that method. It ensures the database connection is available in the body of theGetListAsyncmethod.
That's all. You can execute any Dapper operation using the DbConnection and DbTransaction objects obtained from the _bookRepository object. Please refer to Dapper's documentation for other operations.
We've obtained the
DbContextobject from a repository. However, a repository is not required to obtain aDbContext. Instead, you could inject theIDbContextProvider<T>service (IDbContextProvider<DapperDemoDbContext>for this demo) and call itsGetDbContextAsyncmethod.
Using the Volo.Abp.Dapper Package
In the previous section, you saw that you don't need an ABP integration package to be able to use Dapper in your ABP applications. However, there is an integration package here: Volo.Abp.Dapper. In fact, that package doesn't contain much services. It just provides a convenient base class to create Dapper based repository classes.
Installing the Volo.Abp.Dapper Package
You can use the ABP CLI to easily install ABP packages to your projects. Execute the following command in the folder of the .csproj file that you want to install the package on:
abp add-package Volo.Abp.Dapper
You can check the ABP Dapper document for alternative installation options.
Creating a Repository Class
In the DemoService example, we used database objects out of a repository class. If you want to implement layering to your solution and abstracting database operations, it can be better to create a repository class to execute the Dapper operations.
Here's a repository class that executes the same database query:
public class BookRepository : DapperRepository<DapperDemoDbContext>, ITransientDependency
{
    public BookRepository(IDbContextProvider<DapperDemoDbContext> dbContextProvider)
        : base(dbContextProvider)
    {
    }

    public virtual async Task<List<BookDataView>> GetListAsync()
    {
        var connection = await GetDbConnectionAsync();
        var queryResult = await connection.QueryAsync<BookDataView>(
            "SELECT Id, Name, Price FROM Books",
            transaction: await GetDbTransactionAsync()
        );
        return queryResult.ToList();
    }
}
Let's examine this class:
- It inherits from the
DapperRepositoryclass, which provides useful methods and properties for database operations. It also implements theIUnitOfWorkEnabledinterface, so ABP makes the database connection (and transaction if requested) available in the method body by implementing dynamic proxies (a.k.a. interception). - The
GetListAsyncmethod's been madevirtual. That's needed to make the interception process working. It wouldn't be needed if we introduceIBookRepositoryto that class and always use it by injecting theBookRepositoryclass (in this case, it will use interface proxying - however, this is too much details for the purpose of this article). - We've used the
GetDbConnectionAsyncandGetDbTransactionAsyncmethods to obtain the current database connection and transaction (that is managed by ABP's unit of work system).
You can then inject the BookRepository class when you want to get a list of BookDataView whenever it is needed. In the demo project, I used it inside the IndexModel.cshtml.cs to show a list of books on the page:

Conclusion
In this article, I've explained ABP's Dapper integration and demonstrated how you can execute Dapper operations in your applications. I suggest to use Dapper when it is really needed and adds any significant value (generally a performance gain) to your application. Otherwise, EF Core is much more convenient for most of the database operations and you will have a more maintainable codebase using EF Core.
Source Code
You can find the full source code of the demo application here.


Comments
Alper Ebiçoğlu 150 weeks ago
Helpful when you want to use Dapper with EF Core together in an ABP project.
Engincan Veske 150 weeks ago
Great article, thanks for sharing!
vipulbuoyancy 135 weeks ago
Please help with the code of multi layer application. I have tried by adding a interface in domain layer and then adding in to the service layer but I am getting an error about "Activator Chain". I am using Angular a s a frontend. Thank you.
derhemsaad328@gmail.com 132 weeks ago
hi ABP community , we have Reporting DataBase in sql server with millions of data ,how to get data with ABP Framework
Jeff B 106 weeks ago
Great article! But it seems to have a problem here tackling the mapping of ExtraProperties in querying in Dapper. I followed your instructions but I had an object that includes ExtraProperties but it throws: System.Data.DataException: Error parsing column 10 (ExtraProperties={} - String). I hope you notice this and I hope there is an optimal solution with this problem.