How to add custom property to the user entity
Note: If your application is greater than version 4.3.3, please follow this article.
Introduction
In this step-by-step article, I will explain how you can customize the user entity class, which is available in every web application you create using the ABP framework, according to your needs. When you read this article, you will learn how to override the services of built-in modules, extend the entities, extend data transfer objects and customize the user interface in the applications you develop using the ABP framework.
Note: This article is not about customizing the
Loginpage. If you have such a need, please follow this article.
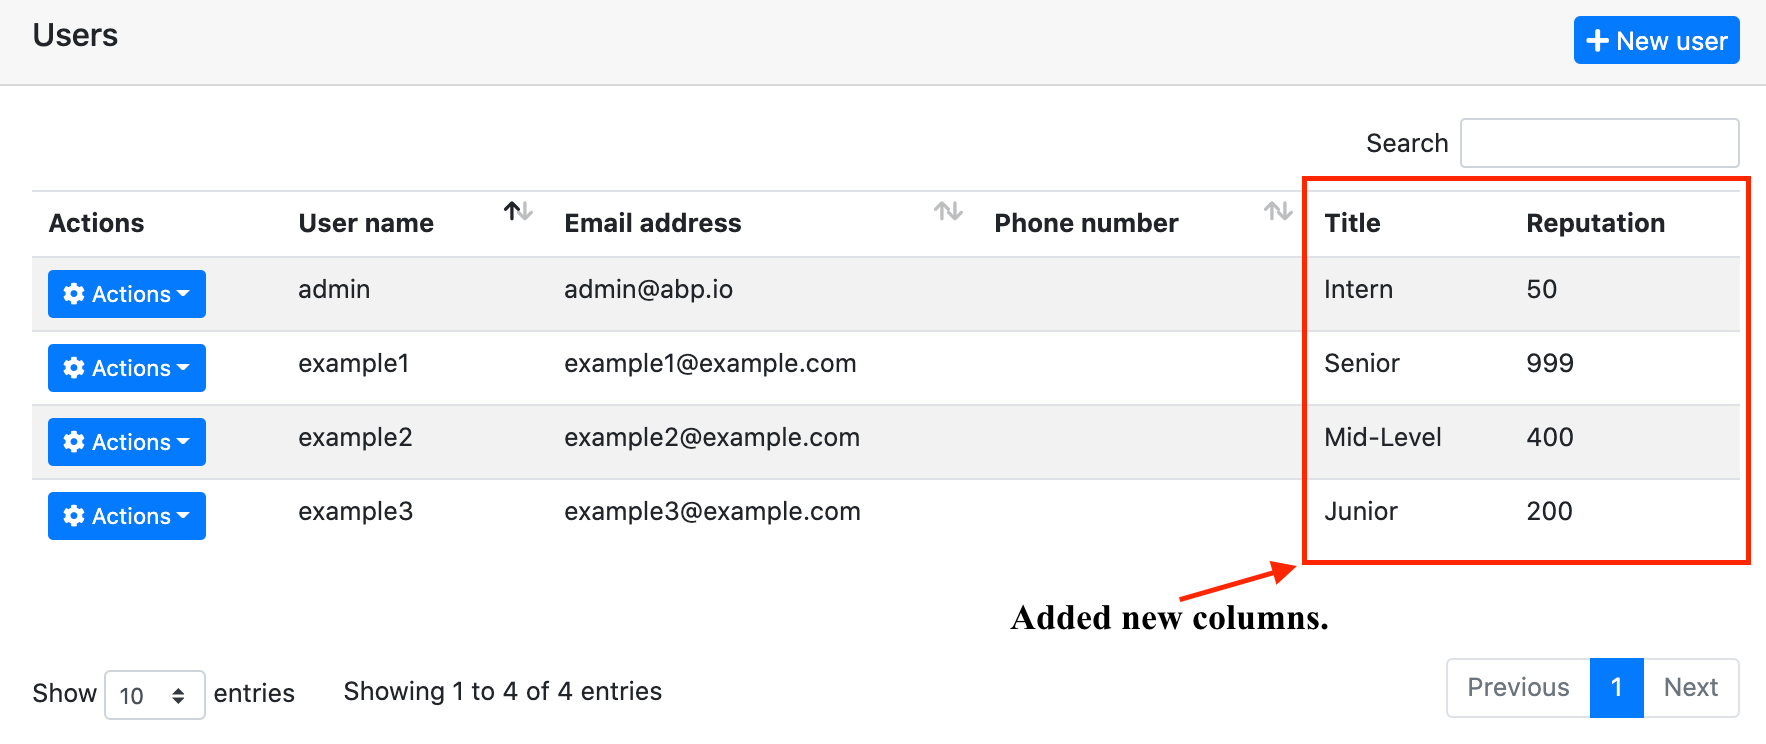
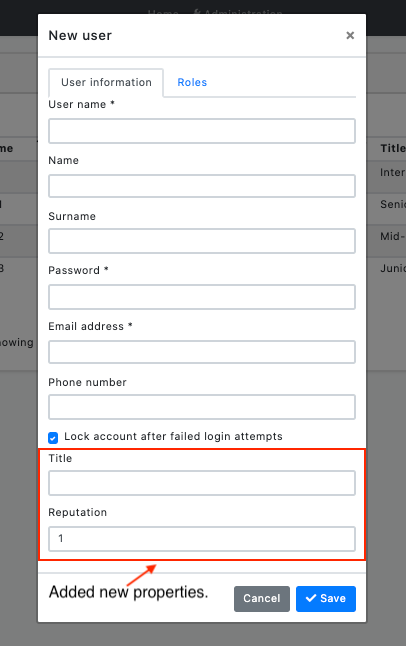
You can see the screenshots below which we will reach at the end of the article.
Preparing the Project
Startup template and the initial run
Abp Framework offers startup templates to get into the work faster. We can create a new startup template using Abp CLI:
abp new CustomizeUserDemo
In this article, I will go through the MVC application, but it will work also in the Angular, Blazor Server, and Blazor WebAssembly application.
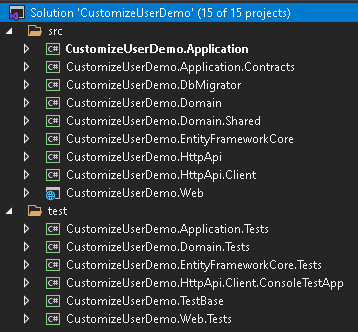
After the download is finished, we can run CustomizeUserDemo.DbMigrator project to create the database migrations and seed the initial data (admin user, role, etc). Then we can run CustomizeUserDemo.Web to see that our application is working.
Default admin username is admin and password is 1q2w3E*
In this article, we will go through a scenario together and find the solutions to our questions through this scenario. However, since the scenario is not a real-life scenario, it may be strange, please don't get too about this issue :)
Step-1
Add two new properties to the AppUser in the Users folder of the CustomizeUserDemo.Domain project as follows:
public string Title { get; protected set; }

public int Reputation { get; protected set; }
Step-2
Create the Users folder in the CustomizeUserDemo.Domain.Shared project, create the class UserConsts inside the folder and update the class you created as below:
public static class UserConsts
{
    public const string TitlePropertyName = "Title";

    public const string ReputationPropertyName = "Reputation";

    public const int MaxTitleLength = 64;

    public const double MaxReputationValue = 1_000;

    public const double MinReputationValue = 1;
}
Step-3
Update the CustomizeUserDemoEfCoreEntityExtensionMappings class in the CustomizeUserDemo.EntityFramework project in the EntityFrameworkCore folder as below:
public static class CustomizeUserDemoEfCoreEntityExtensionMappings
{
    private static readonly OneTimeRunner OneTimeRunner = new OneTimeRunner();

    public static void Configure()
    {
        CustomizeUserDemoGlobalFeatureConfigurator.Configure();
        CustomizeUserDemoModuleExtensionConfigurator.Configure();

        OneTimeRunner.Run(() =>
        {
            ObjectExtensionManager.Instance
                .MapEfCoreProperty<IdentityUser, string>(
                    nameof(AppUser.Title),
                    (entityBuilder, propertyBuilder) =>
                    {
                        propertyBuilder.HasDefaultValue("");
                        propertyBuilder.HasMaxLength(UserConsts.MaxTitleLength);
                    }
                ).MapEfCoreProperty<IdentityUser, int>(
                    nameof(AppUser.Reputation),
                    (entityBuilder, propertyBuilder) =>
                    {
                        propertyBuilder.HasDefaultValue(UserConsts.MinReputationValue);
                    }
                );
        });
    }
}
This class can be used to map these extra properties to table fields in the database. Please read this article to improve your understanding of what we are doing.
So far, we have added our extra features to the User entity and matched these features with the ef core.
Now we need to add migration to see what has changed in our database. This for, open the Package Manager Console (PMC) under the menu Tools > NuGet Package Manager.
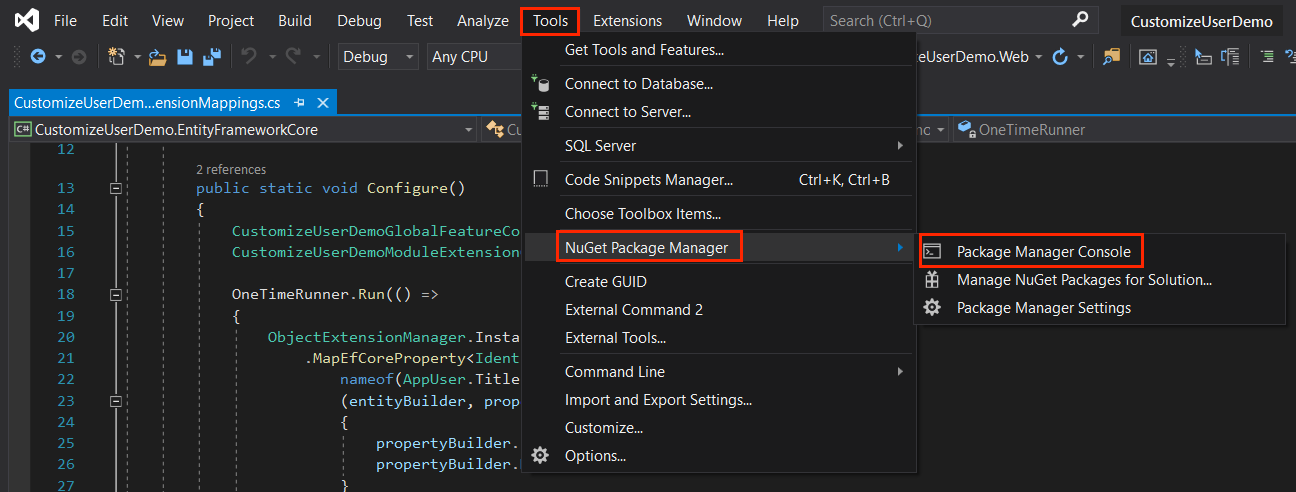
Select the CustomizeUserDemo.EntityFramework as the default project and execute the following command:
Add-Migration "Updated-User-Entity"

This will create a new migration class inside the Migrations folder of the CustomizeUserDemo.EntityFrameworkCore project.
If you are using another IDE than the Visual Studio, you can use
dotnet-eftool as documented here.
Finally, run the CustomizeUserDemo.DbMigrator project to update the database.
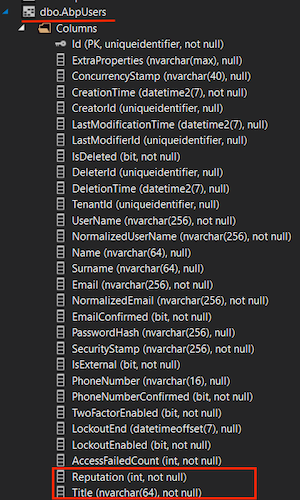
When we updated the database, you can see that the Title and Reputation columns are added to the Users table.
Step-4
Open the CustomizeUserDemoModuleExtensionConfigurator in the CustomizeUserDemo.Domain.Shared project, and change the contents of the ConfigureExtraProperties method as shown below:
private static void ConfigureExtraProperties()
{
    ObjectExtensionManager.Instance.Modules().ConfigureIdentity(identity =>
    {
        identity.ConfigureUser(user =>
        {
            user.AddOrUpdateProperty<string>(
                UserConsts.TitlePropertyName,
                options =>
                {
                    options.Attributes.Add(new RequiredAttribute());
                    options.Attributes.Add(
                        new StringLengthAttribute(UserConsts.MaxTitleLength)
                    );
                }
            );
            user.AddOrUpdateProperty<int>(
                UserConsts.ReputationPropertyName,
                options =>
                {
                    options.DefaultValue = UserConsts.MinReputationValue;
                    options.Attributes.Add(
                        new RangeAttribute(UserConsts.MinReputationValue, UserConsts.MaxReputationValue)
                    );
                }
            );
        });
    });
}
That's it. Now let's run the application and look at the Identity user page. You can also try to edit and recreate a record if you want, it will work even though we haven't done anything extra. Here is the magic code behind ABP framework.
If there is a situation you want to add, you can click the contribute button or make a comment. Also, if you like the article, don't forget to share it :)
Happy coding :)


Comments
Ariful Islam 268 weeks ago
You didn't explain how to insert/get data to Reputation/Title fields. I know it can be done in the following way: user.SetProperty("Title", "My custom title value!"); var user = await _identityUserRepository.GetAsync(userId); Is there any better way. Also, could you please provide the source code.
Berkan Şaşmaz 268 weeks ago
Actually, if you do what I said in step-4, the added properties appear in the creation and update forms of the related entity. For more detailed information, you can check here (https://docs.abp.io/en/abp/latest/Module-Entity-Extensions#quick-example).
So I don't think you need source code, but if you want to look anyway, you can check here (https://github.com/berkansasmaz/CustomizeUserDemo).
Kevin Tshimanga 265 weeks ago
Hello, very useful article. how do you manage if you want to add relationships with other entities, such as a User has many orders and so on ?
Berkan Şaşmaz 265 weeks ago
Hello, I am very glad you found the article useful. You can find the answer to your question from the link here(https://github.com/abpframework/abp/issues/7105#issuecomment-757641838).
Ruslan 264 weeks ago
Thank you for the article. I followed all the steps and successfully created the extra fields in the AbpUser table. However, I couldn't manage to display the new fields in the New User form. I'm using Blazor UI and EFCore, are there any extra steps I should take? Thanks in advance
Berkan Şaşmaz 264 weeks ago
Hello, right now this feature is not supported for the Blazor UI framework.
Ruslan 261 weeks ago
It is also absent from Swagger API. When I try to create a user (either from API or from UI), I get the error "The following errors were detected during validation. - The ConfirmationType field is required." which is the enum that I added following this tutorial. Funny thing is that the field is optional and has a default value. Do you get to see your fields on Swagger API?
Berkan Şaşmaz 260 weeks ago
Hello, the problem might be that the Title is IsRequired. I will update the article as soon as possible. Also, when I query a user on Swagger, I have "Title" and "Reputation". If you think there is a problem related to this issue, you can create a new issue with the steps of the problem so that we can repeat the problem. https://github.com/abpframework/abp/issues/new
Berkan Şaşmaz 251 weeks ago
Hi Ruslan, module extensibility feature is supported for Blazor WASM and Blazor Server together with ABP v4.3. So you can apply what is described in this article right now on all ABP user interfaces :)
Thank you for your suggestion :)
For more detailed information, you can check here => https://blog.abp.io/abp/ABP-Framework-4.3-RC-Has-Been-Published
Ruslan 251 weeks ago
Hi there Berkan, thanks for letting me know. That's great news :) I will give it a try at soonest!
zhangzhuang@163.com 260 weeks ago
when i flow you to change the AppUser info, the UI is running ok,but i cann't Register a new user ,it's still to show error for Title Null Exception.
Berkan Şaşmaz 260 weeks ago
Hello, the problem is caused by the "propertyBuilder.IsRequired();" line in step-3. If we replace this line with "propertyBuilder.HasDefaultValue(string.Empty);", the problem will be solved. Thank you for your feedback, I will update the article as soon as possible.
nick.coleman 259 weeks ago
Really helpful article and some great functionality there. Is there a way to order the properties? So I can control the display of these in the UI?
Berkan Şaşmaz 259 weeks ago
I am delighted that you like the article :) Yes, you can do that really easily. ABP has a lot of great features, but I especially like to be able to the extent or customize everything. And there is a very nice document written about it :) I believe you will find the answer to your question here: https://docs.abp.io/en/abp/latest/UI/AspNetCore/Customization-User-Interface
nick.coleman 259 weeks ago
Ah right.. I was hoping there was a way to order them without having to override the UI.. so we could add them via the object extensibility and order them at the same time somehow as they appear in a random order... That's fine I will create a new UI... Thanks!
nick.coleman 259 weeks ago
Ah right.. I was hoping there was a way to order them without having to override the UI.. so we could add them via the object extensibility and order them at the same time somehow as they appear in a random order... That's fine I will create a new UI... Thanks!
Engincan Veske 232 weeks ago
Hi Nick, I think this is what you are looking for: (https://github.com/abpframework/abp/blob/48c52625f4c4df007f04d5ac6368b07411aa7521/modules/identity/src/Volo.Abp.Identity.Web/AbpIdentityWebModule.cs#L101-L118)
David Crumb 253 weeks ago
I would like to be able to have each Tenant to manage values from an extended Tenant entity. Say for example I had an extension to the Tenant entity such as:
public string TenantOfficialName {get;set;)
and I want each tenant to be able to manage this field.
What approach would you take. The UI for the tenant?
Many thanks
David Crumb 253 weeks ago
Perhaps using the Settings features?
Berkan Şaşmaz 252 weeks ago
I don't know the scope of your question, but as a junior developer, I would look for answers to a few questions while making this choice;
1-) Is there a logic on the features to be added? I wouldn't consider using my narratives in this article if any.
Berkan Şaşmaz 252 weeks ago
2-) Many people on the team know about this use? This question may be necessary for maintenance. That's all that comes to mind for now, but you can start a new issue or discussion to benefit from experienced developers on this topic. https://github.com/abpframework/abp/discussions
Tony Albutt 250 weeks ago
Excellent, Is there a way to enable the user to update these fields in the Manage User Profile?
Berkan Şaşmaz 246 weeks ago
Hello, sorry for my late reply. To add these two properties to the Account/Manage page, you should extend the relevant Dtos of this page after coming up to step-4 in this article. You can then customize the Account/Manage page to show ExtraProperties.
Berkan Şaşmaz 246 weeks ago
For more information, you can refer to the following addresses: https://docs.abp.io/en/abp/latest/Customizing-Application-Modules-Overriding-Services#example
https://docs.abp.io/en/abp/latest/Object-Extensions#object-extension-manager
https://docs.abp.io/en/abp/latest/UI/AspNetCore/Customization-User-Interface
Tony Albutt 246 weeks ago
I gather that I need to replace Account module with source code
a.ashokri1388@gmail.com 236 weeks ago
Hello, I Want to show property "Name" in Register page. Could you please explain how ?
Berkan Şaşmaz 234 weeks ago
Hi, I think you will get the answer to your question from the links below :)
https://support.abp.io/QA/Questions/1668
https://docs.abp.io/en/abp/latest/Customizing-Application-Modules-Overriding-User-Interface
szilardd 219 weeks ago
Which version of Abp.Io supports this approach?
In version 4.4 there is no
AppUseror*.Domain.SharedprojectBerkan Şaşmaz 219 weeks ago
This article is obsolete and will be updated as soon as possible but until then you can check it out here =>
https://github.com/abpframework/abp/blob/dev/docs/en/Community-Articles/2021-05-24-Removing-EfCore-Migrations/POST.md#the-appuser-entity--custom-properties
szilardd 219 weeks ago
thanks for the update, I found a solution like this (I'm extending the Role entity with the SortOrder field):
but I guess it is equivalent to the approach described in the link you provided like this:
Berkan Şaşmaz 219 weeks ago
Yes, it is true, as you have noticed, the absence of
AppUserdoes not affect Module Entity Extensions.Anyway, I won't have much trouble updating this article soon 😂
v.merkling@groupebriand.fr 170 weeks ago
Thanks, very nice tutorial ! Is it possible to make linq query on those fields ? For example can you search in your db all user with reputation above 5 ?
v.merkling@groupebriand.fr 170 weeks ago
Thanks, very nice tutorial ! Is it possible to make linq query on those fields ? For example can you search in your db all user with reputation above 5 ?
Berkan Şaşmaz 170 weeks ago
Thank you 🙏
You can look here for that.
shanthakumarnat@gmail.com 138 weeks ago
Hi, Thanks. I am able to add few controls based on the article. I would like to add a dropdown with numeric values which should be 1,2,3,4,5. Could you please help me to fix this issue. Also the dropdown selection should happen based on a condition. Which event I should use to validate.
Berkan Şaşmaz 137 weeks ago
Hi, you can find the easiest way to do this in this doc.