Using ABP Client Proxies in MAUI with OpenID Connect
The purpose of this article is to integrate ABP Core into the MAUI project and initialize it as an AbpModule then make able consuming API using ABP IAppServices.
Before we start, I offer my special thanks to @hikalkan because this repository ( hikalkan/maui-abp-playing ) is a fantastic inspiration for the purpose of this article.
Getting Started
In this article, we'll work on an application that was built on the previous article: Integrating MAUI Client via Using OpenID Connect.
Source Code
Source code is available on GitHub:
abpframework/abp-samples/MAUI-OpenId
Configuring ABP Core
As a first step, Dependency Injection will be changed with module initialization. We have to initialize our application as an ABP Module first.
Add the following dependencies to MAUI Client.
<PackageReference Include="Volo.Abp.Http.Client.IdentityModel" Version="5.1.3" />
<PackageReference Include="Volo.Abp.Autofac" Version="5.1.3" />
Add HttpApi.Client project reference
<ProjectReference Include="..\..\aspnet-core\src\Acme.BookStore.HttpApi.Client\Acme.BookStore.HttpApi.Client.csproj" />And run
abp buildcommand under MAUI application folder.abp buildcommand is equivalent ofdotnet build /graphBuild, it's like a shortcut to graphBuild. The graphBuild finds all dependency tree and build them recursively.Create BookStoreMauiClientModule.
using IdentityModel.OidcClient;
using Microsoft.Extensions.Configuration;
using Microsoft.Extensions.Options;
using Volo.Abp.Autofac;
using Volo.Abp.Http.Client.IdentityModel;
using Volo.Abp.Modularity;

namespace Acme.BookStore.MauiClient;

[DependsOn(
    typeof(AbpAutofacModule),
    typeof(AbpHttpClientIdentityModelModule),
    typeof(BookStoreHttpApiClientModule)
    )]
public class BookStoreMauiClientModule : AbpModule
{
    public override void ConfigureServices(ServiceConfigurationContext context)
    {
        var configuration = context.Services.GetConfiguration();

        Configure<OidcClientOptions>(configuration.GetSection("Oidc:Options"));

        context.Services.AddTransient<OidcClient>(sp =>
        {
            var options = sp.GetRequiredService<IOptions<OidcClientOptions>>().Value;
            options.Browser = sp.GetRequiredService<WebAuthenticatorBrowser>();
            return new OidcClient(options);
        });

        context.Services.AddTransient<HttpClient>(sp =>
            new HttpClient(sp.GetRequiredService<AccessTokenHttpMessageHandler>())
            {
                // Temporarily. We'll use ABP's Proxy for sendind requests.
                BaseAddress = new Uri(configuration.GetValue<string>("RemoteServices:Default:BaseUrl"))
            });
    }
}
Mark all dependencies with interfaces for registering as services.
internal class WebAuthenticatorBrowser : IBrowser, ITransientDependencypublic partial class MainPage : ContentPage, ITransientDependencypublic class AccessTokenHttpMessageHandler : DelegatingHandler, ISingletonDependencyAdd
appsettings.jsonfile to root path of your application and mark it as Embedded resource.{ "Oidc": { "Options": { "Authority": "https://46fd-45-156-29-175.ngrok.io", "ClientId": "BookStore_Maui", "RedirectUri": "bookstore://", "Scope": "openid email profile role BookStore offline_access", "ClientSecret": "1q2w3E*" } }, "RemoteServices": { "Default": { "BaseUrl": "https://46fd-45-156-29-175.ngrok.io" } } }Finally, Go back
MauiApplication.csand clear old codes and initialize ABP.using Microsoft.Extensions.Configuration; using Microsoft.Extensions.FileProviders; using System.Reflection; using Volo.Abp; using Volo.Abp.Autofac; namespace Acme.BookStore.MauiClient; public static class MauiProgram { public static MauiApp CreateMauiApp() { var builder = MauiApp.CreateBuilder(); builder.ConfigureContainer(new AbpAutofacServiceProviderFactory(new Autofac.ContainerBuilder()), containerBuilder => { }); builder .UseMauiApp<App>() .ConfigureFonts(fonts => { fonts.AddFont("OpenSans-Regular.ttf", "OpenSansRegular"); }); ConfigureConfiguration(builder); builder.Services.AddApplication<BookStoreMauiClientModule>(options => { options.Services.ReplaceConfiguration(builder.Configuration); }); var app = builder.Build(); app.Services.GetRequiredService<IAbpApplicationWithExternalServiceProvider>() .Initialize(app.Services); return app; } private static void ConfigureConfiguration(MauiAppBuilder builder) { var assembly = typeof(App).GetTypeInfo().Assembly; builder.Configuration.AddJsonFile(new EmbeddedFileProvider(assembly), "appsettings.json", optional: false, false); } }Now application is runnable and all behaviors are the same with previos state. But it uses power of ABP right now.
Switching to SecureStorage
.Net MAUI supports a secure storage by default. Before we go further, we need to switch to secure storage instead of using app properties. Just update login method as below at MainPage.xaml.cs
private async void OnLoginClicked(object sender, EventArgs e)
{
    var loginResult = await OidcClient.LoginAsync(new LoginRequest());
    if (loginResult.IsError)
    {
        await DisplayAlert("Error", loginResult.Error, "Close");
        return;
    }

    await SecureStorage.SetAsync(OidcConsts.AccessTokenKeyName, loginResult.AccessToken);
    await SecureStorage.SetAsync(OidcConsts.RefreshTokenKeyName, loginResult.RefreshToken);
}
Additionally, please configure each platform according to Secure Storage documentation
Configuring Client Proxies
ABP Client-Proxies don't use HttpClient directly. They use IHttpClientFactory to activate a new HttpClient instead of injecting it directly. So, we won't need AccessTokenHttpMessageHandler anymore. But still there is a way needed to set access token in requests. No worries, ABP has IRemoteServiceHttpClientAuthenticator to do that operation. Implementing it and registering to container will solve that issue and the client will be able to make authorized request to server.
Remove AccessTokenHttpMessageHandler.cs from the project.
Add AccessTokenRemoteServiceHttpClientAuthenticator.cs instead.
using IdentityModel.Client;
using IdentityModel.OidcClient;
using System.IdentityModel.Tokens.Jwt;
using Volo.Abp.DependencyInjection;
using Volo.Abp.Http.Client.Authentication;
using DependencyAttribute = Volo.Abp.DependencyInjection.DependencyAttribute;

namespace Acme.BookStore.MauiClient;

[Dependency(ReplaceServices = true)]
[ExposeServices(typeof(IRemoteServiceHttpClientAuthenticator))]
public class AccessTokenRemoteServiceHttpClientAuthenticator : IRemoteServiceHttpClientAuthenticator, ITransientDependency
{
    protected OidcClient OidcClient { get; }

    public AccessTokenRemoteServiceHttpClientAuthenticator(OidcClient oidcClient)
    {
        OidcClient = oidcClient;
    }

    public async Task Authenticate(RemoteServiceHttpClientAuthenticateContext context)
    {
        var currentAccessToken = await SecureStorage.GetAsync(OidcConsts.AccessTokenKeyName);

        if (!currentAccessToken.IsNullOrEmpty())
        {
            // TODO: Find better way to find if token is expired instead of parsing it.
            var jwtToken = new JwtSecurityTokenHandler().ReadJwtToken(currentAccessToken) as JwtSecurityToken;
            if (jwtToken.ValidTo <= DateTime.UtcNow)
            {
                var refreshToken = await SecureStorage.GetAsync(OidcConsts.RefreshTokenKeyName);
                if (!refreshToken.IsNullOrEmpty())
                {
                    var refreshResult = await OidcClient.RefreshTokenAsync(refreshToken);

                    await SecureStorage.SetAsync(OidcConsts.AccessTokenKeyName, refreshResult.AccessToken);
                    await SecureStorage.SetAsync(OidcConsts.RefreshTokenKeyName, refreshResult.RefreshToken);

                    context.Request.SetBearerToken(refreshResult.AccessToken);
                }
                else
                {
                    var loginResult = await OidcClient.LoginAsync(new LoginRequest());

                    await SecureStorage.SetAsync(OidcConsts.AccessTokenKeyName, loginResult.AccessToken);
                    await SecureStorage.SetAsync(OidcConsts.RefreshTokenKeyName, loginResult.RefreshToken);

                    context.Request.SetBearerToken(loginResult.AccessToken);
                }
            }

            context.Request.SetBearerToken(currentAccessToken);
        }
    }
}
Now we are ready to inject IAppServices to communicate with backend.
Displaying Data in UI
Go back to Acme.BookStore.Domain project and add a simple data seed contributor to generate some example data for users.
public class UsersDataSeederContributor : IDataSeedContributor, ITransientDependency
{
    protected IIdentityUserRepository repository;

    protected IGuidGenerator guidGenerator;
    public UsersDataSeederContributor(IIdentityUserRepository repository, IGuidGenerator guidGenerator)
    {
        this.repository = repository;
        this.guidGenerator = guidGenerator;
    }

    public async Task SeedAsync(DataSeedContext context)
    {
        var count = await repository.GetCountAsync();
        if(count <= 1) // Not sure 'admin' user was seeded before or not.
        {
            // All the names below were generated by https://www.name-generator.org.uk/quick/
            // The names does not represent real people.
            await repository.InsertManyAsync(new []{
                new IdentityUser(guidGenerator.Create(), "john.doe", "john.doe@abp.io"),
                new IdentityUser(guidGenerator.Create(), "Zane.Frost", "Zane.Frost@abp.io"),
                new IdentityUser(guidGenerator.Create(), "Oscar.Landry", "Oscar.Landry@abp.io"),
                new IdentityUser(guidGenerator.Create(), "Yasemin.Roberts", "Yasemin.Roberts@abp.io"),
                new IdentityUser(guidGenerator.Create(), "Yasmine.Perez", "Yasmine.Perez@abp.io"),
                new IdentityUser(guidGenerator.Create(), "Tobi.Becker", "Tobi.Becker@abp.io"),
                new IdentityUser(guidGenerator.Create(), "Fox.Gilmore", "Fox.Gilmore@abp.io"),
                new IdentityUser(guidGenerator.Create(), "Benny.Burris", "Benny.Burris@abp.io"),
                new IdentityUser(guidGenerator.Create(), "Chad.Camacho", "Chad.Camacho@abp.io"),
            });
        }
    }
}
Run the Acme.BookStore.DbMigrator project.
Turn back to MAUI app, and create a folder named ViewModels and add a simple
UsersViewModel.csunder it.public class UsersViewModel : BindableObject, ITransientDependency { protected IIdentityUserAppService IdentityUserAppService { get; } public GetIdentityUsersInput Input { get; } = new(); public ObservableCollection<IdentityUserDto> Items { get; } = new(); public Command RefreshCommand { get; } private bool isBusy; public bool IsBusy { get => isBusy; set => SetProperty(ref isBusy, value); } public UsersViewModel(IIdentityUserAppService identityUserAppService) { IdentityUserAppService = identityUserAppService; GetUsersAsync(); RefreshCommand = new Command(GetUsersAsync); } protected async void GetUsersAsync() { if (IsBusy) { return; // For preventing parallel request while searching. } IsBusy = true; Items.Clear(); var result = await IdentityUserAppService.GetListAsync(Input); foreach (var user in result.Items) { Items.Add(user); } IsBusy = false; } protected void SetProperty<T>(ref T backField, T value, [CallerMemberName] string propertyName = null) { backField = value; OnPropertyChanged(propertyName); } }Create a folder named Pages and add a content page named
UsersPage.(Make sure you're adding MAUI Content Page)
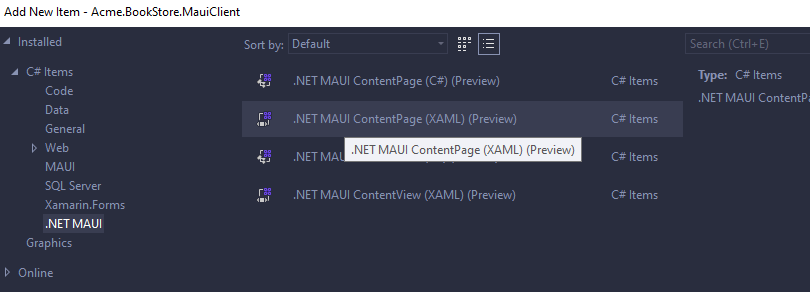
And inject
UsersViewModelinto it.public partial class UsersPage : ContentPage, ITransientDependency { public UsersViewModel ViewModel { get; } public UsersPage(UsersViewModel viewModel) { ViewModel = viewModel; InitializeComponent(); } }And use that ViewModel in XAML design page.
<?xml version="1.0" encoding="utf-8" ?>
<ContentPage xmlns="http://schemas.microsoft.com/dotnet/2021/maui"
            xmlns:x="http://schemas.microsoft.com/winfx/2009/xaml"
            x:Class="Acme.BookStore.MauiClient.UsersPage"
            Title="UsersPage"
            x:Name="page"
            BindingContext="{Binding ViewModel, Source={x:Reference page}}">
    <StackLayout>
        <ListView
            IsPullToRefreshEnabled="True"
            ItemsSource="{Binding Items}"
            IsRefreshing="{Binding IsBusy}"
            RefreshCommand="{Binding RefreshCommand}">
            <ListView.Header>
                <SearchBar Text="{Binding Input.Filter}" SearchCommand="{Binding RefreshCommand}" />
            </ListView.Header>
            <ListView.ItemTemplate>
                <DataTemplate>
                    <TextCell
                        Text="{Binding UserName, StringFormat='@{0}'}"
                        Detail="{Binding Email}"/>
                </DataTemplate>
            </ListView.ItemTemplate>
        </ListView>
    </StackLayout>
</ContentPage>
I've used binding while setting BindingContext as ViewModel because of IntelliSense support. With this method, you'll see intellisense will suggest properties from your ViewModel.

After a couple of try, I realized, only AppShell supports dependency injection while navigating between pages. So, adding a new AppShell will help to build app menus and navigating with route. We can pass parameters with querystring with this way.
Add
Shell Pagae (MAUI)to root of your application with name AppShell.xaml.I've got some help for design of shell page from microsoft's articles.
Additionally, you might want to put abp_icon.svg file under your Resources/Images folder.
<?xml version="1.0" encoding="utf-8" ?>
<Shell x:Class="Acme.BookStore.MauiClient.AppShell"
    xmlns="http://schemas.microsoft.com/dotnet/2021/maui"
    xmlns:x="http://schemas.microsoft.com/winfx/2009/xaml"
    xmlns:local="clr-namespace:Acme.BookStore.MauiClient">
    <Shell.Resources>
        <ResourceDictionary>
            <Color x:Key="Primary">#512BD4</Color>
            <Style x:Key="BaseStyle" TargetType="Element">
                <Setter Property="Shell.BackgroundColor" Value="{StaticResource Primary}" />
                <Setter Property="Shell.ForegroundColor" Value="White" />
                <Setter Property="Shell.TitleColor" Value="White" />
                <Setter Property="Shell.DisabledColor" Value="#B4FFFFFF" />
                <Setter Property="Shell.UnselectedColor" Value="#95FFFFFF" />
                <Setter Property="Shell.TabBarBackgroundColor" Value="{StaticResource Primary}" />
                <Setter Property="Shell.TabBarForegroundColor" Value="White"/>
                <Setter Property="Shell.TabBarUnselectedColor" Value="#95FFFFFF"/>
                <Setter Property="Shell.TabBarTitleColor" Value="White"/>
            </Style>
            <Style TargetType="TabBar" BasedOn="{StaticResource BaseStyle}" />
            <Style TargetType="FlyoutItem" BasedOn="{StaticResource BaseStyle}" />
            <Style Class="FlyoutItemLabelStyle" TargetType="Label">
                <Setter Property="TextColor" Value="White"></Setter>
                <Setter Property="Margin" Value="16"></Setter>
            </Style>
            <Style Class="FlyoutItemLayoutStyle" TargetType="Layout" ApplyToDerivedTypes="True">
                <Setter Property="VisualStateManager.VisualStateGroups">
                    <VisualStateGroupList>
                        <VisualStateGroup x:Name="CommonStates">
                            <VisualState x:Name="Normal">
                                <VisualState.Setters>
                                    <Setter Property="BackgroundColor" Value="{x:OnPlatform UWP=Transparent, iOS=White, Android=White}" />
                                    <Setter TargetName="FlyoutItemLabel" Property="Label.TextColor" Value="{StaticResource Primary}" />
                                </VisualState.Setters>
                            </VisualState>
                            <VisualState x:Name="Selected">
                                <VisualState.Setters>
                                    <Setter Property="BackgroundColor" Value="{StaticResource Primary}" />
                                </VisualState.Setters>
                            </VisualState>
                        </VisualStateGroup>
                    </VisualStateGroupList>
                </Setter>
            </Style>

            <Style Class="MenuItemLayoutStyle" TargetType="Layout" ApplyToDerivedTypes="True">
                <Setter Property="VisualStateManager.VisualStateGroups">
                    <VisualStateGroupList>
                        <VisualStateGroup x:Name="CommonStates">
                            <VisualState x:Name="Normal">
                                <VisualState.Setters>
                                    <Setter TargetName="FlyoutItemLabel" Property="Label.TextColor" Value="{StaticResource Primary}" />
                                </VisualState.Setters>
                            </VisualState>
                        </VisualStateGroup>
                    </VisualStateGroupList>
                </Setter>
            </Style>
        </ResourceDictionary>
    </Shell.Resources>

    <FlyoutItem Title="Home">
        <ShellContent ContentTemplate="{DataTemplate local:MainPage}" Route="main" />
    </FlyoutItem>

    <FlyoutItem Title="Users">
        <ShellContent ContentTemplate="{DataTemplate local:UsersPage}" Route="UsersPage" />
    </FlyoutItem>

    <Shell.FlyoutHeader>
        <StackLayout>
            <Image
                Source="abp_logo.svg"
                HorizontalOptions="Center"
                Margin="25"/>
        </StackLayout>
    </Shell.FlyoutHeader>

</Shell>
One more step is required. Go to App.xaml.cs and replace MainPage with AppShell.
public partial class App : Application
{
    public App()
    {
        InitializeComponent();

        MainPage = new AppShell();
    }
}
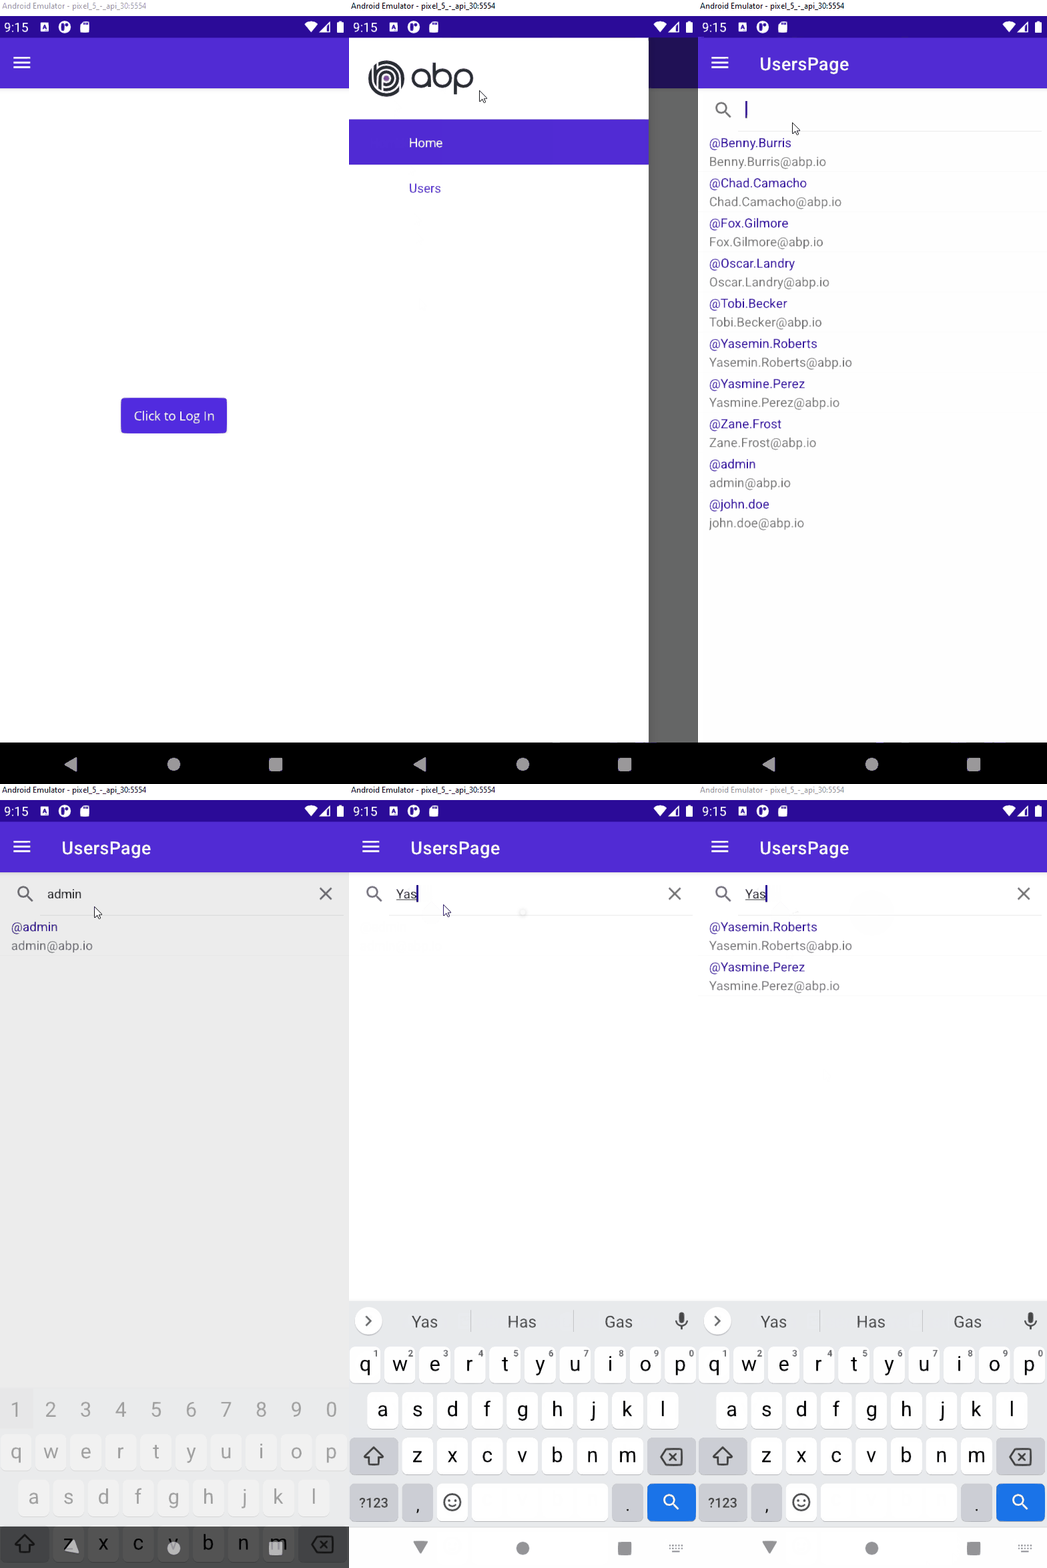
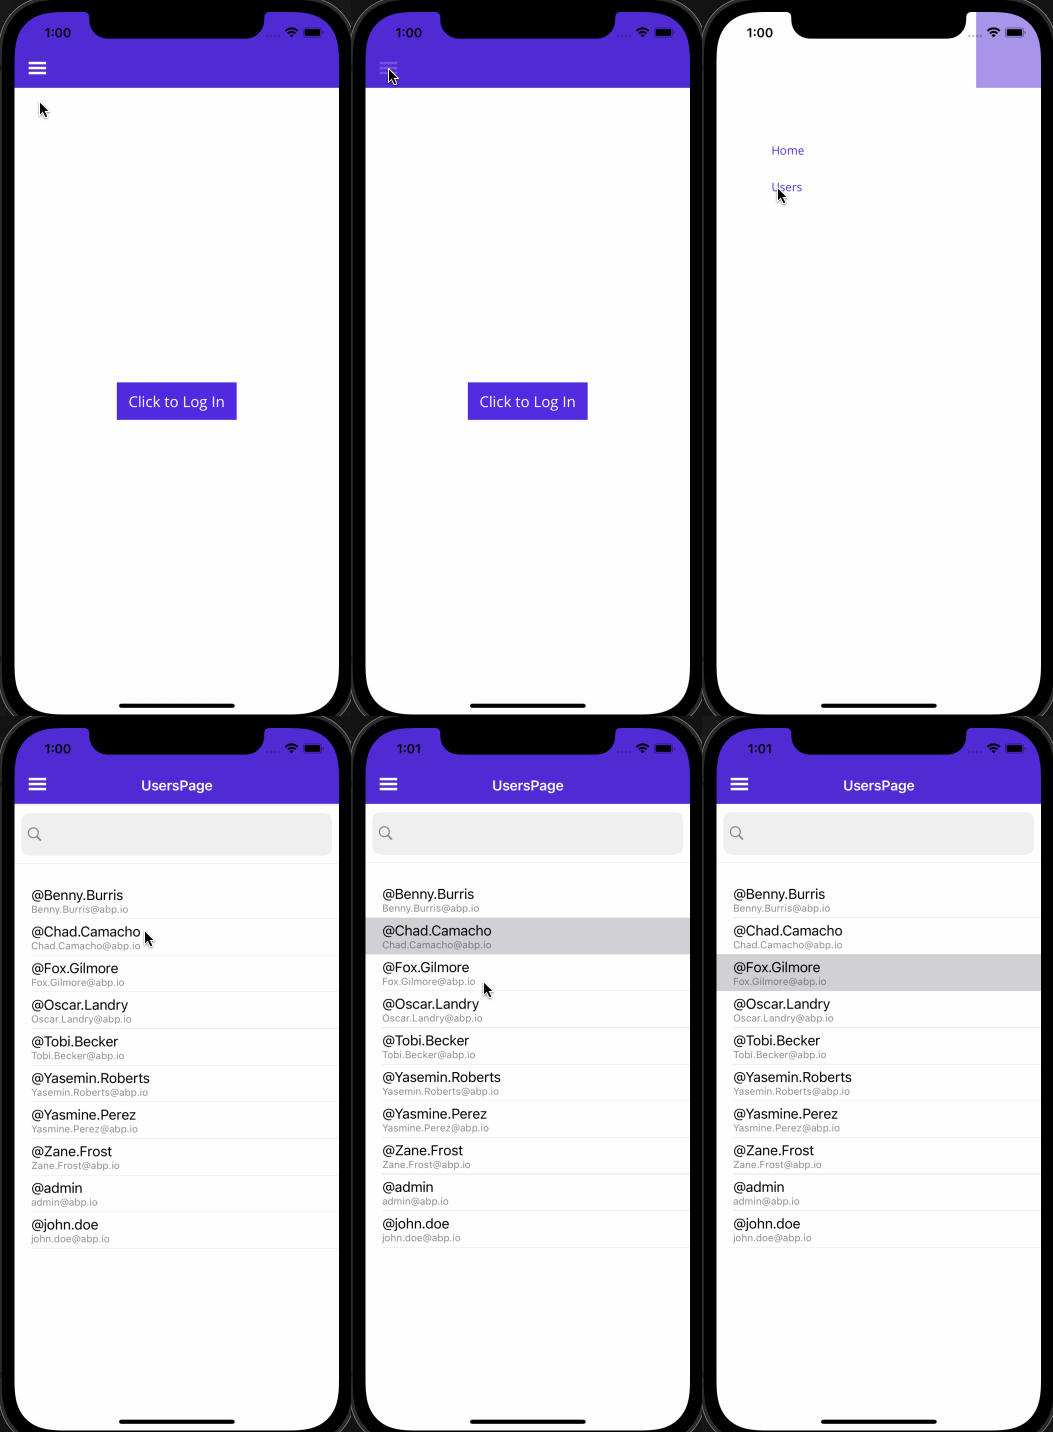
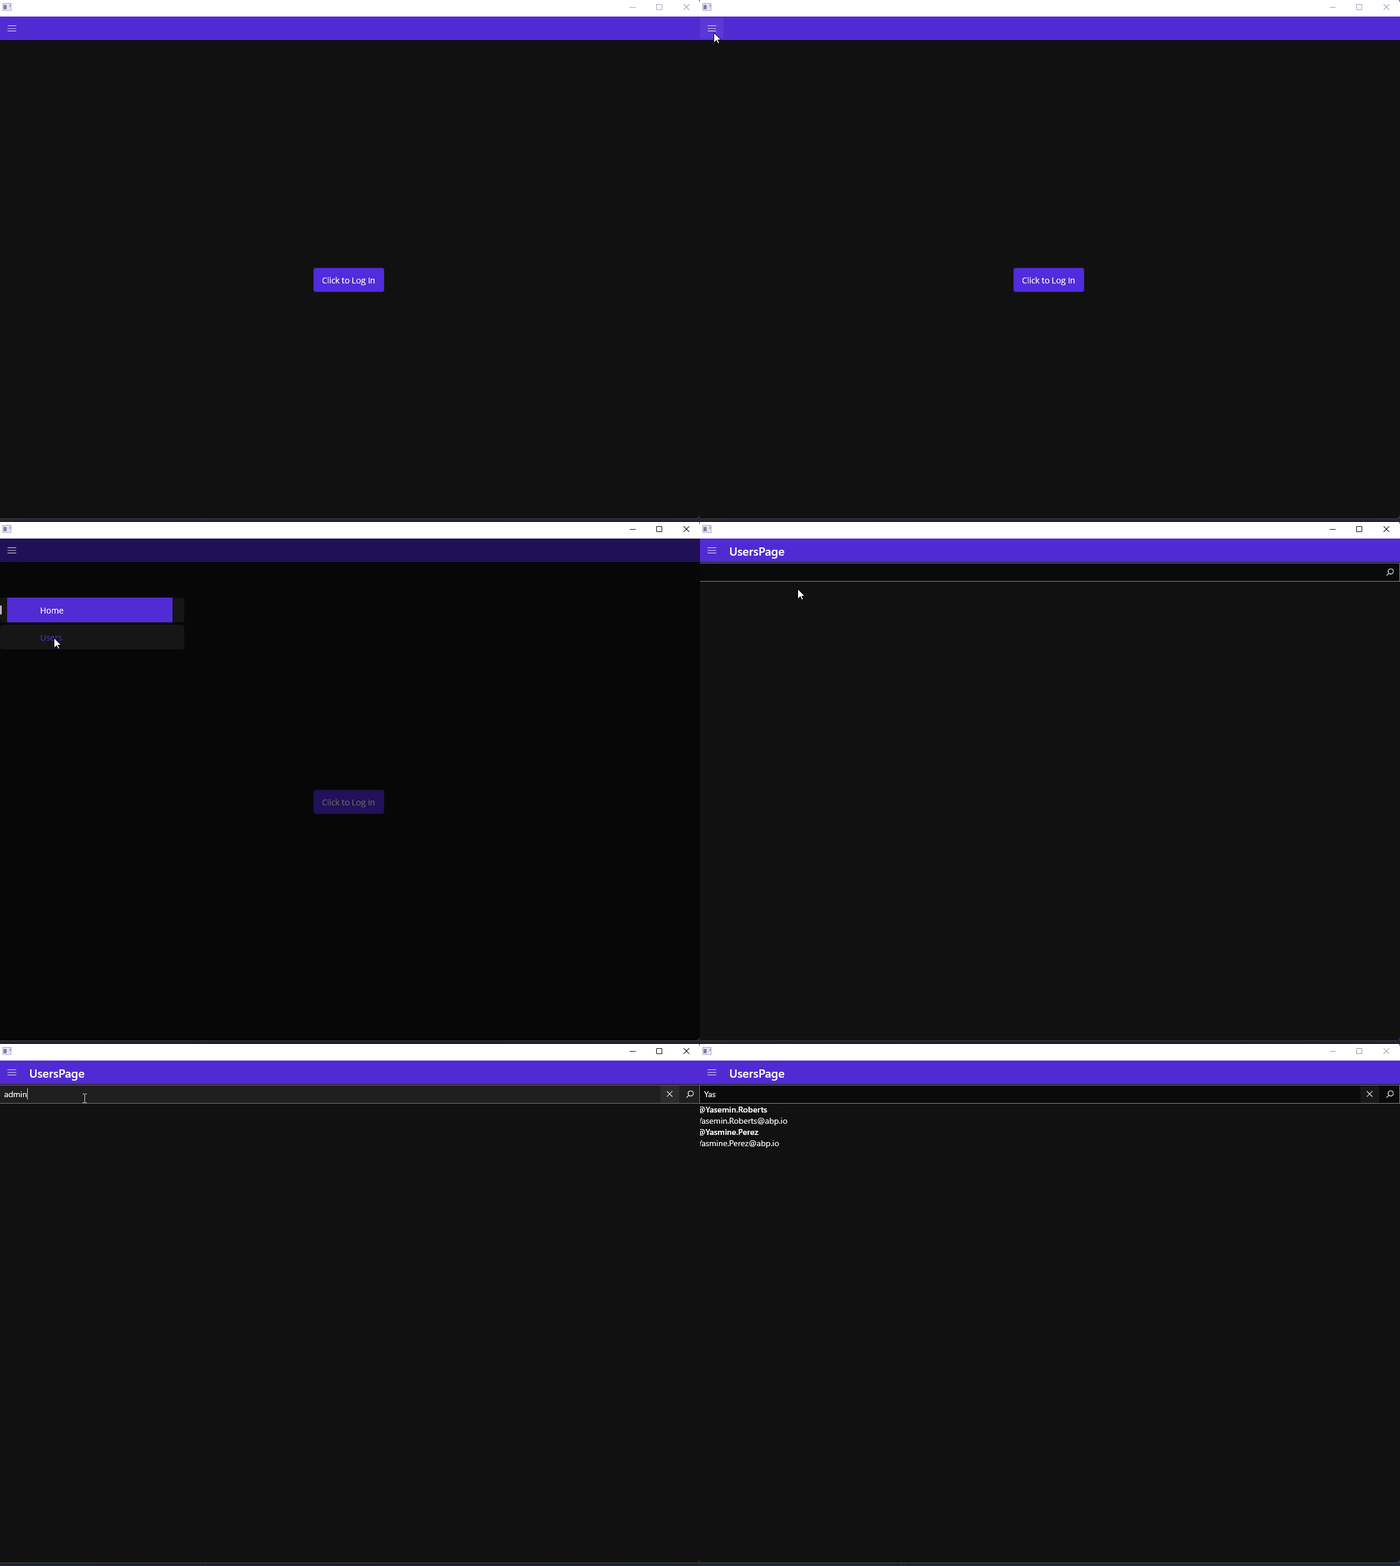
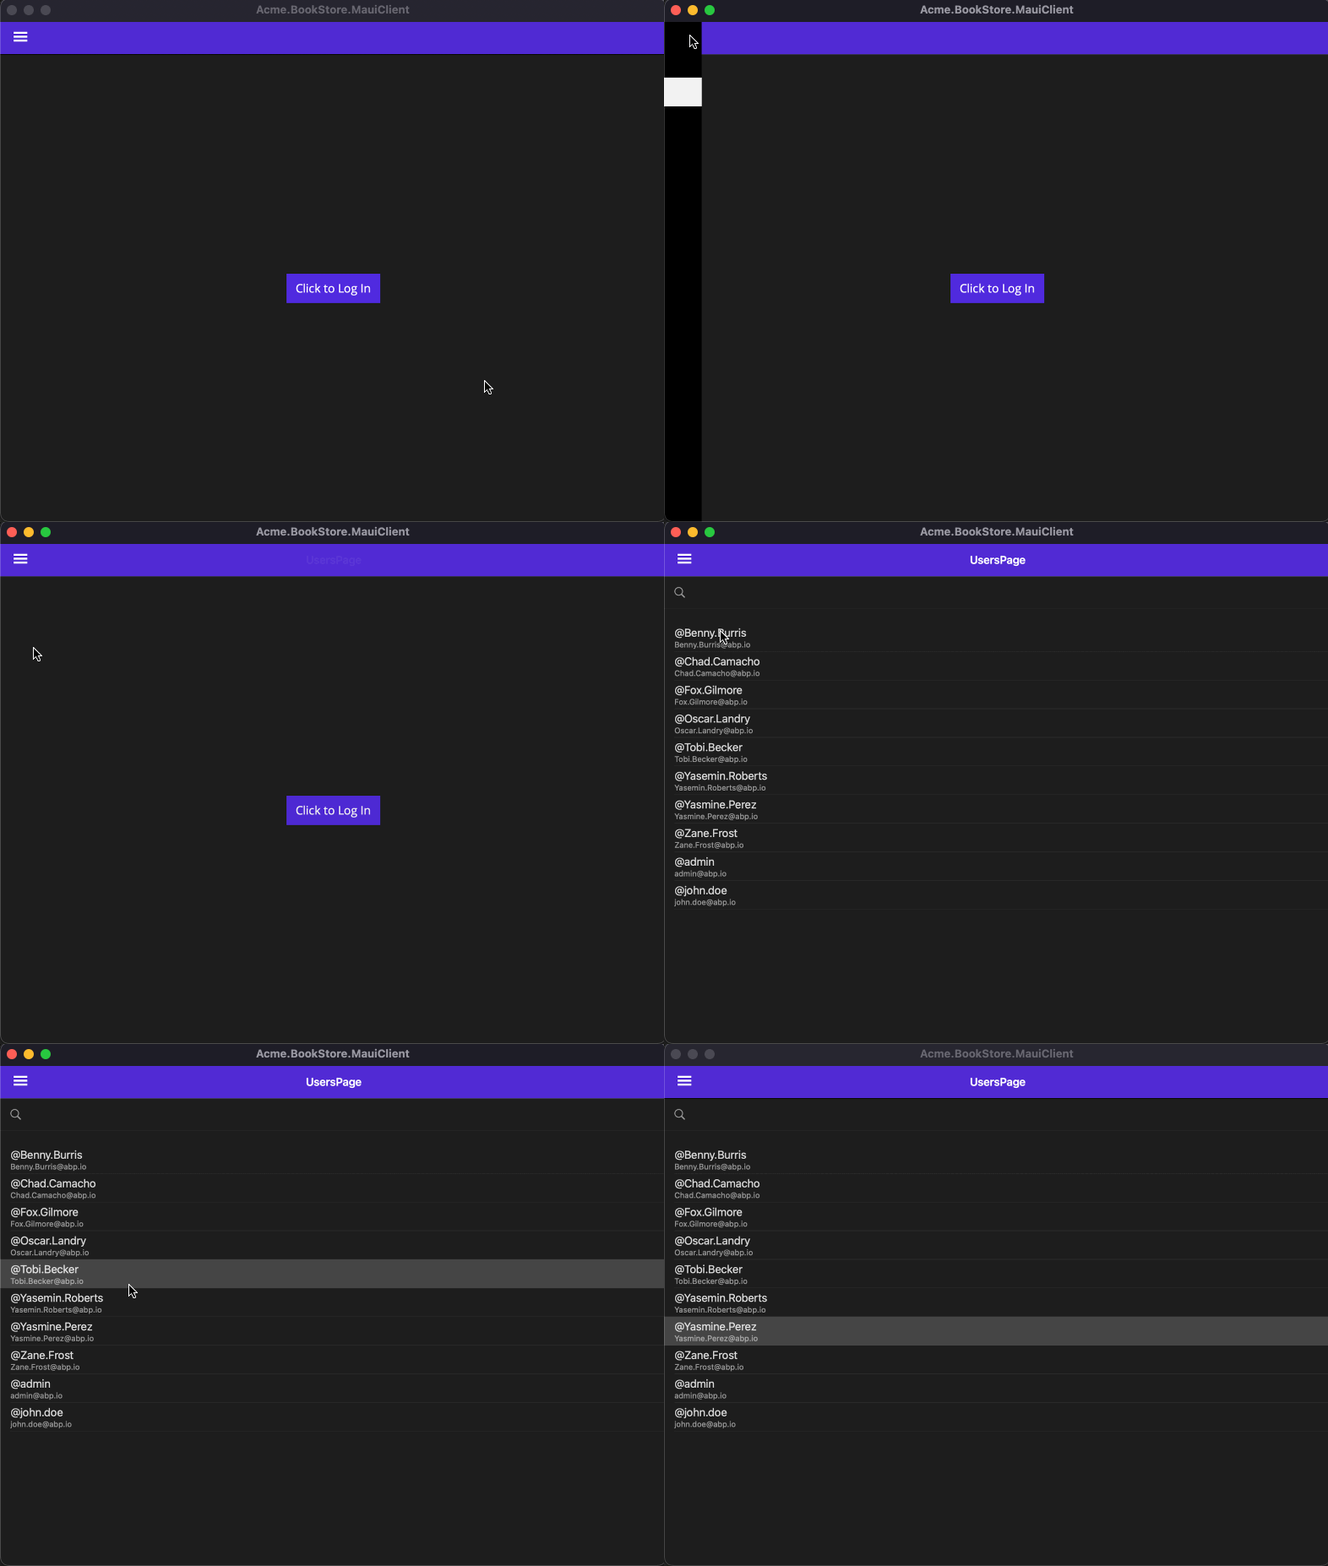
Run the application.
Login once if you haven't done before.
Navigate to Users page with hamburger menu at the right top.
| Android | iOS |
|---|---|
 |
 |
| UWP |
|---|
 |
| MacCatalyst |
|---|
 |
Conclusion
ABP Framework can be implemented any platform that runs on dotnet without suffer. ABP provides reusable abstractions layers and HttpApi Clients. In this article we've used powerful ABP core features such as Dependency Injection, Client Proxies, Validation and more.


Comments
zsanhong 172 weeks ago
thank you, when I update the code to abp v6.0.1, I can't run the maui project,would you please update the code to recent abp version 6.0.1
Enis Necipoğlu 172 weeks ago
Have you updated all the MAUI workloads with code
dotnet workload install mauiPlease create an issue with a detailed explanation about this.
aitlahmid 172 weeks ago
Thank you for providing us with this very useful solution. Is it possible to replace IdentityServer with OpenIddict. If yes, how?
ngwenyaspa@gmail.com 168 weeks ago
Abp now uses OpenIddict, and the structure is a bit different, now im getting an error saying The specified 'redirect_uri' is not valid for this client application. BookStore://
omerkaya 166 weeks ago
Article uses identity models, so it should work for OpenIddict also. For RedirectUri you may add/change dbo.OpenIddictApplications.RedirectUris value in database.
Enis Necipoğlu 166 weeks ago
Yes, it's working well with OpenIddict well. The only different thing is the data seeder for OpenIddict. If you properly configure your client information in OpenIddictDataSeeder, it'll work properly. Both of them use OAuth for authentication.
ngwenyaspa@gmail.com 163 weeks ago
How do you log out? i tried to create a logout request, but it takes me page thats says u have been signed out soon u will be redirected. But when u close and loggin again it automatically login in as if the credentials used before a cached some where. NB. on logout i clear everything in the storage
catalinc 118 weeks ago
Hi, How can I inject ICurrentUser or IAuthorizationService in the MAUI app? The results are null. All other application services work fine. Or is there any other way to check if user is authenticated and the roles/permissions of the user? Thank you.