


Integrating the Modules: Implementing Integration Services
You have created two modules so far: the Catalog module to store and manage products and the Ordering module to accept orders. However, these modules were completely independent from each other. The main application brought them together to execute in the same application, but these modules don't communicate with each other.
In this part and next two pars, you will learn to implement three common patterns for integrating these modules:
- The Order module will make a request to the Catalog module to get product information when needed.
- The Product module will listen to events from the Ordering module, so it can decrease a product's stock count when an order is placed.
- Finally, you will execute a database query that includes product and order data.
Let's begin from the first one: The Integration Services.
The Need for the Integration Services
Remember from the previous part, the Orders page shows product's identities instead of their names:
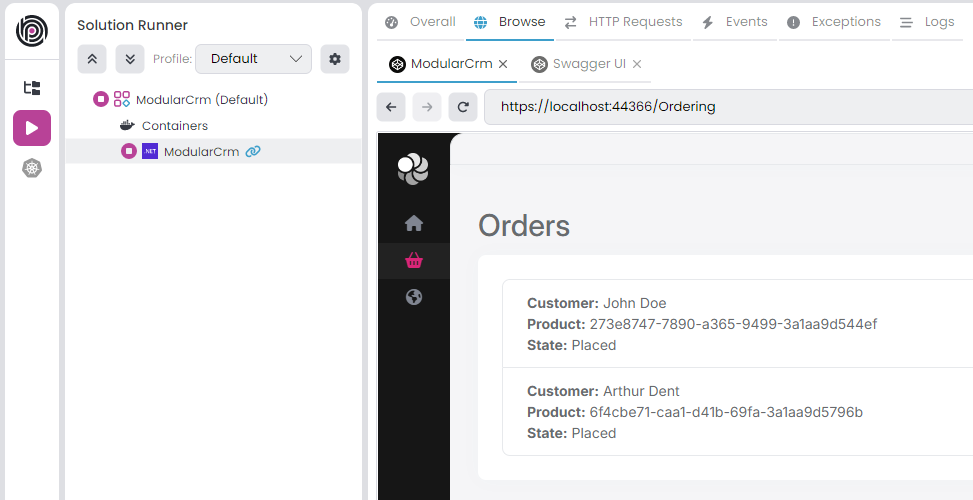
That is because the Ordering module has no access to the product data, so it can not perform a JOIN query to get the names of products from the Products table. That is a natural result of the modular design. However, you also don't want to show a product's GUID identity on the UI, which is not a good user experience.
As a solution to that problem, the Ordering module may ask product names to the Catalog module using an integration service. Integration service concept in ABP is designed for request/response style inter-module (in modular applications) and inter-microservice (in distributed systems) communication.
When you implement integration services for inter-module communication, you can easily convert them to REST API calls if you convert your solution to a microservice system and convert your modules to services later.
Creating a Products Integration Service
The first step is to create an integration service in the Catalog module, so other modules can consume it.
You will define an interface in the ModularCrm.Catalog.Contracts package and implement it in the ModularCrm.Catalog package.
Defining the IProductIntegrationService Interface
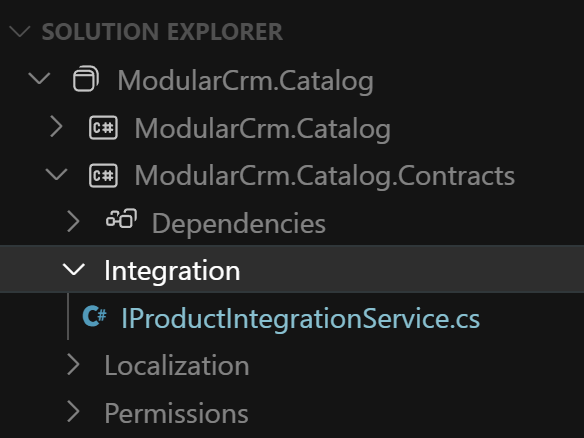
Open the ModularCrm.Catalog .NET solution in your IDE, find the ModularCrm.Catalog.Contracts project, create an Integration folder inside inside of that project and finally create an interface named IProductIntegrationService into that folder. The final folder structure should be like that:
Creating anIntegration folder is not required, but it can be a good practice to isolate integration-related code from the business logic of your module.
Open the IProductIntegrationService.cs file and replace it's content with the following code block:
using System;
using System.Collections.Generic;
using System.Threading.Tasks;
using Volo.Abp;
using Volo.Abp.Application.Services;

namespace ModularCrm.Catalog.Integration;

[IntegrationService]
public interface IProductIntegrationService : IApplicationService
{
    Task<List<ProductDto>> GetProductsByIdsAsync(List<Guid> ids);
}
IProductIntegrationService is very similar to a typical application service. The only difference is that it has an [IntegrationService] attribute on top of the interface definition. In that way, ABP can recognize and behave differently for them (for example, ABP doesn't expose integration services as HTTP APIs by default if you've configured the Auto API Controllers feature)
IProductIntegrationService has a single method that gets a list of product Ids and returns a list of ProductDto objects for these Ids. Any other module can use that method to get details of products when it only has some product Ids. This is exactly what we need in the Ordering module.
Design Tip
You may think if we can use the existing application services (like
IProductAppService) from other modules instead of creating specific integration services. Technically you can use, ABP has no restriction. However, from good design and best practice points, we don't suggest it. Because, application services are designed to be consumed specifically by the presentation layer. They will have different authorization and validation logic, they will need different DTO input and output properties, they will have different performance, optimization and caching requirements, and so on. And most importantly, all these will change by the time based on UI requirements and these changes may break your integrations later. It is best to implement specific integration APIs that is designed and optimized for that purpose.We've reused the
ProductDtoobject created forIProductAppService, which can be reasonable from a maintenance point of view. But if you think your integration service results will be different from the application service results in the future, it can be good to separate them from the first day so you don't need to introduce breaking changes later.
Implementing the ProductIntegrationService Class
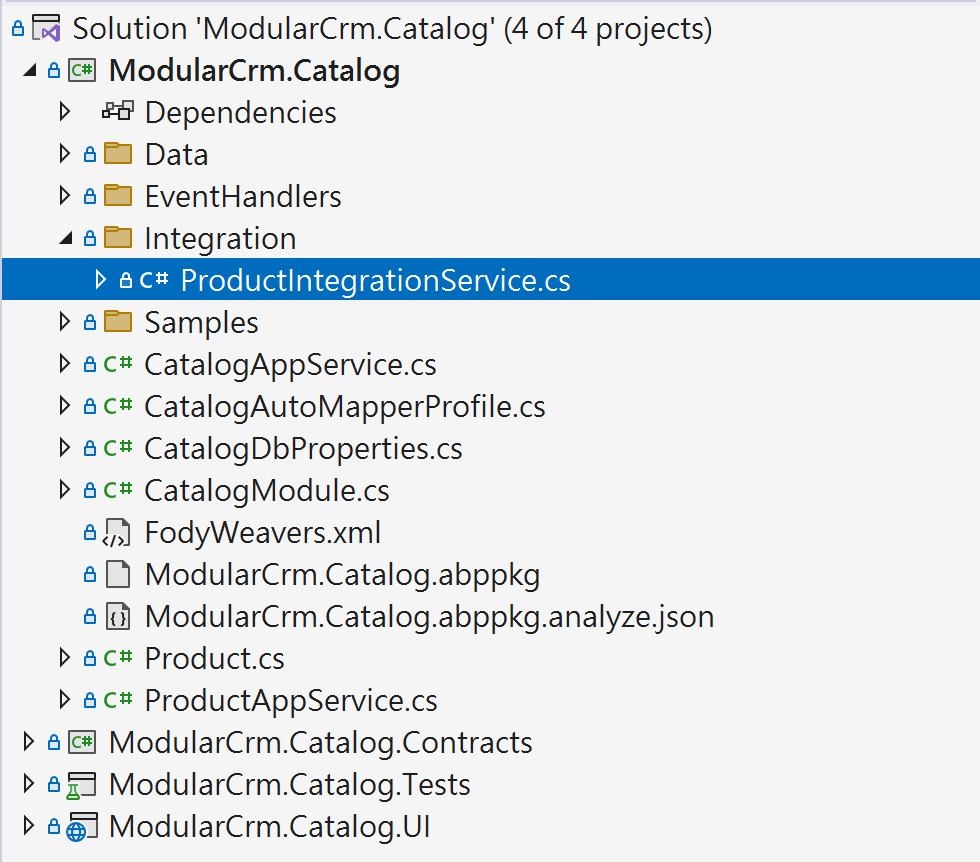
We've defined the integration service interface. Now, you can implement it in the ModularCrm.Catalog project. Create an Integration folder and then create a ProductIntegrationService class in that folder. The final folder structure should be like this:
Open the ProductIntegrationService.cs file and replace its content with the following code block:
using System;
using System.Collections.Generic;
using System.Threading.Tasks;
using Volo.Abp.Domain.Repositories;

namespace ModularCrm.Catalog.Integration;

public class ProductIntegrationService
    : CatalogAppService, IProductIntegrationService
{
    private readonly IRepository<Product, Guid> _productRepository;

    public ProductIntegrationService(IRepository<Product, Guid> productRepository)
    {
        _productRepository = productRepository;
    }

    public async Task<List<ProductDto>> GetProductsByIdsAsync(List<Guid> ids)
    {
        var products = await _productRepository.GetListAsync(
            product => ids.Contains(product.Id)
        );

        return ObjectMapper.Map<List<Product>, List<ProductDto>>(products);
    }
}
The implementation is pretty simple. Just using a repository to query Product entities.
Here, you directly used
List<T>classes, but instead, you could wrap inputs and outputs into DTOs. In that way, it can be possible to add new properties to these DTOs without changing the signature of your integration service method (and without introducing breaking changes for your client modules).
Consuming the Products Integration Service
The Product Integration Service is ready for the other modules to use. In this section, you will use it in the Ordering module to convert product IDs to product names.
Adding a Reference of the ModularCrm.Catalog.Contracts Package
Open the ABP Studio UI and stop the application if it is already running. Then open the Solution Explorer in ABP Studio, right-click the ModularCrm.Ordering package and select the Add Package Reference command:
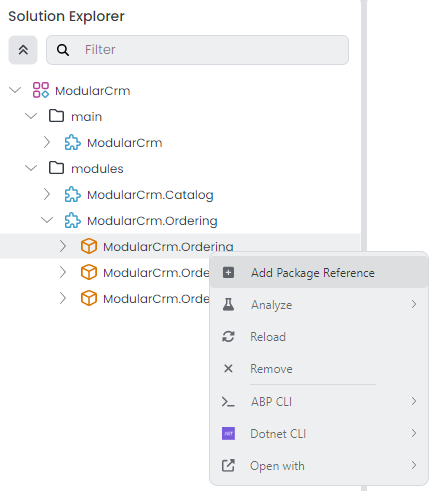
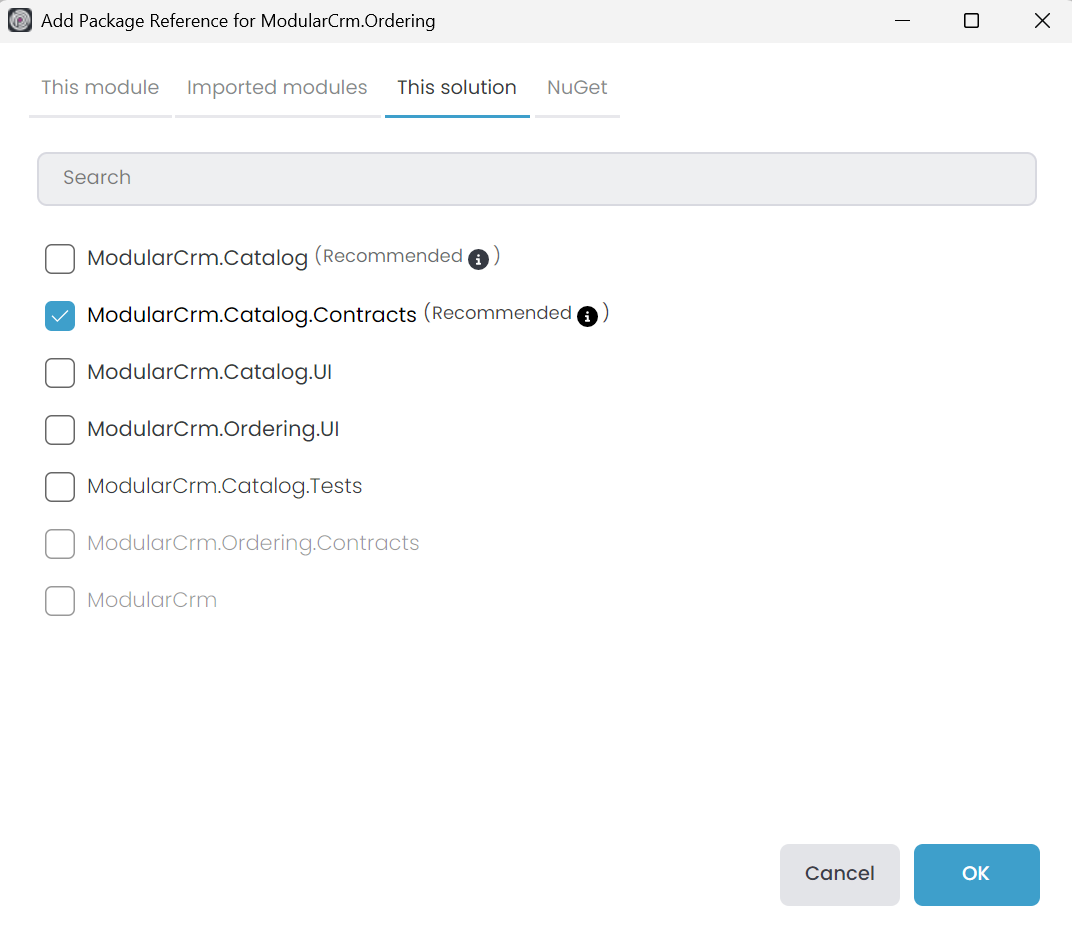
In the opening dialog, select the This solution tab, find and check the ModularCrm.Catalog.Contracts package and click the OK button:
ABP Studio adds the package reference and arranges the module dependency.
Instead of directly adding such a package reference, it can be possible to import the module first (right-click the
ModularCrm.Orderingmodule, select the Import Module command and import theModularCrm.Catalogmodule), then add the package references. ABP automatically import module when you add a package reference from a local module, but for other sources you may need to do it manually.
Using the Products Integration Service
Now, you can inject and use IProductIntegrationService in the Ordering module codebase.
Open the OrderAppService class of the ModularCrm.Ordering project of the ModularCrm.Ordering .NET solution and change its content as like the following code block:
using System;
using System.Collections.Generic;
using System.Linq;
using System.Threading.Tasks;
using ModularCrm.Catalog.Integration;
using Volo.Abp.Domain.Repositories;

namespace ModularCrm.Ordering;

public class OrderAppService : OrderingAppService, IOrderAppService
{
    private readonly IRepository<Order, Guid> _orderRepository;
    private readonly IProductIntegrationService _productIntegrationService;

    public OrderAppService(
        IRepository<Order, Guid> orderRepository,
        IProductIntegrationService productIntegrationService)
    {
        _orderRepository = orderRepository;
        _productIntegrationService = productIntegrationService;
    }

    public async Task<List<OrderDto>> GetListAsync()
    {
        var orders = await _orderRepository.GetListAsync();

        // Prepare a list of products we need
        var productIds = orders.Select(o => o.ProductId).Distinct().ToList();
        var products = (await _productIntegrationService
                .GetProductsByIdsAsync(productIds))
            .ToDictionary(p => p.Id, p => p.Name);

        var orderDtos = ObjectMapper.Map<List<Order>, List<OrderDto>>(orders);

        orderDtos.ForEach(orderDto =>
        {
            orderDto.ProductName = products[orderDto.ProductId];
        });

        return orderDtos;
    }

    public async Task CreateAsync(OrderCreationDto input)
    {
        var order = new Order
        {
            CustomerName = input.CustomerName,
            ProductId = input.ProductId,
            State = OrderState.Placed
        };

        await _orderRepository.InsertAsync(order);
    }
}
And also, open the OrderDto class of the ModularCrm.Ordering.Contracts project of the ModularCrm.Ordering .NET solution and add a ProductName property to it:
using System;

namespace ModularCrm.Ordering;

public class OrderDto
{
    public Guid Id { get; set; }
    public string CustomerName { get; set; } = null!;
    public Guid ProductId { get; set; }
    public OrderState State { get; set; }
    public string ProductName { get; set; } = null!; // New Property
}
Lastly, open the OrderingAutoMapperProfile class (the OrderingAutoMapperProfile.cs file under the Services folder of the ModularCrm.Ordering project of the ModularCrm.Ordering .NET solution) and ignore the ProductName property in the mapping configuration:
using AutoMapper;
using Volo.Abp.AutoMapper;

namespace ModularCrm.Ordering;

public class OrderingApplicationAutoMapperProfile : Profile
{
    public OrderingApplicationAutoMapperProfile()
    {
        CreateMap<Order, OrderDto>()
            .Ignore(x => x.ProductName); // New line
    }
}
Let's see what we've changed:
- We've added a
ProductNameproperty to theOrderDtoclass to store the product name. - Injecting the
IProductIntegrationServiceinterface so you can use it to request products. - In the
GetListAsyncmethod;- First getting the orders from the ordering module's database just like done before.
- Next, you are preparing a unique list of product IDs since the
GetProductsByIdsAsyncmethod requests it. - Then you are calling the
IProductIntegrationService.GetProductsByIdsAsyncmethod to get aList<ProductDto>object. - In the last line, we are converting the product list to a dictionary, where the key is
Guid Idand the value isstring Name. That way, we can easily find a product's name with its ID. - Finally, we are mapping the orders to
OrderDtoobjects and setting the product name by looking up the product ID in the dictionary.
Open the Index.cshtml file, and change the @order.ProductId part by @Order.ProductName to write the product name instead of the product ID. The final Index.cshtml content should be the following:
@page
@model ModularCrm.Ordering.UI.Pages.Ordering.IndexModel

<h1>Orders</h1>

<abp-card>
    <abp-card-body>
        <abp-list-group>
            @foreach (var order in Model.Orders)
            {
                <abp-list-group-item>
                    <strong>Customer:</strong> @order.CustomerName <br />
                    <strong>Product:</strong> @order.ProductName <br />
                    <strong>State:</strong> @order.State
                </abp-list-group-item>
            }
        </abp-list-group>
    </abp-card-body>
</abp-card>
That's all. Now, you can graph build the main application and run it in ABP Studio to see the result:

As you can see, we can see the product names instead of product IDs.
Design Tip
It is suggested that you keep that type of communication to a minimum and not couple your modules with each other. It can make your solution complicated and may also decrease your system performance. When you need to do it, think about performance and try to make some optimizations. For example, if the Ordering module frequently needs product data, you can use a kind of cache layer, so it doesn't make frequent requests to the Catalog module. Especially if you consider converting your system to a microservice solution in the future, too many direct integration API calls can be a performance bottleneck.
Conclusion
In the way explained in this part of this tutorial, you can easily create integration services for your modules and consume these integration services in any other module. In the next part, we will explore event based messaging between the modules.

