Thank you for reporting this issue. We have investigated and confirmed that edition features continue to work even after the edition subscription expires. This is indeed a bug in the ABP Framework's feature management system.
When you set an edition with an expiration date for a tenant:
EditionEndDateUtc is correctly stored in the databaseThis affects subscription-based applications where features should be disabled when a subscription expires.
The issue is in the ABP Framework's EditionFeatureValueProvider class, which is responsible for retrieving feature values for tenants based on their edition. Currently, this provider:
EditionIdEditionEndDateUtc)The SaaS module has the necessary data (EditionEndDateUtc) and logic (GetActiveEditionId() method) to handle expiration, but the feature system doesn't use this information.
While we work on a permanent fix, here are some workarounds you can implement a workaround.
When a subscription is canceled or updated, you can handle these events:
using Volo.Abp.DependencyInjection;
using Volo.Abp.EventBus.Distributed;
using Volo.Payment.Subscription;

public class CustomSubscriptionEventHandler :
    IDistributedEventHandler<SubscriptionCanceledEto>,
    IDistributedEventHandler<SubscriptionUpdatedEto>,
    ITransientDependency
{
    private readonly IDistributedCache<TenantConfigurationCacheItem> _cache;
    private readonly ILogger<CustomSubscriptionEventHandler> _logger;
    private readonly IEmailSender _emailSender;

    public CustomSubscriptionEventHandler(
        IDistributedCache<TenantConfigurationCacheItem> cache,
        ILogger<CustomSubscriptionEventHandler> logger,
        IEmailSender emailSender)
    {
        _cache = cache;
        _logger = logger;
        _emailSender = emailSender;
    }

    public async Task HandleEventAsync(SubscriptionCanceledEto eventData)
    {
        var tenantId = Guid.Parse(eventData.ExtraProperties[TenantConsts.TenantIdParameterName]?.ToString());

        _logger.LogWarning($"Subscription canceled for tenant {tenantId}");

        // *** Set the EditionId of the tenant to null if needed: ***

        // var tenant = await TenantRepository.FindAsync(tenantId, includeDetails: false);
        // tenant.EditionId = null;
        // await TenantRepository.UpdateAsync(tenant);

        // Clear tenant configuration cache to force feature re-check
        await InvalidateTenantCacheAsync(tenantId);

        // Send notification email
        await _emailSender.SendAsync(
            to: await GetTenantAdminEmailAsync(tenantId),
            subject: "Subscription Canceled",
            body: "Your subscription has been canceled. You have access until the end of your billing period."
        );
    }

    public async Task HandleEventAsync(SubscriptionUpdatedEto eventData)
    {
        var tenantId = Guid.Parse(eventData.ExtraProperties[TenantConsts.TenantIdParameterName]?.ToString());

        // Check if subscription expired (PeriodEndDate is in the past)
        if (eventData.PeriodEndDate.HasValue && eventData.PeriodEndDate < DateTime.UtcNow)
        {
            _logger.LogWarning($"Subscription expired for tenant {tenantId}");


            // *** Set the EditionId of the tenant to null if needed: ***

            // var tenant = await TenantRepository.FindAsync(tenantId, includeDetails: false);
            // tenant.EditionId = null;
            // await TenantRepository.UpdateAsync(tenant);

            // Clear cache to force feature re-check
            await InvalidateTenantCacheAsync(tenantId);

            // Send expiration notification
            await _emailSender.SendAsync(
                to: await GetTenantAdminEmailAsync(tenantId),
                subject: "Subscription Expired",
                body: "Your subscription has expired. Please renew to continue using premium features."
            );
        }
    }

    private async Task InvalidateTenantCacheAsync(Guid tenantId)
    {
        // Clear tenant configuration cache
        await _cache.RemoveAsync(
            TenantConfigurationCacheItem.CalculateCacheKey(tenantId, null),
            considerUow: true
        );
    }

    private async Task<string> GetTenantAdminEmailAsync(Guid tenantId)
    {
        // Implement logic to get tenant admin email
        return "admin@tenant.com";
    }
}
To verify your workaround is working:
EditionEndDateUtc to a past date:
var tenant = await TenantRepository.GetAsync(tenantId);
tenant.EditionEndDateUtc = DateTime.UtcNow.AddDays(-1);
await TenantRepository.UpdateAsync(tenant);
var tenant = await TenantRepository.GetAsync(tenantId);
tenant.EditionEndDateUtc = DateTime.UtcNow.AddMonths(1);
await TenantRepository.UpdateAsync(tenant);
If you have existing tenants with expired editions that should be blocked:
var expiredTenants = await TenantRepository.GetListAsync(
    expirationDateMax: DateTime.UtcNow
);

foreach (var tenant in expiredTenants)
{
    if (tenant.EditionId != null && tenant.GetActiveEditionId() == null)
    {
        Logger.LogInformation($"Tenant {tenant.Name} has expired edition {tenant.EditionId}");
    }
}
For each expired tenant, you can:
Option A: Clear Edition (if they shouldn't have any edition features)
tenant.EditionId = null;
tenant.EditionEndDateUtc = null;
await TenantRepository.UpdateAsync(tenant);
Option B: Set to Free/Trial Edition
var freeEditionId = await GetFreeEditionIdAsync();
tenant.EditionId = freeEditionId;
tenant.EditionEndDateUtc = null; // Perpetual free edition
await TenantRepository.UpdateAsync(tenant);
Option C: Extend Expiration (give them grace period)
tenant.EditionEndDateUtc = DateTime.UtcNow.AddDays(7); // 7 day grace
await TenantRepository.UpdateAsync(tenant);
foreach (var tenant in expiredTenants)
{
    await EmailService.SendAsync(
        to: await GetTenantAdminEmailAsync(tenant.Id),
        subject: "Subscription Expired",
        body: $"Your subscription has expired. Please renew to continue using premium features."
    );
}
We'll update this document as we make progress on the fix. You can track:
We understand this impacts subscription-based applications, and we're prioritizing a fix. In the meantime, please implement one of the workarounds provided above.
If you need further assistance implementing any of these workarounds, please don't hesitate to reach out.
In MerkeziSSO.AuthServer project's appsettings.json:
{
  "App": {
    "SelfUrl": "https://localhost:44387",
    "RedirectAllowedUrls": "https://localhost:44305,https://localhost:44308"  // Client and API URLs
  }
}
POST https://localhost:44387/connect/token
Content-Type: application/x-www-form-urlencoded

grant_type=authorization_code
client_id=TestClient_Swagger
client_secret=1q2w3E*
code=<authorization_code>
redirect_uri=https://localhost:44308/swagger/oauth2-redirect.html

# OR for password grant (if enabled for testing)
grant_type=password
client_id=TestClient_Swagger
client_secret=1q2w3E*
username=admin
password=1q2w3E*
scope=openid profile email roles MerkeziSSO TestClient offline_access
CRITICAL: The scope parameter MUST include TestClient (your API resource scope).
POST https://localhost:44308/api/identity/users
Authorization: Bearer <access_token>
Content-Type: application/json

{
  "userName": "testuser",
  "name": "Test",
  "surname": "User",
  "email": "test@test.com",
  "password": "1q2w3E*",
  "roleNames": ["admin"]
}
Decode your JWT token at jwt.io and verify:
TestClientTestClientExample token payload:
{
  "iss": "https://localhost:44387",
  "aud": ["TestClient", "MerkeziSSO"],
  "sub": "39f69c84-2862-bcba-ca19-3a0dbbbfe559",
  "email": "admin@abp.io",
  "role": "admin",
  "scope": ["openid", "profile", "email", "roles", "TestClient", "MerkeziSSO", "offline_access"],
  "permission": ["AbpIdentity.Users", "AbpIdentity.Users.Create"],  // If using Solution C
  "exp": 1729565400,
  "iat": 1729561800
}
Cause: The requested scope doesn't exist in OpenIddict scopes. Solution: Ensure "TestClient" scope is created and the client has permission to request it.
Cause: Token validation failed - audience mismatch or wrong authority.
Solution: Verify Audience in API appsettings matches the scope name, and Authority points to SSO.
Cause: User authenticated but lacks permissions. Solutions:
Cause: Different StringEncryption:DefaultPassPhrase across applications.
Solution: Copy the exact passphrase from SSO to all applications.
The 403 Forbidden error specifically requires addressing the permission storage issue using one of the three solutions provided above.
You want to use a central ABP Auth Server (SSO solution) and configure another project's API Host (ReactAppService) to obtain and validate tokens from this central Auth Server. The user is experiencing a 403 Forbidden error when calling API endpoints even though authentication (401) is passing.
Based on the ABP source code and the ticket conversation, there are several configuration requirements that must be met:
The fact that you're getting 403 means the token is being accepted, but the user lacks the necessary permissions in the API application's database.
When you use a separate database for your API application, ABP's permission system cannot find the user's permissions because:
IPermissionChecker queries the local databaseIn your MerkeziSSO (Central SSO) solution's OpenIddictDataSeedContributor.cs:
public class OpenIddictDataSeedContributor : IDataSeedContributor, ITransientDependency
{
    // ... other code ...

    public async Task SeedAsync(DataSeedContext context)
    {
        await CreateApiScopesAsync();
        await CreateClientsAsync();
    }

    private async Task CreateApiScopesAsync()
    {
        // Create a scope for your API application
        await CreateScopesAsync(new OpenIddictScopeDescriptor
        {
            Name = "TestClient",  // This is your API resource scope
            DisplayName = "Test Client API",
            Description = "Test Client API Scope",
            Resources =
            {
                "TestClient"  // API resource name
            }
        });

        // Standard OpenID scopes (usually already exist)
        await CreateScopesAsync(new OpenIddictScopeDescriptor
        {
            Name = OpenIddictConstants.Scopes.Email,
            DisplayName = "Email",
            Resources = { }
        });

        await CreateScopesAsync(new OpenIddictScopeDescriptor
        {
            Name = OpenIddictConstants.Scopes.Profile,
            DisplayName = "Profile",
            Resources = { }
        });

        await CreateScopesAsync(new OpenIddictScopeDescriptor
        {
            Name = OpenIddictConstants.Scopes.Roles,
            DisplayName = "Roles",
            Resources = { }
        });

        // MerkeziSSO scope (for accessing SSO's own APIs)
        await CreateScopesAsync(new OpenIddictScopeDescriptor
        {
            Name = "MerkeziSSO",
            DisplayName = "Merkezi SSO API",
            Resources =
            {
                "MerkeziSSO"
            }
        });
    }

    private async Task CreateClientsAsync()
    {
        var commonScopes = new List<string>
        {
            OpenIddictConstants.Permissions.Scopes.Email,
            OpenIddictConstants.Permissions.Scopes.Profile,
            OpenIddictConstants.Permissions.Scopes.Roles,
            OpenIddictConstants.Permissions.Prefixes.Scope + "MerkeziSSO",
            OpenIddictConstants.Permissions.Prefixes.Scope + "TestClient",  // Important!
            OpenIddictConstants.Permissions.Scopes.OfflineAccess
        };

        // Client for your Blazor/React App
        await CreateOrUpdateApplicationAsync(
            applicationType: OpenIddictConstants.ApplicationTypes.Web,
            name: "TestClient_App",
            type: OpenIddictConstants.ClientTypes.Confidential,
            consentType: OpenIddictConstants.ConsentTypes.Implicit,
            displayName: "Test Client Application",
            secret: Configuration["TestClient_App:ClientSecret"] ?? "1q2w3E*",
            grantTypes: new List<string>
            {
                OpenIddictConstants.GrantTypes.AuthorizationCode,
                OpenIddictConstants.GrantTypes.RefreshToken
            },
            scopes: commonScopes,
            redirectUris: new List<string>
            {
                "https://localhost:44305/signin-oidc",  // Your Blazor app URL
                "https://localhost:44305"
            },
            postLogoutRedirectUris: new List<string>
            {
                "https://localhost:44305/signout-callback-oidc",
                "https://localhost:44305"
            },
            clientUri: "https://localhost:44305"
        );

        // Swagger client for API testing
        await CreateOrUpdateApplicationAsync(
            applicationType: OpenIddictConstants.ApplicationTypes.Web,
            name: "TestClient_Swagger",
            type: OpenIddictConstants.ClientTypes.Confidential,
            consentType: OpenIddictConstants.ConsentTypes.Implicit,
            displayName: "Test Client Swagger",
            secret: Configuration["TestClient_Swagger:ClientSecret"] ?? "1q2w3E*",
            grantTypes: new List<string>
            {
                OpenIddictConstants.GrantTypes.AuthorizationCode
            },
            scopes: commonScopes,
            redirectUris: new List<string>
            {
                "https://localhost:44308/swagger/oauth2-redirect.html"  // Your API Host URL
            },
            clientUri: "https://localhost:44308"
        );
    }
}
TestClient.HttpApi.Host)appsettings.json{
"App": {
"SelfUrl": "https://localhost:44308",
"CorsOrigins": "https://*.TestClient.com,https://localhost:44305,https://localhost:44387"
},
"ConnectionStrings": {
"Default": "Server=(LocalDb)\\MSSQLLocalDB;Database=TestClient;Trusted_Connection=True;TrustServerCertificate=True"
},
"AuthServer": {
"Authority": "https://localhost:44387", // Your MerkeziSSO Auth Server URL
"RequireHttpsMetadata": true,
"Audience": "TestClient", // Must match API resource/scope name
"SwaggerClientId": "TestClient_Swagger",
"SwaggerClientSecret": "1q2w3E*"
},
"StringEncryption": {
"DefaultPassPhrase": "SAME_AS_SSO_PASSPHRASE" // CRITICAL: Must match SSO exactly!
},
"Redis": {
"Configuration": "127.0.0.1"
}
}
Ensure your TestClientHttpApiHostModule.cs is configured properly:
private void ConfigureAuthentication(ServiceConfigurationContext context, IConfiguration configuration)
{
    context.Services.AddAuthentication(JwtBearerDefaults.AuthenticationScheme)
        .AddAbpJwtBearer(options =>
        {
            options.Authority = configuration["AuthServer:Authority"];
            options.RequireHttpsMetadata = configuration.GetValue<bool>("AuthServer:RequireHttpsMetadata");
            options.Audience = configuration["AuthServer:Audience"] ?? "TestClient";

            // Token validation parameters
            options.TokenValidationParameters = new TokenValidationParameters
            {
                ValidateIssuerSigningKey = true,
                ValidateIssuer = true,
                ValidateAudience = true,
                ValidateLifetime = true,
                ValidAudiences = new[] { "TestClient" },
                ClockSkew = TimeSpan.Zero
            };
        });
}

private void ConfigureSwagger(ServiceConfigurationContext context, IConfiguration configuration)
{
    context.Services.AddAbpSwaggerGenWithOAuth(
        configuration["AuthServer:Authority"],
        new Dictionary<string, string>
        {
            {"TestClient", "TestClient API"}  // API scope
        },
        options =>
        {
            options.SwaggerDoc("v1", new OpenApiInfo { Title = "TestClient API", Version = "v1" });
            options.DocInclusionPredicate((docName, description) => true);
            options.CustomSchemaIds(type => type.FullName);
        });
}
appsettings.json (Blazor){
"App": {
"SelfUrl": "https://localhost:44305"
},
"AuthServer": {
"Authority": "https://localhost:44387", // Your MerkeziSSO Auth Server
"ClientId": "TestClient_App",
"ClientSecret": "1q2w3E*",
"RequireHttpsMetadata": true,
"ResponseType": "code",
"Scope": "openid profile email phone roles MerkeziSSO TestClient offline_access" // Include TestClient scope!
},
"RemoteServices": {
"Default": {
"BaseUrl": "https://localhost:44308/" // Your API Host URL
}
},
"StringEncryption": {
"DefaultPassPhrase": "SAME_AS_SSO_PASSPHRASE" // CRITICAL: Must match SSO exactly!
}
}
private void ConfigureAuthentication(ServiceConfigurationContext context, IConfiguration configuration)
{
    context.Services.AddAuthentication(options =>
        {
            options.DefaultScheme = "Cookies";
            options.DefaultChallengeScheme = "oidc";
        })
        .AddCookie("Cookies", options =>
        {
            options.ExpireTimeSpan = TimeSpan.FromDays(365);
            options.CheckTokenExpiration();
        })
        .AddAbpOpenIdConnect("oidc", options =>
        {
            options.Authority = configuration["AuthServer:Authority"];
            options.RequireHttpsMetadata = configuration.GetValue<bool>("AuthServer:RequireHttpsMetadata");
            options.ResponseType = OpenIdConnectResponseType.Code;  // Authorization Code flow

            options.ClientId = configuration["AuthServer:ClientId"];
            options.ClientSecret = configuration["AuthServer:ClientSecret"];

            options.UsePkce = true;
            options.SaveTokens = true;
            options.GetClaimsFromUserInfoEndpoint = true;

            // Add required scopes
            options.Scope.Clear();
            options.Scope.Add("openid");
            options.Scope.Add("profile");
            options.Scope.Add("email");
            options.Scope.Add("roles");
            options.Scope.Add("MerkeziSSO");  // SSO API scope
            options.Scope.Add("TestClient");  // Your API scope - CRITICAL!
            options.Scope.Add("offline_access");
        });
}
The 403 error occurs because permissions are stored in the database, and your API application uses a different database than the SSO server. There are three solutions:
Configure both MerkeziSSO and TestClient.HttpApi.Host to use the same database connection string:
"ConnectionStrings": {
  "Default": "Server=(LocalDb)\\MSSQLLocalDB;Database=MerkeziSSO;Trusted_Connection=True;TrustServerCertificate=True"
}
Pros:
Cons:
Create a data synchronization mechanism:
Example using ABP Distributed Events:
// In MerkeziSSO - Publish event when permissions change
public class PermissionChangeNotifier
{
    private readonly IDistributedEventBus _distributedEventBus;

    public PermissionChangeNotifier(IDistributedEventBus distributedEventBus)
    {
        _distributedEventBus = distributedEventBus;
    }

    public async Task NotifyPermissionChange(Guid userId, string[] permissions)
    {
        await _distributedEventBus.PublishAsync(new UserPermissionsChangedEto
        {
            UserId = userId,
            Permissions = permissions
        });
    }
}

// In TestClient - Handle event and update local database
public class UserPermissionsChangedEventHandler :
    IDistributedEventHandler<UserPermissionsChangedEto>,
    ITransientDependency
{
    private readonly IPermissionManager _permissionManager;

    public UserPermissionsChangedEventHandler(IPermissionManager permissionManager)
    {
        _permissionManager = permissionManager;
    }

    public async Task HandleEventAsync(UserPermissionsChangedEto eventData)
    {
        // Update permissions in local database
        foreach (var permission in eventData.Permissions)
        {
            await _permissionManager.SetForUserAsync(
                eventData.UserId,
                permission,
                true
            );
        }
    }
}
Modify the central auth server to include permissions as claims in the JWT token:
// In MerkeziSSO - Add custom claims contributor
public class PermissionClaimsPrincipalContributor : IAbpClaimsPrincipalContributor, ITransientDependency
{
    private readonly IPermissionManager _permissionManager;
    private readonly IPermissionDefinitionManager _permissionDefinitionManager;

    public PermissionClaimsPrincipalContributor(
        IPermissionManager permissionManager,
        IPermissionDefinitionManager permissionDefinitionManager)
    {
        _permissionManager = permissionManager;
        _permissionDefinitionManager = permissionDefinitionManager;
    }

    public async Task ContributeAsync(AbpClaimsPrincipalContributorContext context)
    {
        var identity = context.ClaimsPrincipal.Identities.FirstOrDefault();
        var userId = identity?.FindUserId();

        if (userId.HasValue)
        {
            // Get all permissions for user
            var permissions = await _permissionManager.GetAllForUserAsync(userId.Value);

            // Add permissions as claims
            foreach (var permission in permissions)
            {
                if (permission.IsGranted)
                {
                    identity.AddClaim(new Claim("permission", permission.Name));
                }
            }
        }
    }
}

// In TestClient API - Create custom permission value provider
public class ClaimPermissionValueProvider : PermissionValueProvider
{
    public ClaimPermissionValueProvider(IPermissionStore permissionStore)
        : base(permissionStore)
    {
    }

    public override string Name => "Claim";

    public override async Task<PermissionGrantResult> CheckAsync(PermissionValueCheckContext context)
    {
        var permissionClaims = context.Principal?
            .FindAll("permission")
            .Select(c => c.Value)
            .ToList();

        if (permissionClaims != null && permissionClaims.Contains(context.Permission.Name))
        {
            return PermissionGrantResult.Granted;
        }

        return PermissionGrantResult.Undefined;
    }
}

// Register the custom provider in TestClientHttpApiHostModule
public override void ConfigureServices(ServiceConfigurationContext context)
{
    // ... other configurations ...

    Configure<AbpPermissionOptions>(options =>
    {
        options.ValueProviders.Add<ClaimPermissionValueProvider>();
    });
}
Don't forget to configure OpenIddict to include the permission claims:
// In MerkeziSSO - Configure OpenIddict claims
Configure<AbpClaimsServiceOptions>(options =>
{
    options.RequestedClaims.AddRange(new[] { "permission" });
});
Hi!
I fixed your project and there is the take-aways:
Created 2 different client in the "MerkeziSSO" application's OpenIddictDataSeedContributor.cs file and added required parameters in appsettings.json file of MerkeziSSO.DbMigrator project.
Reorganized appsettings.json files of both projects TestClient.Blazor and TestClient.HttpApi.Host to use MerkeziSSO.AuthServer project.
MerkeziSSO scope instead TestClient scope in TestClient.Blazor and TestClient.HttpApi.Host projects.
I updated RedirectAllowedUrls section of MerkeziSSO.AuthServer project in their appsettings.json file to allow redirection to TestClient projects after authentication.
String Encryption PassPhrase was different for both projects since they're created separately. I set the exact same PassPhrase from MerkeziSSO.AuthServer for TestClient.Blazor and TestClient.HttpApi.Host projects to read token without any problem
⚠️ Make sure your Redis cache is completely cleaned and make sure your database is seeded from scratch (at least OpenId Applications table)
I've sent fixed version of your project to your email address, you can check it from there.
In your scenario, you cannot retrieve authenticated user information from the database since your TestClient.HttpApi.Host uses different database and the same user id doesn't exist that database, so CurrentUser will be always null unless you use the same database or duplicate users in to that new application's database. Or use HttpApi.Client packages of Account module insted direct using Application layer
Hi @rbautista,
Yes, this solution applies to Blazor but with some small changes. Support bot suggested you to download the source-code but your license is restricted to download the source-code. So I'll try to help you without downloading the source-code of the LeptonX Theme.
Here's how to achieve your custom layout (main menu, submenu, and page actions):
In your Blazor project, create Components/Layout/CustomApplicationLayout.razor:
@inherits LayoutComponentBase
@using Volo.Abp.AspNetCore.Components.Web.LeptonXTheme.Components.ApplicationLayout.Common
@using Volo.Abp.AspNetCore.Components.Web.Theming.Layout
@using YourProjectName.Blazor.Components.Layout

<div>
    <div id="lpx-wrapper" class="custom-layout">
        <MainHeader />

        <div class="lpx-content-container">
            <!-- GREEN AREA: Dynamic Submenu -->
            <CustomSubmenu />

            <!-- Breadcrumbs -->
            <div class="lpx-topbar-container">
                <div class="lpx-topbar">
                    <Breadcrumbs />
                </div>
            </div>

            <div class="lpx-content-wrapper">
                <div class="lpx-content">
                    <!-- BLUE AREA: Page Actions -->
                    <CustomPageActions />

                    @Body
                </div>
            </div>

            <footer><Footer /></footer>
        </div>

        <MobileNavbar />
    </div>
</div>
Components/Layout/CustomSubmenu.razor:
@using Volo.Abp.UI.Navigation
@inject IMenuManager MenuManager
@inject NavigationManager NavigationManager

@if (SubMenuItems.Any())
{
    <div class="custom-submenu">
        <ul class="submenu-list">
            @foreach (var item in SubMenuItems)
            {
                <li>
                    <a href="@item.Url" class="@GetActiveClass(item)">
                        @if (!string.IsNullOrEmpty(item.Icon))
                        {
                            <i class="@item.Icon"></i>
                        }
                        <span>@item.DisplayName</span>
                    </a>
                </li>
            }
        </ul>
    </div>
}

@code {
    protected List<ApplicationMenuItem> SubMenuItems { get; set; } = new();

    protected override async Task OnInitializedAsync()
    {
        await LoadSubMenuAsync();
        NavigationManager.LocationChanged += async (s, e) => await OnLocationChanged();
    }

    private async Task LoadSubMenuAsync()
    {
        var mainMenu = await MenuManager.GetMainMenuAsync();
        var currentUrl = NavigationManager.ToBaseRelativePath(NavigationManager.Uri);

        // Find active main menu and get its children
        var activeMainMenuItem = FindActiveMenuItem(mainMenu.Items, currentUrl);
        SubMenuItems = activeMainMenuItem?.Items.ToList() ?? new List<ApplicationMenuItem>();
    }

    private async Task OnLocationChanged()
    {
        await LoadSubMenuAsync();
        await InvokeAsync(StateHasChanged);
    }

    private ApplicationMenuItem FindActiveMenuItem(IList<ApplicationMenuItem> items, string currentUrl)
    {
        foreach (var item in items)
        {
            if (!string.IsNullOrEmpty(item.Url) && currentUrl.StartsWith(item.Url.TrimStart('/')))
                return item;

            if (item.Items.Any())
            {
                var child = FindActiveMenuItem(item.Items, currentUrl);
                if (child != null) return item;
            }
        }
        return null;
    }

    private string GetActiveClass(ApplicationMenuItem item)
    {
        var currentUrl = NavigationManager.ToBaseRelativePath(NavigationManager.Uri);
        return currentUrl.StartsWith(item.Url?.TrimStart('/') ?? "") ? "active" : "";
    }

    public void Dispose()
    {
        NavigationManager.LocationChanged -= async (s, e) => await OnLocationChanged();
    }
}
Components/Layout/CustomPageActions.razor:
@using Volo.Abp.AspNetCore.Components.Web.Theming.Layout
@inject PageLayout PageLayout

@if (!string.IsNullOrEmpty(PageLayout.Title) || ToolbarItemRenders.Any())
{
    <div class="custom-page-actions">
        <div class="page-title">
            <h1>@PageLayout.Title</h1>
        </div>
        <div class="page-actions">
            @foreach (var toolbarItem in ToolbarItemRenders)
            {
                @toolbarItem
            }
        </div>
    </div>
}

@code {
    protected List<RenderFragment> ToolbarItemRenders { get; } = new();

    protected override Task OnInitializedAsync()
    {
        PageLayout.ToolbarItems.CollectionChanged += async (s, e) => await RenderAsync();
        PageLayout.PropertyChanged += async (s, e) => await InvokeAsync(StateHasChanged);
        return base.OnInitializedAsync();
    }

    protected override async Task OnAfterRenderAsync(bool firstRender)
    {
        if (firstRender) await RenderAsync();
        await base.OnAfterRenderAsync(firstRender);
    }

    protected virtual async Task RenderAsync()
    {
        ToolbarItemRenders.Clear();
        foreach (var item in PageLayout.ToolbarItems)
        {
            var sequence = 0;
            ToolbarItemRenders.Add(builder =>
            {
                builder.OpenComponent(sequence, item.ComponentType);
                if (item.Arguments != null)
                {
                    foreach (var argument in item.Arguments)
                    {
                        sequence++;
                        builder.AddAttribute(sequence, argument.Key, argument.Value);
                    }
                }
                builder.CloseComponent();
            });
        }
        await InvokeAsync(StateHasChanged);
    }
}
In your module class (e.g., YourProjectBlazorModule.cs):
using Volo.Abp.AspNetCore.Components.Web.LeptonXTheme;
using YourProjectName.Blazor.Components.Layout;

public override void ConfigureServices(ServiceConfigurationContext context)
{
    Configure<LeptonXThemeBlazorOptions>(options =>
    {
        options.Layout = typeof(CustomApplicationLayout);
    });
}
In your MenuContributor:
private Task ConfigureMainMenuAsync(MenuConfigurationContext context)
{
    // RED AREA: Main menu item
    var products = new ApplicationMenuItem(
        "Products",
        "Products",
        icon: "fas fa-box"
    );

    // GREEN AREA: Submenu items (will appear when Products is active)
    products.AddItem(new ApplicationMenuItem(
        "Products.List",
        "Product List",
        url: "/products",
        icon: "fas fa-list"
    ));

    products.AddItem(new ApplicationMenuItem(
        "Products.Categories",
        "Categories",
        url: "/products/categories",
        icon: "fas fa-tags"
    ));

    context.Menu.AddItem(products);
    return Task.CompletedTask;
}
In your page component (e.g., Products/Index.razor.cs):
public partial class Index
{
    [Inject]
    protected PageLayout PageLayout { get; set; }

    protected override async Task OnInitializedAsync()
    {
        PageLayout.Title = "Products";

        // BLUE AREA: Add action buttons
        PageLayout.ToolbarItems.Add(new PageToolbarItem(typeof(CreateProductButton)));
        PageLayout.ToolbarItems.Add(new PageToolbarItem(typeof(ExportButton)));

        await base.OnInitializedAsync();
    }
}
Add this to your wwwroot/global-styles.css:
.custom-submenu {
    background-color: #f8f9fa;
    border-bottom: 1px solid #dee2e6;
    padding: 0.5rem 1rem;
}

.submenu-list {
    display: flex;
    list-style: none;
    margin: 0;
    padding: 0;
    gap: 0.5rem;
}

.submenu-list a {
    padding: 0.5rem 1rem;
    color: [#495057](https://abp.io/QA/Questions/495057);
    text-decoration: none;
    border-radius: 0.25rem;
}

.submenu-list a.active {
    background-color: #007bff;
    color: white;
}

.custom-page-actions {
    display: flex;
    justify-content: space-between;
    align-items: center;
    padding: 1rem 0;
    border-bottom: 2px solid #007bff;
    margin-bottom: 1rem;
}

.page-actions {
    display: flex;
    gap: 0.5rem;
}
I've created a complete example project structure showing all three areas (red, green, blue) you requested. Let me know if you need clarification on any part
Hello
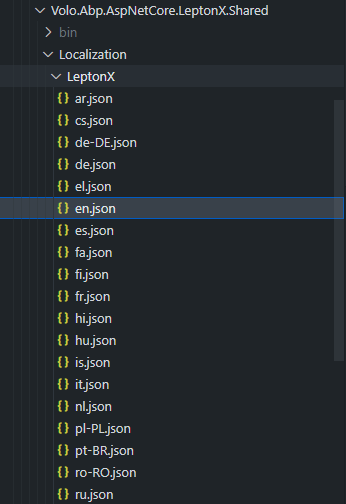
Interesting that the LeptonX resource appered, but the texts for base english culture does not.
I checked LeptonX source code and it has only 1 resource for generic English (en) and there is no separation for en-GB.
If your preferred default English is en-GB that might be the issue currently you face:
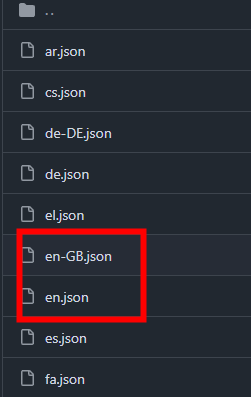
I'll check the same scenario as you mentioned and fix if it's a bug
Hi,
It depends on a couple of different cases:
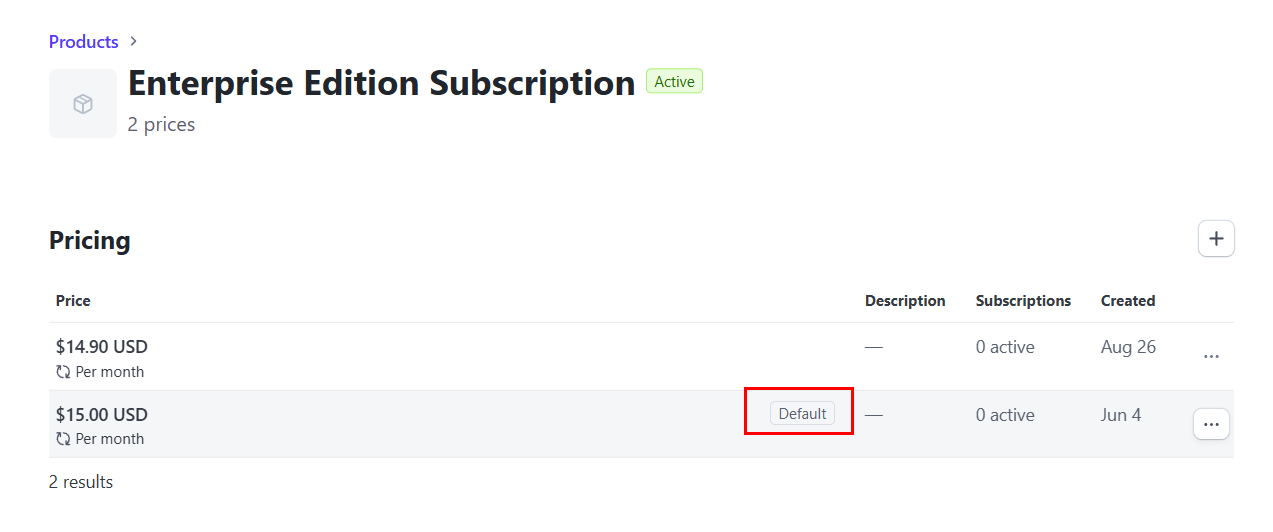
If still doesn't help, you can use directly price ID that starts with price_xx
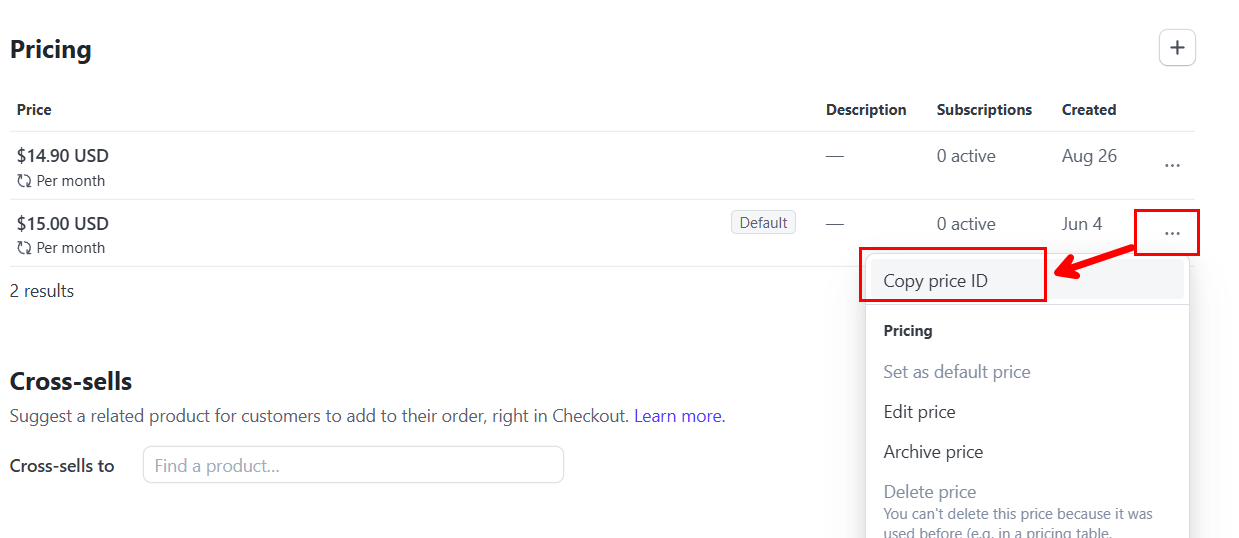
Both product and price id works as ExternalId in payment module.
My suggestion, you can directly try copying price id and using it, if it doesn't work please let us know.
Stripe or any other 3rd party service UIs are changing constanly, so we cannot mantain screenshots in our documentation, but here is the latest dashboard design of Stripe that I shared in this post
Short answer: Login is controlled by tenant activation state, not by subscription/edition expiry. Keep the tenant ActivationState as Active and do not use ActivationEndDate for subscription purposes. Subscription expiry is tracked with EditionEndDateUtc, which disables edition-based features but does not block login.
public virtual Task<bool> IsActiveAsync(Tenant tenant)
{
    return Task.FromResult(tenant.ActivationState switch
    {
        TenantActivationState.Active => true,
        TenantActivationState.Passive => false,
        TenantActivationState.ActiveWithLimitedTime => tenant.ActivationEndDate >= Clock.Now,
        _ => false
    });
}
This value is used when populating TenantConfiguration.IsActive in the TenantStore, which in turn controls tenant availability for login resolution.
tenant.EditionEndDateUtc = eventData.PeriodEndDate;
tenant.EditionId = Guid.Parse(eventData.ExtraProperties[EditionConsts.EditionIdParameterName]?.ToString());
if (tenant.EditionEndDateUtc <= DateTime.UtcNow)
{
    tenant.EditionId = null;
}
var tenant = await tenantRepository.FindAsync(currentTenant.Id.Value);
if (tenant?.GetActiveEditionId() != null)
{
    identity.AddOrReplace(new Claim(AbpClaimTypes.EditionId, tenant.GetActiveEditionId().ToString()));
}
public virtual Guid? GetActiveEditionId()
{
    if (!EditionEndDateUtc.HasValue)
    {
        return EditionId;
    }
    if (EditionEndDateUtc >= DateTime.UtcNow)
    {
        return EditionId;
    }
    return null;
}
To allow login after subscription ends: Leave the tenant ActivationState as Active (or avoid using ActiveWithLimitedTime/ActivationEndDate for subscription timing). Let the subscription simply expire via EditionEndDateUtc. Users can still log in but won’t have the edition claim/benefits until renewal.
To guide users to renew after login: Add a small middleware/authorization handler that checks GetActiveEditionId() (or the presence of the edition claim) and redirects to a renewal page when it is null.
Only if you must allow login for expired ActivationEndDate: Either set the tenant back to Active or customize the activation evaluation (advanced: replace TenantManager.IsActiveAsync logic), but this is discouraged for subscription logic. Prefer keeping activation for administrative suspension only.
ActivationEndDate for subscriptions. Using EditionEndDateUtc already allows login after expiry and prevents edition features until payment is renewed.Hi @MartinEhv
Here is my findings for your questions below;
Volo.CmsKit.Pro.Admin.Blazor.CmsKitContentWidgetOptions. By default, only Poll is registered for the Blazor admin editor. MVC/Common registers more widgets by default for the MVC pipeline.Volo.CmsKit.Pro.Admin.Blazor (plus its dependencies). It contributes CMS pages like Pages, Blogs, Polls, etc.GlobalFeatureConfigurator:// Domain.Shared
public static class GlobalFeatureConfigurator
{
public static void Configure()
{
GlobalFeatureManager.Instance.Modules.CmsKitPro(cmsKitPro =>
{
cmsKitPro.Contact.Enable();
cmsKitPro.Newsletters.Enable();
cmsKitPro.PollsFeature.Enable();
cmsKitPro.UrlShortingFeature.Enable();
cmsKitPro.PageFeedbackFeature.Enable();
cmsKitPro.FaqFeature.Enable();
});
}
}
[RequiresFeature(CmsKitProFeatures.PollEnable)]
[RequiresGlobalFeature(typeof(PollsFeature))]
Create and run database migrations after enabling features. This is important to ensure the database schema is updated to support the new features.
There are two distinct concepts often called “widgets” in CMS Kit Pro:
[Widget Type="..."]) used by the content editor and content renderer.In Blazor Admin, the markdown editor’s widget list comes from CmsKitContentWidgetOptions. By default, the Blazor Admin module only registers the Poll widget:
Configure<CmsKitContentWidgetOptions>(options =>
{
    options.AddWidget(null, "Poll", "CmsPollByCode", "CmsPolls", parameterWidgetType: typeof(PollsComponent));
});
In contrast, the MVC/Common web module registers multiple widgets for the MVC rendering pipeline (FAQ, Poll, PageFeedback, …):
Configure<CmsKitContentWidgetOptions>(options =>
{
    options.AddWidget("Faq", "CmsFaq", "CmsFaqOptions");
    options.AddWidget("Poll", "CmsPollByCode", "CmsPolls");
    options.AddWidget("PageFeedback", "CmsPageFeedback", "CmsPageFeedbacks");
    options.AddWidget("PageFeedbackModal", "CmsPageFeedbackModal", "CmsPageFeedbackModals");
});
That is why in an MVC admin/public you see more widget types by default, while the Blazor Admin editor shows only Poll unless you add more.
To add more content widgets to the Blazor Admin editor, register them in your app’s module:
// In your Blazor Admin AppModule.ConfigureServices
Configure<CmsKitContentWidgetOptions>(options =>
{
    // Renders a Blazor component for a CMS widget type
    options.AddWidget<MyFaqDisplayComponent>(
        widgetType: "Faq",
        widgetName: "CmsFaq",
        parameterWidgetName: "CmsFaqOptions" // optional editor parameter UI
    );

    options.AddWidget<MyPageFeedbackDisplayComponent>(
        widgetType: "PageFeedback",
        widgetName: "CmsPageFeedback",
        parameterWidgetName: "CmsPageFeedbacks"
    );
});
Notes:
widgetType is the value used inside [Widget Type="..."] tags.ComponentBase that can render the widget at preview/runtime.parameterWidgetName and optionally a parameterWidgetType component (see how Polls uses PollsComponent).The editor then inserts tokens like [Widget Type="CmsFaq" ...] into content. The Blazor Admin preview renders with ContentRender, which uses a render context to compose a ContentFragmentComponent from the fragments:
public virtual async Task<string> RenderAsync(string content)
{
    var contentDto = new DefaultContentDto { ContentFragments = await ContentParser.ParseAsync(content) };
    var contentFragment = RenderContext.RenderComponent<ContentFragmentComponent>(
        parameters => parameters.Add(p => p.ContentDto, contentDto));

    return contentFragment.Markup;
}
If your public site is also Blazor, you must similarly ensure your public app knows how to render these widget types (map them via CmsKitContentWidgetOptions and provide the corresponding components).
This dropdown is fed by CmsKitPollingOptions.WidgetNames and returned by GetWidgetsAsync() in the admin app service:
public Task<ListResultDto<PollWidgetDto>> GetWidgetsAsync()
{
    return Task.FromResult(new ListResultDto<PollWidgetDto>()
    {
        Items = _cmsKitPollingOptions.WidgetNames
            .Select(n => new PollWidgetDto { Name = n }).ToList()
    });
}
And the options type is:
public class CmsKitPollingOptions
{
    public List<string> WidgetNames { get; set; } = new();
    public void AddWidget(string name) { /* adds unique names */ }
}
So in your startup, configure named placements you want to appear in the Poll editor’s Widget dropdown:
Configure<CmsKitPollingOptions>(options =>
{
    options.AddWidget("Default");
    options.AddWidget("Sidebar");
    options.AddWidget("HomepageHero");
});
This is separate from content widgets. One is a Poll’s “placement name”, the other is the markdown‐embedded content widget system.
CmsKitProCommonWebModule.CmsKitContentWidgetOptions in the public app so that content rendering recognizes [Widget Type="..."] tokens at runtime.CmsKitPollingOptions names configured.CmsKitContentWidgetOptions registrations in the Blazor Admin app.CmsKitProFeatures.* are enabled (Feature Management and global features).Volo.CmsKit.Pro.Admin.Blazor and your public site references either Volo.CmsKit.Pro.Common.Web (MVC) or you have equivalent Blazor registrations.Configure<CmsKitContentWidgetOptions>(options =>
{
options.AddWidget(null, "Poll", "CmsPollByCode", "CmsPolls", parameterWidgetType: typeof(PollsComponent));
});
Configure<CmsKitContentWidgetOptions>(options =>
{
    options.AddWidget("Faq", "CmsFaq", "CmsFaqOptions");
    options.AddWidget("Poll", "CmsPollByCode", "CmsPolls");
    options.AddWidget("PageFeedback", "CmsPageFeedback", "CmsPageFeedbacks");
    options.AddWidget("PageFeedbackModal", "CmsPageFeedbackModal", "CmsPageFeedbackModals");
});
CmsKitPollingOptions/GetWidgetsAsync:public Task<ListResultDto<PollWidgetDto>> GetWidgetsAsync() { ... }
[RequiresFeature(CmsKitProFeatures.PollEnable)]
[RequiresGlobalFeature(typeof(PollsFeature))]
ITenantAppService) is host‑only and protected by SaasHostPermissions.Tenants.*.SubscriptionAppService.CreateSubscriptionAsync(Guid editionId, Guid tenantId)), which creates a PaymentRequest with required extra properties:
EditionConsts.EditionIdParameterNameTenantConsts.TenantIdParameterNameSubscriptionCreatedHandler sets tenant.EditionId and tenant.EditionEndDateUtc.SubscriptionUpdatedHandler refreshes tenant.EditionEndDateUtc and optionally tenant.EditionId.Relevant code in this repository:
SaaS tenant creation (host‑only app service): src/Volo.Saas.Host.Application/Volo/Saas/Host/TenantAppService.cssrc/Volo.Saas.Host.Application/Volo/Saas/Subscription/SubscriptionAppService.csabp/payment/src/Volo.Payment.Domain/Volo/Payment/...src/Volo.Saas.Domain/Volo/Payment/Subscription/SubscriptionCreatedHandler.cs, SubscriptionUpdatedHandler.csIf you call TenantAppService.CreateAsync from a public page, you’ll get AbpAuthorizationException because it is decorated with [Authorize(SaasHostPermissions.Tenants.Default)] and intended for host administrators.
Create a dedicated, public endpoint that:
ITenantManager + ITenantRepository) and publishes TenantCreatedEto (to seed the admin user, etc.),SubscriptionAppService.CreateSubscriptionAsync(editionId, tenantId),This avoids host‑only permissions while keeping the standard cross‑module behaviors (user seeding and subscription updates) intact.
using System;
using System.Threading.Tasks;
using Microsoft.AspNetCore.Authorization;
using Volo.Abp;
using Volo.Abp.EventBus.Distributed;
using Volo.Saas.Tenants;
using Volo.Saas.Host.Dtos; // for consistency if you reuse DTOs
using Volo.Saas.Host.Application.Volo.Saas.Subscription; // ISubscriptionAppService

[AllowAnonymous]
public class PublicTenantRegistrationAppService : MyAppAppService
{
    private readonly ITenantManager _tenantManager;
    private readonly ITenantRepository _tenantRepository;
    private readonly IDistributedEventBus _eventBus;
    private readonly ISubscriptionAppService _subscriptionAppService;

    public PublicTenantRegistrationAppService(
        ITenantManager tenantManager,
        ITenantRepository tenantRepository,
        IDistributedEventBus eventBus,
        ISubscriptionAppService subscriptionAppService)
    {
        _tenantManager = tenantManager;
        _tenantRepository = tenantRepository;
        _eventBus = eventBus;
        _subscriptionAppService = subscriptionAppService;
    }

    public async Task<StartSubscriptionResultDto> RegisterAndSubscribeAsync(RegisterTenantInput input)
    {
        // 1) Create tenant via domain layer (no host permission needed)
        var tenant = await _tenantManager.CreateAsync(input.TenantName, editionId: input.EditionId);

        tenant.SetActivationState(TenantActivationState.Passive); // keep passive until payment succeeds
        await _tenantRepository.InsertAsync(tenant, autoSave: true);

        // 2) Publish TenantCreatedEto to seed admin user (same as TenantAppService does)
        await _eventBus.PublishAsync(new TenantCreatedEto
        {
            Id = tenant.Id,
            Name = tenant.Name,
            Properties =
            {
                {"AdminEmail", input.AdminEmail},
                {"AdminPassword", input.AdminPassword}
            }
        });

        // 3) Start subscription (creates PaymentRequest with TenantId/EditionId extra props)
        var paymentRequest = await _subscriptionAppService.CreateSubscriptionAsync(input.EditionId, tenant.Id);

        return new StartSubscriptionResultDto
        {
            TenantId = tenant.Id,
            PaymentRequestId = paymentRequest.Id,
            // redirect URL depends on your payment gateway UI
        };
    }
}

public class RegisterTenantInput
{
    public string TenantName { get; set; }
    public Guid EditionId { get; set; }
    public string AdminEmail { get; set; }
    public string AdminPassword { get; set; }
}

public class StartSubscriptionResultDto
{
    public Guid TenantId { get; set; }
    public Guid PaymentRequestId { get; set; }
}
SubscriptionCreatedHandler and SubscriptionUpdatedHandler update edition and end date. If you also want to flip activation state on initial payment, add a small handler:
using System;
using System.Threading.Tasks;
using Volo.Abp.DependencyInjection;
using Volo.Abp.EventBus.Distributed;
using Volo.Payment.Subscription;
using Volo.Saas.Tenants;

public class ActivateTenantOnPaidHandler : IDistributedEventHandler<SubscriptionCreatedEto>, ITransientDependency
{
    private readonly ITenantRepository _tenantRepository;

    public ActivateTenantOnPaidHandler(ITenantRepository tenantRepository)
    {
        _tenantRepository = tenantRepository;
    }

    public async Task HandleEventAsync(SubscriptionCreatedEto eventData)
    {
        var tenantId = Guid.Parse(eventData.ExtraProperties[TenantConsts.TenantIdParameterName]?.ToString());
        var tenant = await _tenantRepository.FindAsync(tenantId);
        if (tenant == null) return;

        tenant.SetActivationState(TenantActivationState.Active);
        await _tenantRepository.UpdateAsync(tenant);
    }
}
using System.Threading.Tasks;
using Microsoft.AspNetCore.Http;
using Volo.Abp.MultiTenancy;

public class TenantRequiredMiddleware
{
    private readonly RequestDelegate _next;
    public TenantRequiredMiddleware(RequestDelegate next) => _next = next;

    public async Task InvokeAsync(HttpContext context, ICurrentTenant currentTenant)
    {
        var path = context.Request.Path.Value ?? string.Empty;
        if (path.StartsWith("/Account", StringComparison.OrdinalIgnoreCase) ||
            path.StartsWith("/Public", StringComparison.OrdinalIgnoreCase))
        {
            await _next(context);
            return;
        }

        if (!currentTenant.IsAvailable)
        {
            context.Response.Redirect("/Account/Login");
            return;
        }

        await _next(context);
    }
}
Also consider the domain/subdomain tenant resolver to route tenants to their own subdomains.
TenantAppService.CreateAsync is host‑only. Use domain + repository + event bus in a public endpoint to avoid authorization errors.SubscriptionAppService.CreateSubscriptionAsync must be invoked in host context with a valid tenantId. It automatically emits a PaymentRequest with PaymentType.Subscription and a product PlanId.EditionId and subscription periods. If you need custom onboarding (e.g., activation), add your own distributed event handler.[AllowAnonymous] but aggressively validate inputs and throttle to prevent abuse.


