


Hello. How can I customize my application's layout?
I want a layout like the following:
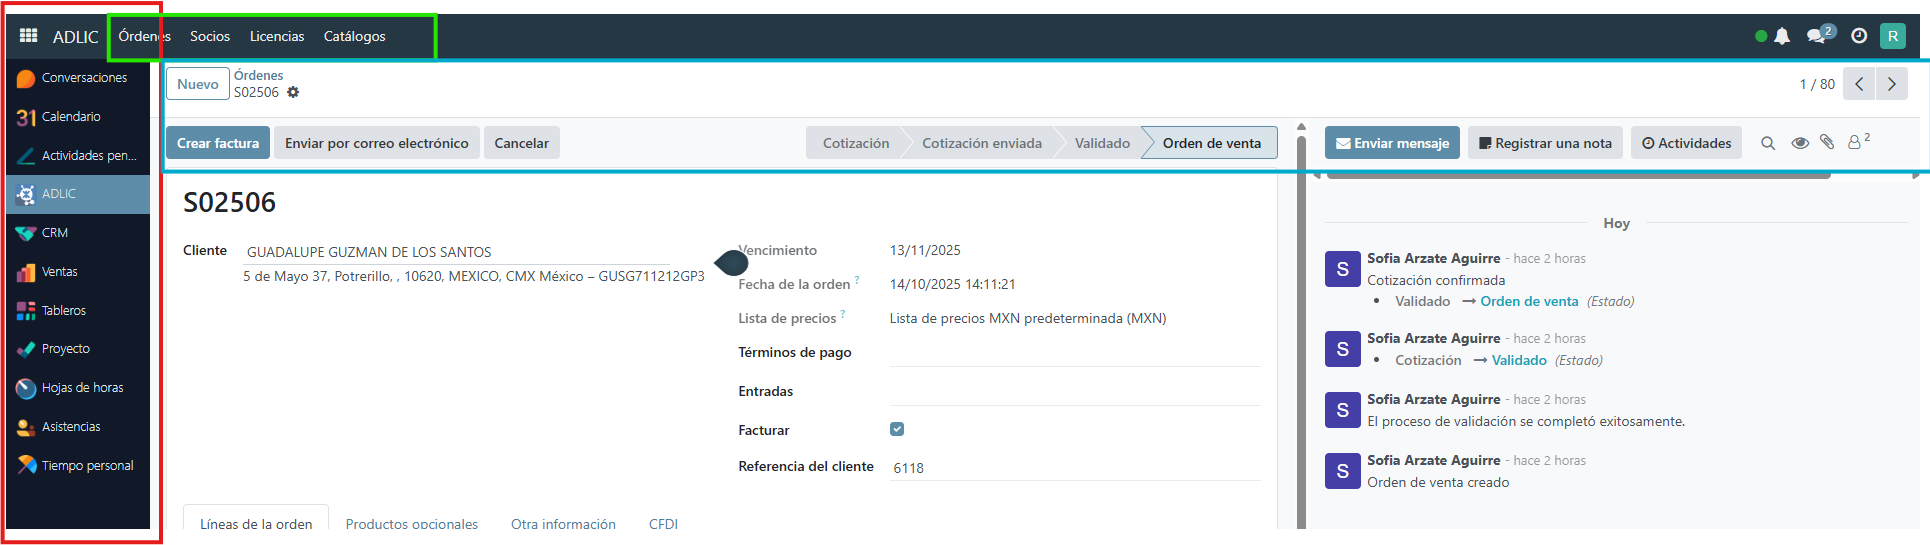
In red, the main menu. In green, a submenu based on the selected main menu item. In blue, the actions that can be executed on the currently displayed page. Alternatively, is it possible for each page associated with the main menu to be displayed in a new folder, allowing for multiple folders in the application?
8 Answer(s)
-
0
To achieve a layout similar to your screenshot (main menu on the left, submenu on top, and page actions), you need to customize your ABP application's layout. This is possible and supported, especially if you are using a theme like LeptonX.
Here’s how you can proceed:
- Download the LeptonX Theme Source Code (if using LeptonX):
- Use the ABP CLI to get the source:
abp get-source Volo.Abp.LeptonXTheme- This will give you access to all layout files.
- Locate and Copy the Layout File:
- Layout files are in:
lepton\aspnet-core\volo\src\Volo.Abp.AspNetCore.Mvc.UI.Theme.LeptonX\Themes\LeptonX\Layouts- For a side menu with a top submenu, you’ll likely want to start with
SideMenuLayout.cshtmlorTopMenuLayout.cshtml(depending on your base).
- Override the Layout in Your Project:
- Copy the desired layout file into your own project, preserving the folder structure:
/Themes/LeptonX/Layouts/Application/SideMenuLayout.cshtml- Modify this file to add a submenu (green area) and actions (blue area) as needed.
Implement Submenu and Actions:
- In your custom layout, add logic to render a submenu based on the selected main menu item.
- You can use ABP’s menu system to define main and submenus, and render them accordingly.
- For actions, you can define a section or component that displays context-specific actions for the current page.
Optional: Organize Pages in Folders
- You can organize your Razor Pages or MVC Views in folders corresponding to each main menu item.
- Each folder can have its own set of pages and even its own layout if needed by setting the
Layoutproperty at the top of the Razor file:
@{ Layout = "/Themes/LeptonX/Layouts/MyCustomLayout.cshtml"; }- Example Reference
- See the official documentation and a step-by-step guide for overriding layouts:
By following these steps, you can fully customize your application's layout to match your requirements, including main menu, submenu, and page actions.
Sources:
- https://abp.io/support/questions/8873
- https://abp.io/docs/latest/ui-themes/lepton-x/mvc
This response was generated by AI. If it didn’t solve your problem, feel free to post a new answer — our support team will jump in to help you soon.
- Download the LeptonX Theme Source Code (if using LeptonX):
-
0
ok. Una aclaración. Como frontend estamos usando la plantilla Blazor. La respuesta anterior aplica en este caso?
-
0
Hi @rbautista,
Yes, this solution applies to Blazor but with some small changes. Support bot suggested you to download the source-code but your license is restricted to download the source-code. So I'll try to help you without downloading the source-code of the LeptonX Theme.
Quick Solution for Blazor
Here's how to achieve your custom layout (main menu, submenu, and page actions):
Step 1: Create Your Custom Layout Component
In your Blazor project, create
Components/Layout/CustomApplicationLayout.razor:@inherits LayoutComponentBase @using Volo.Abp.AspNetCore.Components.Web.LeptonXTheme.Components.ApplicationLayout.Common @using Volo.Abp.AspNetCore.Components.Web.Theming.Layout @using YourProjectName.Blazor.Components.Layout <div> <div id="lpx-wrapper" class="custom-layout"> <MainHeader /> <div class="lpx-content-container"> <!-- GREEN AREA: Dynamic Submenu --> <CustomSubmenu /> <!-- Breadcrumbs --> <div class="lpx-topbar-container"> <div class="lpx-topbar"> <Breadcrumbs /> </div> </div> <div class="lpx-content-wrapper"> <div class="lpx-content"> <!-- BLUE AREA: Page Actions --> <CustomPageActions /> @Body </div> </div> <footer><Footer /></footer> </div> <MobileNavbar /> </div> </div>Step 2: Create the Submenu Component (Green Area)
Components/Layout/CustomSubmenu.razor:@using Volo.Abp.UI.Navigation @inject IMenuManager MenuManager @inject NavigationManager NavigationManager @if (SubMenuItems.Any()) { <div class="custom-submenu"> <ul class="submenu-list"> @foreach (var item in SubMenuItems) { <li> <a href="@item.Url" class="@GetActiveClass(item)"> @if (!string.IsNullOrEmpty(item.Icon)) { <i class="@item.Icon"></i> } <span>@item.DisplayName</span> </a> </li> } </ul> </div> } @code { protected List<ApplicationMenuItem> SubMenuItems { get; set; } = new(); protected override async Task OnInitializedAsync() { await LoadSubMenuAsync(); NavigationManager.LocationChanged += async (s, e) => await OnLocationChanged(); } private async Task LoadSubMenuAsync() { var mainMenu = await MenuManager.GetMainMenuAsync(); var currentUrl = NavigationManager.ToBaseRelativePath(NavigationManager.Uri); // Find active main menu and get its children var activeMainMenuItem = FindActiveMenuItem(mainMenu.Items, currentUrl); SubMenuItems = activeMainMenuItem?.Items.ToList() ?? new List<ApplicationMenuItem>(); } private async Task OnLocationChanged() { await LoadSubMenuAsync(); await InvokeAsync(StateHasChanged); } private ApplicationMenuItem FindActiveMenuItem(IList<ApplicationMenuItem> items, string currentUrl) { foreach (var item in items) { if (!string.IsNullOrEmpty(item.Url) && currentUrl.StartsWith(item.Url.TrimStart('/'))) return item; if (item.Items.Any()) { var child = FindActiveMenuItem(item.Items, currentUrl); if (child != null) return item; } } return null; } private string GetActiveClass(ApplicationMenuItem item) { var currentUrl = NavigationManager.ToBaseRelativePath(NavigationManager.Uri); return currentUrl.StartsWith(item.Url?.TrimStart('/') ?? "") ? "active" : ""; } public void Dispose() { NavigationManager.LocationChanged -= async (s, e) => await OnLocationChanged(); } }Step 3: Create Page Actions Component (Blue Area)
Components/Layout/CustomPageActions.razor:@using Volo.Abp.AspNetCore.Components.Web.Theming.Layout @inject PageLayout PageLayout @if (!string.IsNullOrEmpty(PageLayout.Title) || ToolbarItemRenders.Any()) { <div class="custom-page-actions"> <div class="page-title"> <h1>@PageLayout.Title</h1> </div> <div class="page-actions"> @foreach (var toolbarItem in ToolbarItemRenders) { @toolbarItem } </div> </div> } @code { protected List<RenderFragment> ToolbarItemRenders { get; } = new(); protected override Task OnInitializedAsync() { PageLayout.ToolbarItems.CollectionChanged += async (s, e) => await RenderAsync(); PageLayout.PropertyChanged += async (s, e) => await InvokeAsync(StateHasChanged); return base.OnInitializedAsync(); } protected override async Task OnAfterRenderAsync(bool firstRender) { if (firstRender) await RenderAsync(); await base.OnAfterRenderAsync(firstRender); } protected virtual async Task RenderAsync() { ToolbarItemRenders.Clear(); foreach (var item in PageLayout.ToolbarItems) { var sequence = 0; ToolbarItemRenders.Add(builder => { builder.OpenComponent(sequence, item.ComponentType); if (item.Arguments != null) { foreach (var argument in item.Arguments) { sequence++; builder.AddAttribute(sequence, argument.Key, argument.Value); } } builder.CloseComponent(); }); } await InvokeAsync(StateHasChanged); } }Step 4: Register Your Custom Layout
In your module class (e.g.,
YourProjectBlazorModule.cs):using Volo.Abp.AspNetCore.Components.Web.LeptonXTheme; using YourProjectName.Blazor.Components.Layout; public override void ConfigureServices(ServiceConfigurationContext context) { Configure<LeptonXThemeBlazorOptions>(options => { options.Layout = typeof(CustomApplicationLayout); }); }Step 5: Structure Your Menu with Parent-Child Relationships
In your
MenuContributor:private Task ConfigureMainMenuAsync(MenuConfigurationContext context) { // RED AREA: Main menu item var products = new ApplicationMenuItem( "Products", "Products", icon: "fas fa-box" ); // GREEN AREA: Submenu items (will appear when Products is active) products.AddItem(new ApplicationMenuItem( "Products.List", "Product List", url: "/products", icon: "fas fa-list" )); products.AddItem(new ApplicationMenuItem( "Products.Categories", "Categories", url: "/products/categories", icon: "fas fa-tags" )); context.Menu.AddItem(products); return Task.CompletedTask; }Step 6: Add Page Actions (Blue Area)
In your page component (e.g.,
Products/Index.razor.cs):public partial class Index { [Inject] protected PageLayout PageLayout { get; set; } protected override async Task OnInitializedAsync() { PageLayout.Title = "Products"; // BLUE AREA: Add action buttons PageLayout.ToolbarItems.Add(new PageToolbarItem(typeof(CreateProductButton))); PageLayout.ToolbarItems.Add(new PageToolbarItem(typeof(ExportButton))); await base.OnInitializedAsync(); } }Add Basic CSS
Add this to your
wwwroot/global-styles.css:.custom-submenu { background-color: #f8f9fa; border-bottom: 1px solid #dee2e6; padding: 0.5rem 1rem; } .submenu-list { display: flex; list-style: none; margin: 0; padding: 0; gap: 0.5rem; } .submenu-list a { padding: 0.5rem 1rem; color: [#495057](https://abp.io/QA/Questions/495057); text-decoration: none; border-radius: 0.25rem; } .submenu-list a.active { background-color: #007bff; color: white; } .custom-page-actions { display: flex; justify-content: space-between; align-items: center; padding: 1rem 0; border-bottom: 2px solid #007bff; margin-bottom: 1rem; } .page-actions { display: flex; gap: 0.5rem; }Documentation References
I've created a complete example project structure showing all three areas (red, green, blue) you requested. Let me know if you need clarification on any part
-
0
Hi again. When I apply the suggested changes to my project, the left side of the application no longer displays the navbar (red area). How can I add it?
-
0
Hola Algún comentario sobre este tema?
-
0
- Solution Para mantener/mostrar el menú lateral (área roja) en Blazor con LeptonX después de cambiar a un layout personalizado, debes:
- Usar el layout “Side Menu” de LeptonX o incluir explícitamente los componentes del side menu en tu layout.
- Registrar el layout correcto vía LeptonXThemeBlazorOptions.
- Si creaste un layout propio desde cero, agrega los componentes de LeptonX que pintan el menú lateral.
Paso a paso
A) Usar el layout Side Menu de LeptonX En tu módulo Blazor:
using Volo.Abp.AspNetCore.Components.Web.LeptonXTheme;

public override void ConfigureServices(ServiceConfigurationContext context)
{
    Configure<LeptonXThemeBlazorOptions>(options =>
    {
        // Asegura el layout con menú lateral
        options.Layout = typeof(Volo.Abp.AspNetCore.Components.Web.LeptonXTheme.Components.ApplicationLayout.SideMenu.SideMenuLayout);
    });
}
Con esto, el layout de LeptonX ya renderiza el menú lateral.
B) Si mantienes tu CustomApplicationLayout.razor Incluye los componentes de LeptonX del layout “SideMenu” en tu layout personalizado. Ejemplo mínimo:
@inherits LayoutComponentBase
@using Volo.Abp.AspNetCore.Components.Web.LeptonXTheme.Components.ApplicationLayout.SideMenu.MainHeader
@using Volo.Abp.AspNetCore.Components.Web.LeptonXTheme.Components.ApplicationLayout.SideMenu.SideMenu
@using Volo.Abp.AspNetCore.Components.Web.LeptonXTheme.Components.ApplicationLayout.Common

<div id="lpx-wrapper" class="lpx-layout lpx-layout--side">
    <!-- Header con brand, user, etc. -->
    <MainHeader />

    <div class="lpx-container">
        <!-- MENÚ LATERAL (área roja) -->
        <SideMenu />

        <!-- Contenido -->
        <div class="lpx-content-container">
            <!-- tu Submenu (verde) -->
            <CustomSubmenu />

            <div class="lpx-topbar-container">
                <div class="lpx-topbar">
                    <Breadcrumbs />
                </div>
            </div>

            <div class="lpx-content-wrapper">
                <div class="lpx-content">
                    <!-- Acciones de página (azul) -->
                    <CustomPageActions />
                    @Body
                </div>
            </div>

            <footer><Footer /></footer>
        </div>
    </div>

    <MobileNavbar />
</div>
Claves:
- Usa los componentes SideMenu/MainHeader del namespace SideMenu (no los de TopMenu).
- Mantén el contenedor con id="lpx-wrapper" y clases lpx-… para que aplique el CSS del tema.
- Si reemplazas componentes, verifica que las clases y jerarquía sean compatibles con LeptonX.
C) Asegúrate de no cambiar al layout TopMenu por error Si en Configure<LeptonXThemeBlazorOptions> apuntas a TopMenuLayout o si tu CustomApplicationLayout usa componentes del namespace “TopMenu”, el side menu no se renderiza. Verifica namespaces:
- Correcto para menú lateral: Volo.Abp.AspNetCore.Components.Web.LeptonXTheme.Components.ApplicationLayout.SideMenu.*
- Evita mezclar con TopMenu.*
D) Menú principal y elementos El SideMenu se llena con el Main Menu de ABP (IMenuManager y tus MenuContributors). No necesitas dibujarlo a mano, solo asegúrate de agregar los ApplicationMenuItem en tu MenuContributor (padres e hijos).
E) Si el menú lateral aparece colapsado/oculto El layout puede estar en modo hover/collapsed por CSS. Asegúrate de no añadir clases que escondan el menú o scripts que cambien el estado. En caso de necesitar forzar estado abierto por defecto, puedes controlar clases de “lpx-wrapper” según el comportamiento deseado.
- Sources
- https://abp.io/docs/latest/ui-themes/lepton-x/blazor
- https://docs.abp.io/en/abp/latest/UI/Blazor/Navigation-Menu
This response was generated by AI. If it didn’t solve your problem, feel free to post a new answer — our support team will jump in to help you soon.
-
0
Cual es la razón por la que no me respeta los estilos del tema al mostrar la pagina? Debo agregar un archivo css al componente?
-
0
- Solution Causas típicas por las que tu página deja de respetar los estilos del tema (LeptonX) al usar un layout Blazor personalizado y cómo solucionarlas:
- Falta el wrapper y clases del tema
- LeptonX aplica la mayor parte del CSS a partir del contenedor con id/clases específicas.
- Asegúrate de envolver tu layout con:
- id="lpx-wrapper" y clases como lpx-layout, lpx-content-container, lpx-content, etc.
- Ejemplo:
<div id="lpx-wrapper" class="lpx-layout lpx-layout--side">
      <MainHeader />
      <div class="lpx-container">
        <SideMenu />
        <div class="lpx-content-container">
          <CustomSubmenu />
          <div class="lpx-topbar-container">
            <div class="lpx-topbar"><Breadcrumbs /></div>
          </div>
          <div class="lpx-content-wrapper">
            <div class="lpx-content">
              <CustomPageActions />
              @Body
            </div>
          </div>
          <footer><Footer /></footer>
        </div>
      </div>
      <MobileNavbar />
    </div>
No estás usando los componentes de layout del tema
- Importa y utiliza los componentes de LeptonX del layout que corresponda (SideMenu o TopMenu). Si omites SideMenu/MainHeader/Footer/Breadcrumbs del tema, las clases y estilos asociados no se aplicarán.
El layout registrado no es el de LeptonX o se reemplazó completamente
- Verifica en tu módulo que sigas usando el layout del tema (o uno custom basado en él):
Configure<LeptonXThemeBlazorOptions>(options =>
    {
        options.Layout = typeof(Volo.Abp.AspNetCore.Components.Web.LeptonXTheme.Components
            .ApplicationLayout.SideMenu.SideMenuLayout);
        // o tu CustomApplicationLayout, pero conservando estructura + clases LeptonX
    });
Falta del bundle de estilos del tema (Blazor WASM/WebApp con Global Assets)
- En proyectos WASM/WebApp de ABP 9+, el CSS/JS del tema entra por el sistema de bundling global. Asegúrate de:
- Referenciar el módulo de bundling del tema en el proyecto host (Server/WebApp):
- Volo.Abp.AspNetCore.Components.WebAssembly.LeptonXTheme.Bundling (o LeptonXLite si usas ese).
- Llamar app.MapAbpStaticAssets() y usar los módulos de bundling como indica la guía de Global Assets.
- Referenciar el módulo de bundling del tema en el proyecto host (Server/WebApp):
- Si quitaste accidentalmente esos módulos, el CSS del tema no se generará en global.css.
- En proyectos WASM/WebApp de ABP 9+, el CSS/JS del tema entra por el sistema de bundling global. Asegúrate de:
CSS aislado que sobreescribe variables/clases del tema
- Un .razor.css con selectores globales o !important puede “romper” el tema. Revisa tus .razor.css y limita el alcance; evita redefinir .lpx-* o variables CSS del tema a menos que sea intencional.
Mezcla de namespaces de TopMenu y SideMenu
- No mezcles componentes de TopMenu con clases SideMenu (o viceversa). Usa consistentemente:
- Side menu: Volo.Abp.AspNetCore.Components.Web.LeptonXTheme.Components.ApplicationLayout.SideMenu.*
- Top menu: …ApplicationLayout.TopMenu.*
- No mezcles componentes de TopMenu con clases SideMenu (o viceversa). Usa consistentemente:
¿Debo agregar un CSS al componente?
- No es obligatorio si usas los componentes + estructura del tema. Normalmente no necesitas CSS adicional; solo añade CSS propio para tu submenu/acciones.
- Si agregas CSS, hazlo en:
- global-styles.css incluido vía bundling; o
- archivos .razor.css específicos sin romper .lpx-*.
- En WASM/WebApp, si requieres CSS global personalizado, contribúyelo al bundle global (AbpBundlingOptions) para que se incluya en global.css.
Checklist rápido:
- options.Layout apunta al layout correcto y tu CustomApplicationLayout conserva id="lpx-wrapper" y clases lpx-…
- Usas <SideMenu />, <MainHeader />, <Footer />, <Breadcrumbs /> del tema.
- No eliminaste los módulos de bundling del tema; global.css se sirve y app.MapAbpStaticAssets() está activo.
- No tienes CSS propio que sobrescriba .lpx-* de manera no deseada.
- Sources
- https://abp.io/docs/latest/ui-themes/lepton-x/blazor
- https://docs.abp.io/en/abp/latest/UI/Blazor/Navigation-Menu
This response was generated by AI. If it didn’t solve your problem, feel free to post a new answer — our support team will jump in to help you soon.


