


VoloDocs
What is VoloDocs?
VoloDocs is a cross-platform web application that allows you to easily create beautiful documentation and build developer communities. It simplifies software documentation with the help of GitHub integration. You use the power of GitHub for versioning, hosting of your docs. You let your users to edit a document.
Main Features
- Serves documents from your GitHub repository.
- Supports Markdown / HTML document formatting.
- Supports versioning (integrated to GitHub releases).
- Supports multiple projects.
- Allows users to edit a document on GitHub.
- Cross-platform; deployable to Windows / Linux / macOS.
GitHub Repository
It's free & open-source. You can browse VoloDocs source-code and contribute on GitHub:
https://github.com/abpframework/abp/tree/master/modules/docs
Download
You can download the VoloDocs release from the following links:
http://apps.abp.io/VoloDocs/VoloDocs.win-x64.zip - Windows 64 bit
http://apps.abp.io/VoloDocs/VoloDocs.win-x86.zip - Windows 32 bit
http://apps.abp.io/VoloDocs/VoloDocs.osx-x64.zip - MacOS
http://apps.abp.io/VoloDocs/VoloDocs.linux-x64.zip - Linux
Notice that, all installations are self-contained deployments. It means all the required third-party dependencies along with the version of .NET Core is included. So you don't need to install any .NET Core SDK / Runtime.
Folder Structure
When you extract the VoloDocs.*.zip file, you will see a Web folder and a Migrator folder. The Web folder contains the website files and Migrator contains the application to build your database. Before publishing your website, you need to create a new database or update your existing database to the latest. If this is the first time you install VoloDocs, Migrator will create a new database for you, otherwise it updates to the latest version. The only setting you need to configure, is the ConnectionString which is located in the appsettings.json file. See the next section to learn how to configure your VoloDocs application.
Steps by Step Deployment
Database Migration
To update your existing database or create your initial database, go to
Migratorfolder in your VoloDocs directory.Open
appsettings.jsonin your text editor and set your database connection string. If you don't know how to write the connection string for your database system, you can check out https://www.connectionstrings.com/.After you set your connection string, run
Migrate.batfor Windows platform andVoloDocs.Migratorfor other operating systems. That's it now configure your website.Configuring Website
Go to
Webfolder in your VoloDocs directory. Openappsettings.jsonin your text editor. Set your connection string (same as in theMigrator'sappsettings.json). Settitleof your website. This will be written on the left-upper corner of your website. That's it! Now you can publish your website.If you want to run
Deploying Website
In the previous step, you created or updated your database. Ensure that your database exists on the specified connection string.
Deploying to IIS
- Move
Webfolder to yourwwwrootfolder. - Rename
Webfolder toVoloDocs(Now you haveC:\inetpub\wwwroot\VoloDocs).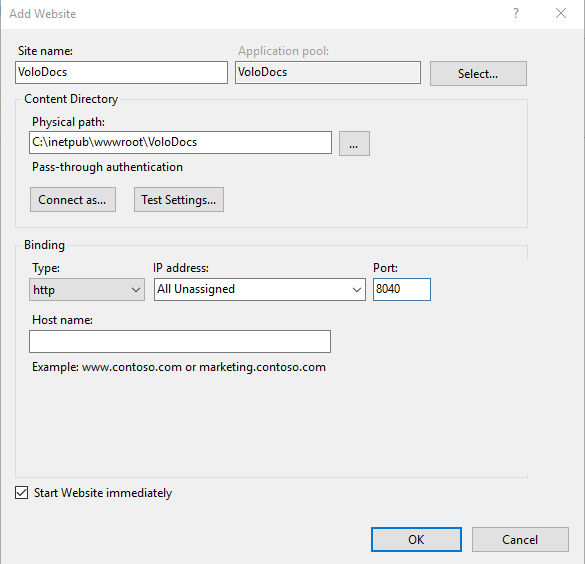
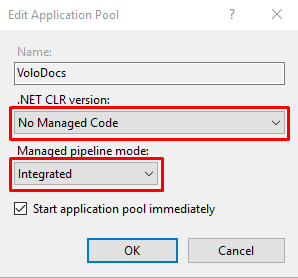
- The
VoloDocsapplication pool is being created automatically. Open Application Pools and double clickVoloDocsapplication pool and set- .NET CLR version:
No Managed Code - Managed pipeline mode:
Integrated
- .NET CLR version:
If you get the below error, it means don't have the hosting bundle installed on the server. See this document to learn how to install it or download Hosting Bundle and run on your server.
Handler "aspNetCore" has a bad module "AspNetCoreModuleV2" in its module list using IISFurther information about hosting VoloDocs check out Microsoft's official document for hosting ASP.NET Core application on IIS.
- Move
Deploying to Azure
Microsoft has a good document on how to deploy your ASP.NET Core web app to Azure App Service. We recommend you to read this document https://docs.microsoft.com/en-us/azure/app-service/app-service-web-get-started-dotnet.
Running the Application From Command Line
Alternatively you can run the application from command line, navigate to
VoloDocs\Webfolder and runVoloDocs.Web.exefor Windows orVoloDocs.Webfor MacOS / Linux.
First Run
To start the website, navigate to your address (as configured in the previous section).
When you first open the website, you need to create a project.
Creating a Project
Go to the following address to create project
http://<yourwebsite>/Account/Login?returnUrl=/Docs/Admin/Projects
Default credentials
To login the admin side, use the following credentials:
Username:
adminPassword:
1q2w3E*
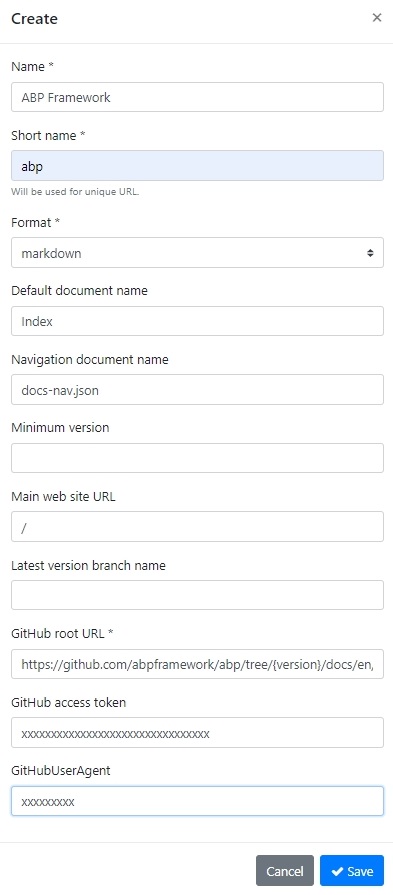
An example project definition
Here's a sample project information that uses GitHub source.
We will configure the VoloDocs to show ABP Framework's documentation that's stored in GitHub.
Here's the link to ABP Framework GitHub docs folder:
https://github.com/abpframework/abp/tree/master/docs/en
Name:
ABP FrameworkShort name:
abpFormat:
markdownDefault document name:
IndexNavigation document name:
docs-nav.json(see the sample navigation)Minimum version: leave empty (hides the previous versions)
Main web site URL:
/Latest version branch name: leave empty ()
GitHub root URL:
https://github.com/abpframework/abp/tree/{version}/docs/en/GitHub access token: see how to retrieve GitHub access token
GitHub user agent: see how to learn your GitHub username
Retrieving GitHub Access Token
To create a personal access token in GitHub, you need to visit the Settings of the user account and under Developer settings you will find Personal access tokens. Select Generate new token, enter in a name as the Token description and enable the repo checkbox. Alternatively, to enter generate new token, browse to https://github.com/settings/tokens/new.
Generate Token for Public Repositories
To access public repositories, check
public_repounder thereposection. This will enable VoloDocs to access your public GitHub repositories. ClickGenerate Tokenbutton on the bottom of the page.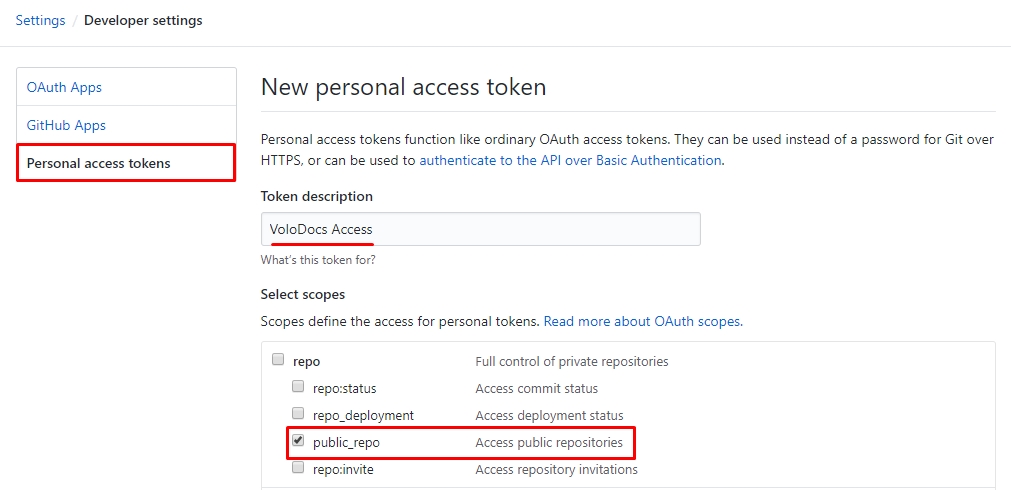
Generate Token for Private Repositories
To access public repositories, check all items under the
reposection. This will enable VoloDocs to access your private GitHub repositories. ClickGenerate Tokenbutton on the bottom of the page.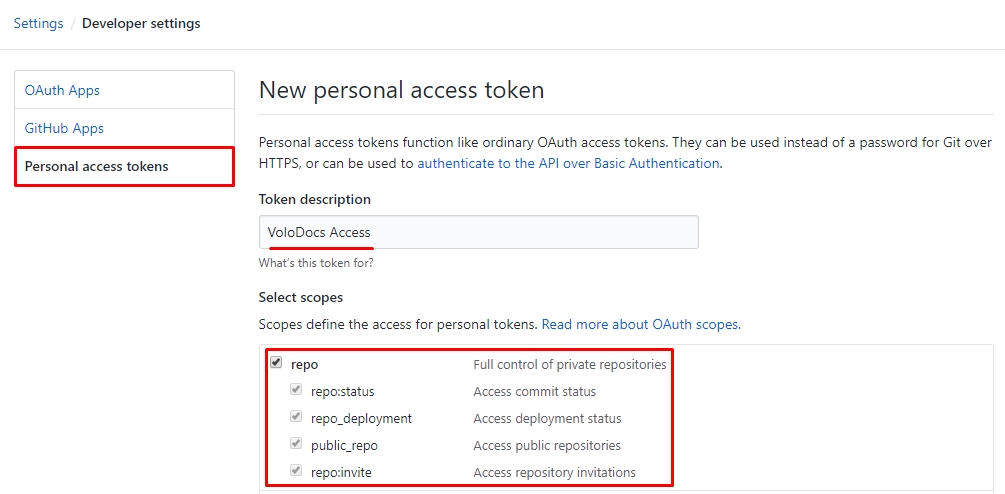
Learn Your GitHub Username
To learn your GitHub username, click on your profile picture on the top-right corner of the GitHub page. You will see your username right after the text "Signed in as ..."

After you save the project, go to root website address and you will see your documentation.
http://<yourwebsite>/documents
Any Issues?
If you encounter any problem or issues about installation, usage or report a bug, follow the link:


