


ASP.NET Core MVC / Razor Pages Tutorial - Part 2
About this tutorial
This is the second part of the ASP.NET Core MVC / Razor Pages tutorial series. All parts:
- Part I: Creating the project and book list page
- Part II: Creating, updating and deleting books (this tutorial)
- Part III: Integration tests
The completed sample is available: bookstore-mvc-ef.zip. To be able to download this sample, you need to hold an active ABP Commercial license.
You can also watch this video course prepared by an ABP community member, based on this tutorial.*
Creating a new book
In this section, you will learn how to create a new modal dialog form to create a new book. The modal dialog will look like in the below image:

Create the modal form
Create a new razor page, named CreateModal.cshtml under the Pages/Books folder of the Acme.BookStore.Web project.

CreateModal.cshtml.cs
Open the CreateModal.cshtml.cs file (CreateModalModel class) and replace with the following code:
using System.Threading.Tasks;
using Microsoft.AspNetCore.Mvc;

namespace Acme.BookStore.Web.Pages.Books
{
    public class CreateModalModel : BookStorePageModel
    {
        [BindProperty]
        public CreateUpdateBookDto Book { get; set; }

        private readonly IBookAppService _bookAppService;

        public CreateModalModel(IBookAppService bookAppService)
        {
            _bookAppService = bookAppService;
        }

        public async Task<IActionResult> OnPostAsync()
        {
            await _bookAppService.CreateAsync(Book);
            return NoContent();
        }
    }
}
- This class is derived from the
BookStorePageModelinstead of standardPageModel.BookStorePageModelinherits thePageModeland adds some common properties & methods that can be used in your page model classes. [BindProperty]attribute on theBookproperty binds post request data to this property.- This class simply injects the
IBookAppServicein the constructor and calls theCreateAsyncmethod in theOnPostAsynchandler.
CreateModal.cshtml
Open the CreateModal.cshtml file and paste the code below:
@page
@inherits Acme.BookStore.Web.Pages.BookStorePage
@using Volo.Abp.AspNetCore.Mvc.UI.Bootstrap.TagHelpers.Modal
@model Acme.BookStore.Web.Pages.Books.CreateModalModel
@{
    Layout = null;
}
<abp-dynamic-form abp-model="Book" data-ajaxForm="true" asp-page="/Books/CreateModal">
    <abp-modal>
        <abp-modal-header title="@L["NewBook"].Value"></abp-modal-header>
        <abp-modal-body>
            <abp-form-content />
        </abp-modal-body>
        <abp-modal-footer buttons="@(AbpModalButtons.Cancel|AbpModalButtons.Save)"></abp-modal-footer>
    </abp-modal>
</abp-dynamic-form>
- This modal uses
abp-dynamic-formtag helper to automatically create the form from the modelCreateBookViewModel.abp-modelattribute indicates the model object where it's theBookproperty in this case.data-ajaxFormattribute sets the form to submit via AJAX, instead of a classic page post.abp-form-contenttag helper is a placeholder to render the form controls (it is optional and needed only if you have added some other content in theabp-dynamic-formtag, just like in this page).
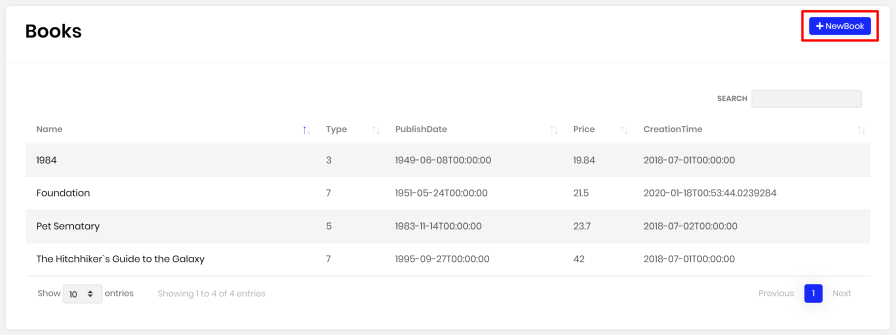
Add the "New book" button
Open the Pages/Books/Index.cshtml and set the content of abp-card-header tag as below:
<abp-card-header>
    <abp-row>
        <abp-column size-md="_6">
            <h2>@L["Books"]</h2>
        </abp-column>
        <abp-column size-md="_6" class="text-right">
            <abp-button id="NewBookButton"
                        text="@L["NewBook"].Value"
                        icon="plus"
                        button-type="Primary" />
        </abp-column>
    </abp-row>
</abp-card-header>
This adds a new button called New book to the top-right of the table:
Open the pages/books/index.js and add the following code just after the Datatable configuration:
var createModal = new abp.ModalManager(abp.appPath + 'Books/CreateModal');

createModal.onResult(function () {
    dataTable.ajax.reload();
});

$('#NewBookButton').click(function (e) {
    e.preventDefault();
    createModal.open();
});
abp.ModalManageris a helper class to manage modals in the client side. It internally uses Twitter Bootstrap's standard modal, but abstracts many details by providing a simple API.
Now, you can run the application and add new books using the new modal form.
Updating a book
Create a new razor page, named EditModal.cshtml under the Pages/Books folder of the Acme.BookStore.Web project:

EditModal.cshtml.cs
Open the EditModal.cshtml.cs file (EditModalModel class) and replace with the following code:
using System;
using System.Threading.Tasks;
using Microsoft.AspNetCore.Mvc;

namespace Acme.BookStore.Web.Pages.Books
{
    public class EditModalModel : BookStorePageModel
    {
        [HiddenInput]
        [BindProperty(SupportsGet = true)]
        public Guid Id { get; set; }

        [BindProperty]
        public CreateUpdateBookDto Book { get; set; }

        private readonly IBookAppService _bookAppService;

        public EditModalModel(IBookAppService bookAppService)
        {
            _bookAppService = bookAppService;
        }

        public async Task OnGetAsync()
        {
            var bookDto = await _bookAppService.GetAsync(Id);
            Book = ObjectMapper.Map<BookDto, CreateUpdateBookDto>(bookDto);
        }

        public async Task<IActionResult> OnPostAsync()
        {
            await _bookAppService.UpdateAsync(Id, Book);
            return NoContent();
        }
    }
}
[HiddenInput]and[BindProperty]are standard ASP.NET Core MVC attributes.SupportsGetis used to be able to getIdvalue from query string parameter of the request.- In the
GetAsyncmethod, we getBookDtofromBookAppServiceand this is being mapped to the DTO objectCreateUpdateBookDto. - The
OnPostAsyncusesBookAppService.UpdateAsync()to update the entity.
Mapping from BookDto to CreateUpdateBookDto
To be able to map the BookDto to CreateUpdateBookDto, configure a new mapping. To do this, open the BookStoreWebAutoMapperProfile.cs in the Acme.BookStore.Web project and change it as shown below:
using AutoMapper;

namespace Acme.BookStore.Web
{
    public class BookStoreWebAutoMapperProfile : Profile
    {
        public BookStoreWebAutoMapperProfile()
        {
            CreateMap<BookDto, CreateUpdateBookDto>();
        }
    }
}
- We have just added
CreateMap<BookDto, CreateUpdateBookDto>();to define this mapping.
EditModal.cshtml
Replace EditModal.cshtml content with the following content:
@page
@inherits Acme.BookStore.Web.Pages.BookStorePage
@using Acme.BookStore.Web.Pages.Books
@using Volo.Abp.AspNetCore.Mvc.UI.Bootstrap.TagHelpers.Modal
@model EditModalModel
@{
    Layout = null;
}
<abp-dynamic-form abp-model="Book" data-ajaxForm="true" asp-page="/Books/EditModal">
    <abp-modal>
        <abp-modal-header title="@L["Update"].Value"></abp-modal-header>
        <abp-modal-body>
            <abp-input asp-for="Id" />
            <abp-form-content />
        </abp-modal-body>
        <abp-modal-footer buttons="@(AbpModalButtons.Cancel|AbpModalButtons.Save)"></abp-modal-footer>
    </abp-modal>
</abp-dynamic-form>
This page is very similar to the CreateModal.cshtml, except:
- It includes an
abp-inputfor theIdproperty to storeIdof the editing book (which is a hidden input). - It uses
Books/EditModalas the post URL and Update text as the modal header.
Add "Actions" dropdown to the table
We will add a dropdown button to the table named Actions.
Open the Pages/Books/Index.cshtml page and change the <abp-table> section as shown below:
<abp-table striped-rows="true" id="BooksTable">
    <thead>
        <tr>
            <th>@L["Actions"]</th>
            <th>@L["Name"]</th>
            <th>@L["Type"]</th>
            <th>@L["PublishDate"]</th>
            <th>@L["Price"]</th>
            <th>@L["CreationTime"]</th>
        </tr>
    </thead>
</abp-table>
- We just added a new
thtag for the "Actions" button.
Open the pages/books/index.js and replace the content as below:
$(function () {

    var l = abp.localization.getResource('BookStore');

    var createModal = new abp.ModalManager(abp.appPath + 'Books/CreateModal');
    var editModal = new abp.ModalManager(abp.appPath + 'Books/EditModal');

    var dataTable = $('#BooksTable').DataTable(abp.libs.datatables.normalizeConfiguration({
        processing: true,
        serverSide: true,
        paging: true,
        searching: false,
        autoWidth: false,
        scrollCollapse: true,
        order: [[1, "asc"]],
        ajax: abp.libs.datatables.createAjax(acme.bookStore.book.getList),
        columnDefs: [
            {
                rowAction: {
                    items:
                        [
                            {
                                text: l('Edit'),
                                action: function (data) {
                                    editModal.open({ id: data.record.id });
                                }
                            }
                        ]
                }
            },
            { data: "name" },
            { data: "type" },
            { data: "publishDate" },
            { data: "price" },
            { data: "creationTime" }
        ]
    }));

    createModal.onResult(function () {
        dataTable.ajax.reload();
    });

    editModal.onResult(function () {
        dataTable.ajax.reload();
    });

    $('#NewBookButton').click(function (e) {
        e.preventDefault();
        createModal.open();
    });
});
- Used
abp.localization.getResource('BookStore')to be able to use the same localization texts defined on the server-side. - Added a new
ModalManagernamedcreateModalto open the create modal dialog. - Added a new
ModalManagernamededitModalto open the edit modal dialog. - Added a new column at the beginning of the
columnDefssection. This column is used for the "Actions" dropdown button. - "New Book" action simply calls
createModal.open()to open the create dialog. - "Edit" action simply calls
editModal.open()to open the edit dialog.
You can run the application and edit any book by selecting the edit action. The final UI looks as below:

Deleting a book
Open the pages/books/index.js and add a new item to the rowAction items:
{
    text: l('Delete'),
    confirmMessage: function (data) {
        return l('BookDeletionConfirmationMessage', data.record.name);
    },
    action: function (data) {
        acme.bookStore.book
            .delete(data.record.id)
            .then(function() {
                abp.notify.info(l('SuccessfullyDeleted'));
                dataTable.ajax.reload();
            });
    }
}
confirmMessageoption is used to ask a confirmation question before executing theaction.acme.bookStore.book.delete()method makes an AJAX request to JavaScript proxy function to delete a book.abp.notify.info()shows a notification after the delete operation.
The final index.js content is shown below:
$(function () {

    var l = abp.localization.getResource('BookStore');

    var createModal = new abp.ModalManager(abp.appPath + 'Books/CreateModal');
    var editModal = new abp.ModalManager(abp.appPath + 'Books/EditModal');

    var dataTable = $('#BooksTable').DataTable(abp.libs.datatables.normalizeConfiguration({
        processing: true,
        serverSide: true,
        paging: true,
        searching: false,
        autoWidth: false,
        scrollCollapse: true,
        order: [[1, "asc"]],
        ajax: abp.libs.datatables.createAjax(acme.bookStore.book.getList),
        columnDefs: [
            {
                rowAction: {
                    items:
                    [
                        {
                            text: l('Edit'),
                            action: function (data) {
                                editModal.open({ id: data.record.id });
                            }
                        },
                        {
                            text: l('Delete'),
                            confirmMessage: function (data) {
                                return l('BookDeletionConfirmationMessage', data.record.name);
                            },
                            action: function (data) {
                                acme.bookStore.book
                                    .delete(data.record.id)
                                    .then(function() {
                                        abp.notify.info(l('SuccessfullyDeleted'));
                                        dataTable.ajax.reload();
                                    });
                            }
                        }
                    ]
                }
            },
            { data: "name" },
            { data: "type" },
            { data: "publishDate" },
            { data: "price" },
            { data: "creationTime" }
        ]
    }));

    createModal.onResult(function () {
        dataTable.ajax.reload();
    });

    editModal.onResult(function () {
        dataTable.ajax.reload();
    });

    $('#NewBookButton').click(function (e) {
        e.preventDefault();
        createModal.open();
    });
});
Open the en.json in the Acme.BookStore.Domain.Shared project and add the following translations:
"BookDeletionConfirmationMessage": "Are you sure to delete the book {0}?",
"SuccessfullyDeleted": "Successfully deleted"
Run the application and try to delete a book.
Next Part
See the next part of this tutorial.


