


ASP.NET Core Angular Tutorial - Part 2
About this tutorial
This is the second part of the ASP.NET Core Angular tutorial series. All parts:
- Part I: Creating the project and book list page
- Part II: Creating, updating and deleting books (this tutorial)
- Part III: Integration tests
You can also watch this video course prepared by an ABP community member, based on this tutorial.
Creating a new book
In this section, you will learn how to create a new modal dialog form to create a new book.
State definitions
Open book.action.ts in app\book\state folder and replace the content as below:
import { CreateUpdateBookDto } from '../models'; //<== added this line ==>

export class GetBooks {
  static readonly type = '[Book] Get';
}

// added CreateUpdateBook class
export class CreateUpdateBook {
  static readonly type = '[Book] Create Update Book';
  constructor(public payload: CreateUpdateBookDto) { }
}
- We imported the
CreateUpdateBookDtomodel and created theCreateUpdateBookaction.
Open book.state.ts file in app\book\state folder and replace the content as below:
import { PagedResultDto } from '@abp/ng.core';
import { State, Action, StateContext, Selector } from '@ngxs/store';
import { GetBooks, CreateUpdateBook } from './book.actions'; // <== added CreateUpdateBook==>
import { BookService } from '../services';
import { tap } from 'rxjs/operators';
import { Injectable } from '@angular/core';
import { BookDto } from '../models';

export class BookStateModel {
  public book: PagedResultDto<BookDto>;
}

@State<BookStateModel>({
  name: 'BookState',
  defaults: { book: {} } as BookStateModel,
})
@Injectable()
export class BookState {
  @Selector()
  static getBooks(state: BookStateModel) {
    return state.book.items || [];
  }

  constructor(private bookService: BookService) {}

  @Action(GetBooks)
  get(ctx: StateContext<BookStateModel>) {
    return this.bookService.getListByInput().pipe(
      tap((bookResponse) => {
        ctx.patchState({
          book: bookResponse,
        });
      })
    );
  }

  // added CreateUpdateBook action listener
  @Action(CreateUpdateBook)
  save(ctx: StateContext<BookStateModel>, action: CreateUpdateBook) {
    return this.bookService.createByInput(action.payload);
  }
}
- We imported
CreateUpdateBookaction and defined thesavemethod that will listen to aCreateUpdateBookaction to create a book.
When the SaveBook action dispatched, the save method is being executed. It calls createByInput method of the BookService.
Add a modal to BookListComponent
Open book-list.component.html file in books\book-list folder and replace the content as below:
<div class="card">
  <div class="card-header">
    <div class="row">
      <div class="col col-md-6">
        <h5 class="card-title">
          {{ '::Menu:Books' | abpLocalization }}
        </h5>
      </div>
       <!--Added new book button -->
      <div class="text-right col col-md-6">
        <div class="text-lg-right pt-2">
          <button
            id="create"
            class="btn btn-primary"
            type="button"
            (click)="createBook()"
          >
            <i class="fa fa-plus mr-1"></i>
            <span>{{ "::NewBook" | abpLocalization }}</span>
          </button>
        </div>
      </div>
    </div>
  </div>
  <div class="card-body">
    <abp-table
      [value]="books$ | async"
      [abpLoading]="loading"
      [headerTemplate]="tableHeader"
      [bodyTemplate]="tableBody"
      [rows]="10"
      [scrollable]="true"
    >
    </abp-table>
    <ng-template #tableHeader>
      <tr>
        <th>{{ "::Name" | abpLocalization }}</th>
        <th>{{ "::Type" | abpLocalization }}</th>
        <th>{{ "::PublishDate" | abpLocalization }}</th>
        <th>{{ "::Price" | abpLocalization }}</th>
      </tr>
    </ng-template>
    <ng-template #tableBody let-data>
      <tr>
        <td>{{ data.name }}</td>
        <td>{{ booksType[data.type] }}</td>
        <td>{{ data.publishDate | date }}</td>
        <td>{{ data.price }}</td>
      </tr>
    </ng-template>
  </div>
</div>

<!--added modal-->
<abp-modal [(visible)]="isModalOpen">
    <ng-template #abpHeader>
        <h3>{{ '::NewBook' | abpLocalization }}</h3>
    </ng-template>

    <ng-template #abpBody> </ng-template>

    <ng-template #abpFooter>
        <button type="button" class="btn btn-secondary" #abpClose>
             {{ 'AbpAccount::Close' | abpLocalization }}
        </button>
    </ng-template>
</abp-modal>
- We added the
abp-modalwhich renders a modal to allow user to create a new book. abp-modalis a pre-built component to show modals. While you could use another approach to show a modal,abp-modalprovides additional benefits.- We added
New bookbutton to theAbpContentToolbar.
Open book-list.component.ts file in app\book\book-list folder and replace the content as below:
import { Component, OnInit } from '@angular/core';
import { Select, Store } from '@ngxs/store';
import { Observable } from 'rxjs';
import { finalize } from 'rxjs/operators';
import { BookDto, BookType } from '../models';
import { GetBooks } from '../state/book.actions';
import { BookState } from '../state/book.state';

@Component({
  selector: 'app-book-list',
  templateUrl: './book-list.component.html',
  styleUrls: ['./book-list.component.scss'],
})
export class BookListComponent implements OnInit {
  @Select(BookState.getBooks)
  books$: Observable<BookDto[]>;

  booksType = BookType;

  loading = false;

  isModalOpen = false; // <== added this line ==>

  constructor(private store: Store) {}

  ngOnInit() {
    this.get();
  }

  get() {
    this.loading = true;
    this.store
      .dispatch(new GetBooks())
      .pipe(finalize(() => (this.loading = false)))
      .subscribe(() => {});
  }

  // added createBook method
  createBook() {
    this.isModalOpen = true;
  }
}
- We added
isModalOpen = falseandcreateBookmethod.
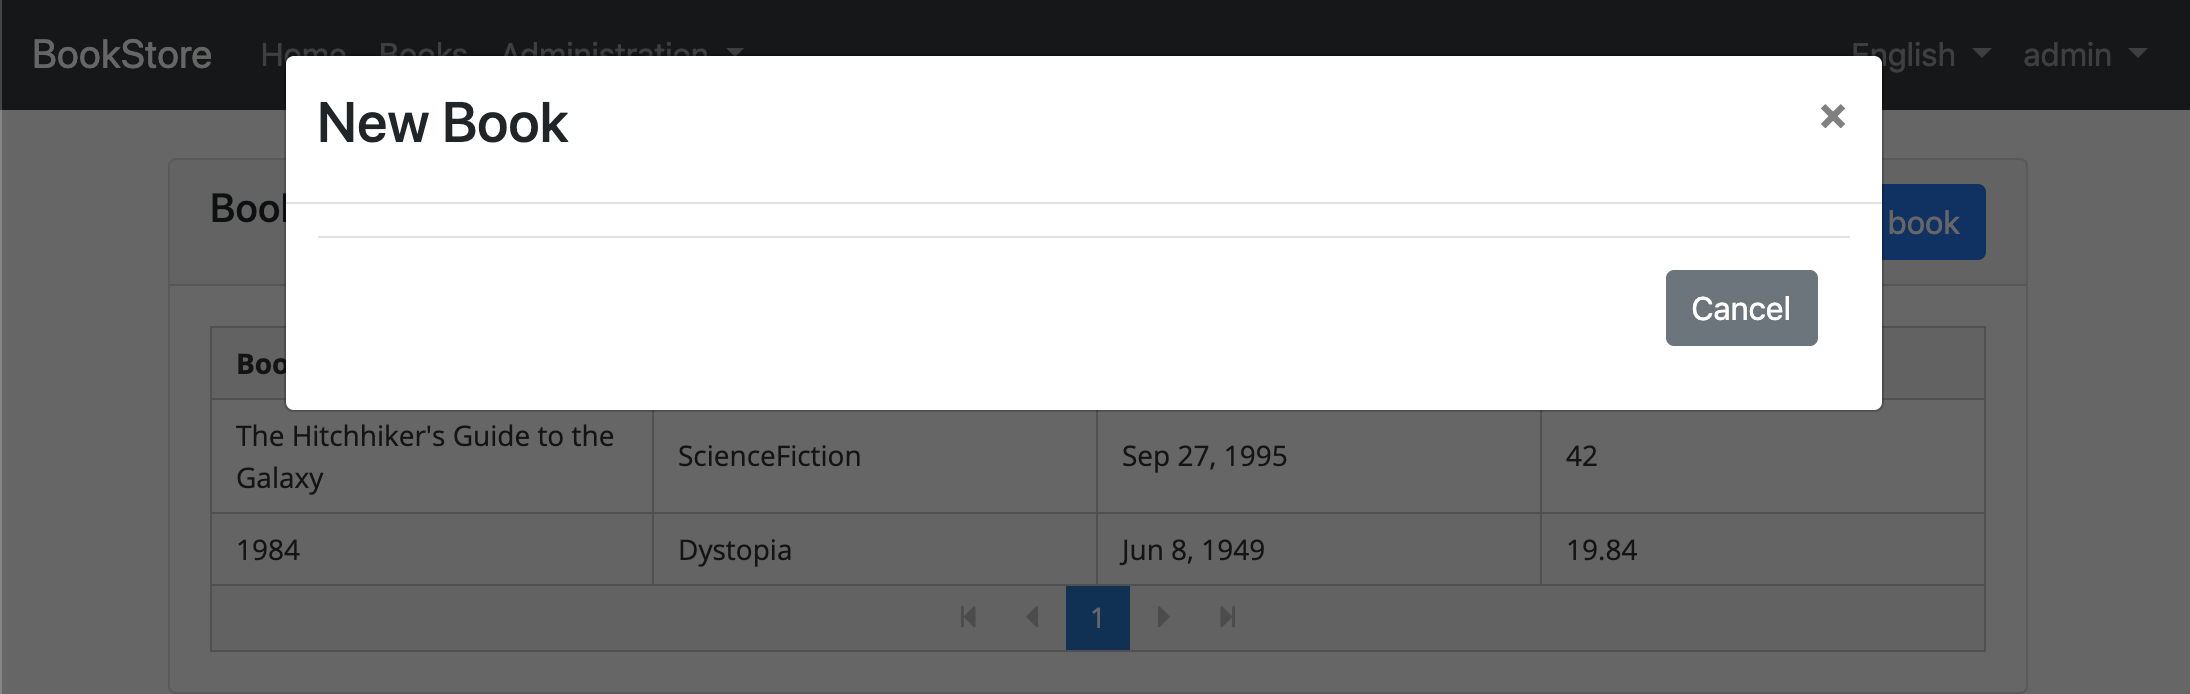
You can open your browser and click New book button to see the new modal.
Create a reactive form
Reactive forms provide a model-driven approach to handling form inputs whose values change over time.
Open book-list.component.ts file in app\book\book-list folder and replace the content as below:
import { Component, OnInit } from '@angular/core';
import { Select, Store } from '@ngxs/store';
import { Observable } from 'rxjs';
import { finalize } from 'rxjs/operators';
import { BookDto, BookType } from '../models';
import { GetBooks } from '../state/book.actions';
import { BookState } from '../state/book.state';
import { FormGroup, FormBuilder, Validators } from '@angular/forms'; // <== added this line ==>

@Component({
  selector: 'app-book-list',
  templateUrl: './book-list.component.html',
  styleUrls: ['./book-list.component.scss'],
})
export class BookListComponent implements OnInit {
  @Select(BookState.getBooks)
  books$: Observable<BookDto[]>;

  booksType = BookType;

  loading = false;

  isModalOpen = false;

  form: FormGroup; // <== added this line ==>

  constructor(private store: Store, private fb: FormBuilder) {} // <== added FormBuilder ==>

  ngOnInit() {
    this.get();
  }

  get() {
    this.loading = true;
    this.store
      .dispatch(new GetBooks())
      .pipe(finalize(() => (this.loading = false)))
      .subscribe(() => {});
  }

  createBook() {
    this.buildForm(); //<== added this line ==>
    this.isModalOpen = true;
  }

  // added buildForm method
  buildForm() {
    this.form = this.fb.group({
      name: ['', Validators.required],
      type: [null, Validators.required],
      publishDate: [null, Validators.required],
      price: [null, Validators.required],
    });
  }
}
- We imported
FormGroup, FormBuilder and Validators. - We added
form: FormGroupvariable. - We injected
fb: FormBuilderservice to the constructor. The FormBuilder service provides convenient methods for generating controls. It reduces the amount of boilerplate needed to build complex forms. - We added
buildFormmethod to the end of the file and executedbuildForm()in thecreateBookmethod. This method creates a reactive form to be able to create a new book.- The
groupmethod ofFormBuilder,fbcreates aFormGroup. - Added
Validators.requiredstatic method which validates the relevant form element.
- The
Create the DOM elements of the form
Open book-list.component.html in app\books\book-list folder and replace <ng-template #abpBody> </ng-template> with the following code part:
<ng-template #abpBody>
  <form [formGroup]="form">
    <div class="form-group">
      <label for="book-name">Name</label><span> * </span>
      <input type="text" id="book-name" class="form-control" formControlName="name" autofocus />
    </div>

    <div class="form-group">
      <label for="book-price">Price</label><span> * </span>
      <input type="number" id="book-price" class="form-control" formControlName="price" />
    </div>

    <div class="form-group">
      <label for="book-type">Type</label><span> * </span>
      <select class="form-control" id="book-type" formControlName="type">
        <option [ngValue]="null">Select a book type</option>
        <option [ngValue]="booksType[type]" *ngFor="let type of bookTypeArr"> {{ type }}</option>
      </select>
    </div>

    <div class="form-group">
      <label>Publish date</label><span> * </span>
      <input
        #datepicker="ngbDatepicker"
        class="form-control"
        name="datepicker"
        formControlName="publishDate"
        ngbDatepicker
        (click)="datepicker.toggle()"
      />
    </div>
  </form>
</ng-template>
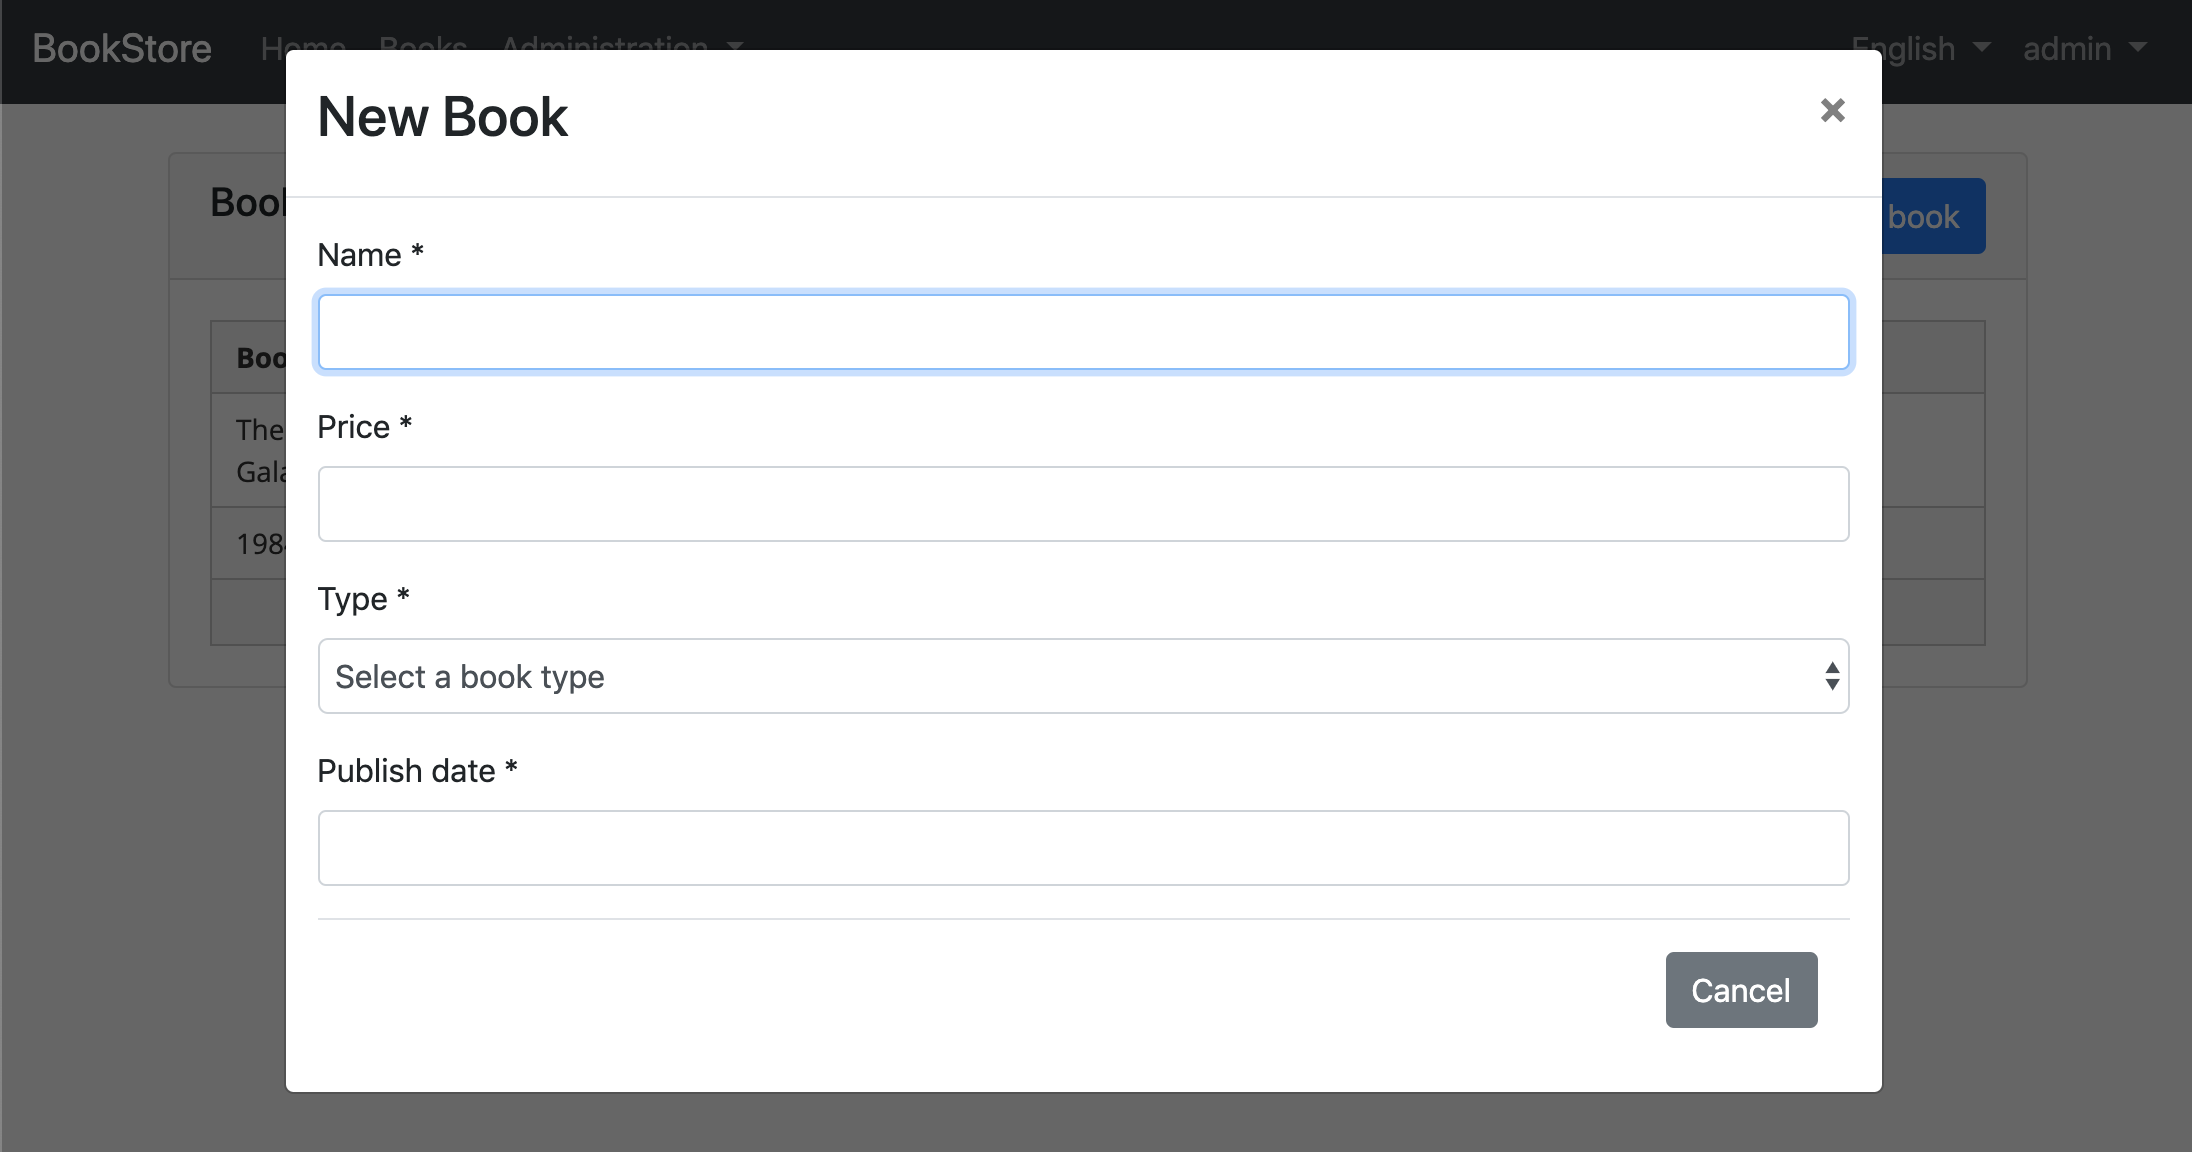
- This template creates a form with
Name,Price,TypeandPublishdate fields. - We've used NgBootstrap datepicker in this component.
Datepicker requirements
Open book.module.ts file in app\book folder and replace the content as below:
import { NgModule } from '@angular/core';
import { CommonModule } from '@angular/common';
import { BookRoutingModule } from './book-routing.module';
import { BookListComponent } from './book-list/book-list.component';
import { SharedModule } from '../shared/shared.module';
import { NgbDatepickerModule } from '@ng-bootstrap/ng-bootstrap'; //<== added this line ==>

@NgModule({
  declarations: [BookListComponent],
  imports: [
    CommonModule,
    BookRoutingModule,
    SharedModule,
    NgbDatepickerModule, //<== added this line ==>
  ],
})
export class BookModule {}
- We imported
NgbDatepickerModuleto be able to use the date picker.
Open book-list.component.ts file in app\book\book-list folder and replace the content as below:
import { Component, OnInit } from '@angular/core';
import { Select, Store } from '@ngxs/store';
import { Observable } from 'rxjs';
import { finalize } from 'rxjs/operators';
import { BookDto, BookType } from '../models';
import { GetBooks } from '../state/book.actions';
import { BookState } from '../state/book.state';
import { FormGroup, FormBuilder, Validators } from '@angular/forms';
import { NgbDateNativeAdapter, NgbDateAdapter } from '@ng-bootstrap/ng-bootstrap'; // <== added this line ==>

@Component({
  selector: 'app-book-list',
  templateUrl: './book-list.component.html',
  styleUrls: ['./book-list.component.scss'],
  providers: [{ provide: NgbDateAdapter, useClass: NgbDateNativeAdapter }], // <== added this line ==>
})
export class BookListComponent implements OnInit {
  @Select(BookState.getBooks)
  books$: Observable<BookDto[]>;

  booksType = BookType;

  //added bookTypeArr array
  bookTypeArr = Object.keys(BookType).filter(
    (bookType) => typeof this.booksType[bookType] === 'number'
  );

  loading = false;

  isModalOpen = false;

  form: FormGroup;

  constructor(private store: Store, private fb: FormBuilder) {}

  ngOnInit() {
    this.get();
  }

  get() {
    this.loading = true;
    this.store
      .dispatch(new GetBooks())
      .pipe(finalize(() => (this.loading = false)))
      .subscribe(() => {});
  }

  createBook() {
    this.buildForm();
    this.isModalOpen = true;
  }

  buildForm() {
    this.form = this.fb.group({
      name: ['', Validators.required],
      type: [null, Validators.required],
      publishDate: [null, Validators.required],
      price: [null, Validators.required],
    });
  }
}
We imported
NgbDateNativeAdapter, NgbDateAdapterWe added a new provider
NgbDateAdapterthat converts Datepicker value toDatetype. See the datepicker adapters for more details.We added
bookTypeArrarray to be able to use it in the combobox values. ThebookTypeArrcontains the fields of theBookTypeenum. Resulting array is shown below:['Adventure', 'Biography', 'Dystopia', 'Fantastic' ...]This array was used in the previous form template in the
ngForloop.
Now, you can open your browser to see the changes:
Saving the book
Open book-list.component.ts file in app\book\book-list folder and replace the content as below:
import { Component, OnInit } from '@angular/core';
import { Select, Store } from '@ngxs/store';
import { Observable } from 'rxjs';
import { finalize } from 'rxjs/operators';
import { BookDto, BookType } from '../models';
import { GetBooks, CreateUpdateBook } from '../state/book.actions'; // <== added CreateUpdateBook ==>
import { BookState } from '../state/book.state';
import { FormGroup, FormBuilder, Validators } from '@angular/forms';
import { NgbDateNativeAdapter, NgbDateAdapter } from '@ng-bootstrap/ng-bootstrap';

@Component({
  selector: 'app-book-list',
  templateUrl: './book-list.component.html',
  styleUrls: ['./book-list.component.scss'],
  providers: [{ provide: NgbDateAdapter, useClass: NgbDateNativeAdapter }],
})
export class BookListComponent implements OnInit {
  @Select(BookState.getBooks)
  books$: Observable<BookDto[]>;

  booksType = BookType;

  bookTypeArr = Object.keys(BookType).filter(
    (bookType) => typeof this.booksType[bookType] === 'number'
  );

  loading = false;

  isModalOpen = false;

  form: FormGroup;

  constructor(private store: Store, private fb: FormBuilder) {}

  ngOnInit() {
    this.get();
  }

  get() {
    this.loading = true;
    this.store
      .dispatch(new GetBooks())
      .pipe(finalize(() => (this.loading = false)))
      .subscribe(() => {});
  }

  createBook() {
    this.buildForm();
    this.isModalOpen = true;
  }

  buildForm() {
    this.form = this.fb.group({
      name: ['', Validators.required],
      type: [null, Validators.required],
      publishDate: [null, Validators.required],
      price: [null, Validators.required],
    });
  }

  // <== added save ==>
  save() {
    if (this.form.invalid) {
      return;
    }

    this.store.dispatch(new CreateUpdateBook(this.form.value)).subscribe(() => {
      this.isModalOpen = false;
      this.form.reset();
      this.get();
    });
  }
}
- We imported
CreateUpdateBook. - We added
savemethod
Open book-list.component.html in app\book\book-list folder and add the following abp-button to save the new book.
<ng-template #abpFooter>
  <button type="button" class="btn btn-secondary" #abpClose>
      {{ 'AbpAccount::Close' | abpLocalization }}
  </button>

  <!--added save button-->
  <button class="btn btn-primary" (click)="save()" [disabled]="form.invalid">
        <i class="fa fa-check mr-1"></i>
        {{ 'AbpAccount::Save' | abpLocalization }}
  </button>
</ng-template>
Find the <form [formGroup]="form"> tag and replace below content:
<form [formGroup]="form" (ngSubmit)="save()"> <!-- added the ngSubmit -->
- We added the
(ngSubmit)="save()"to<form>element to save a new book by pressing the enter. - We added
abp-buttonto the bottom area of the modal to save a new book.
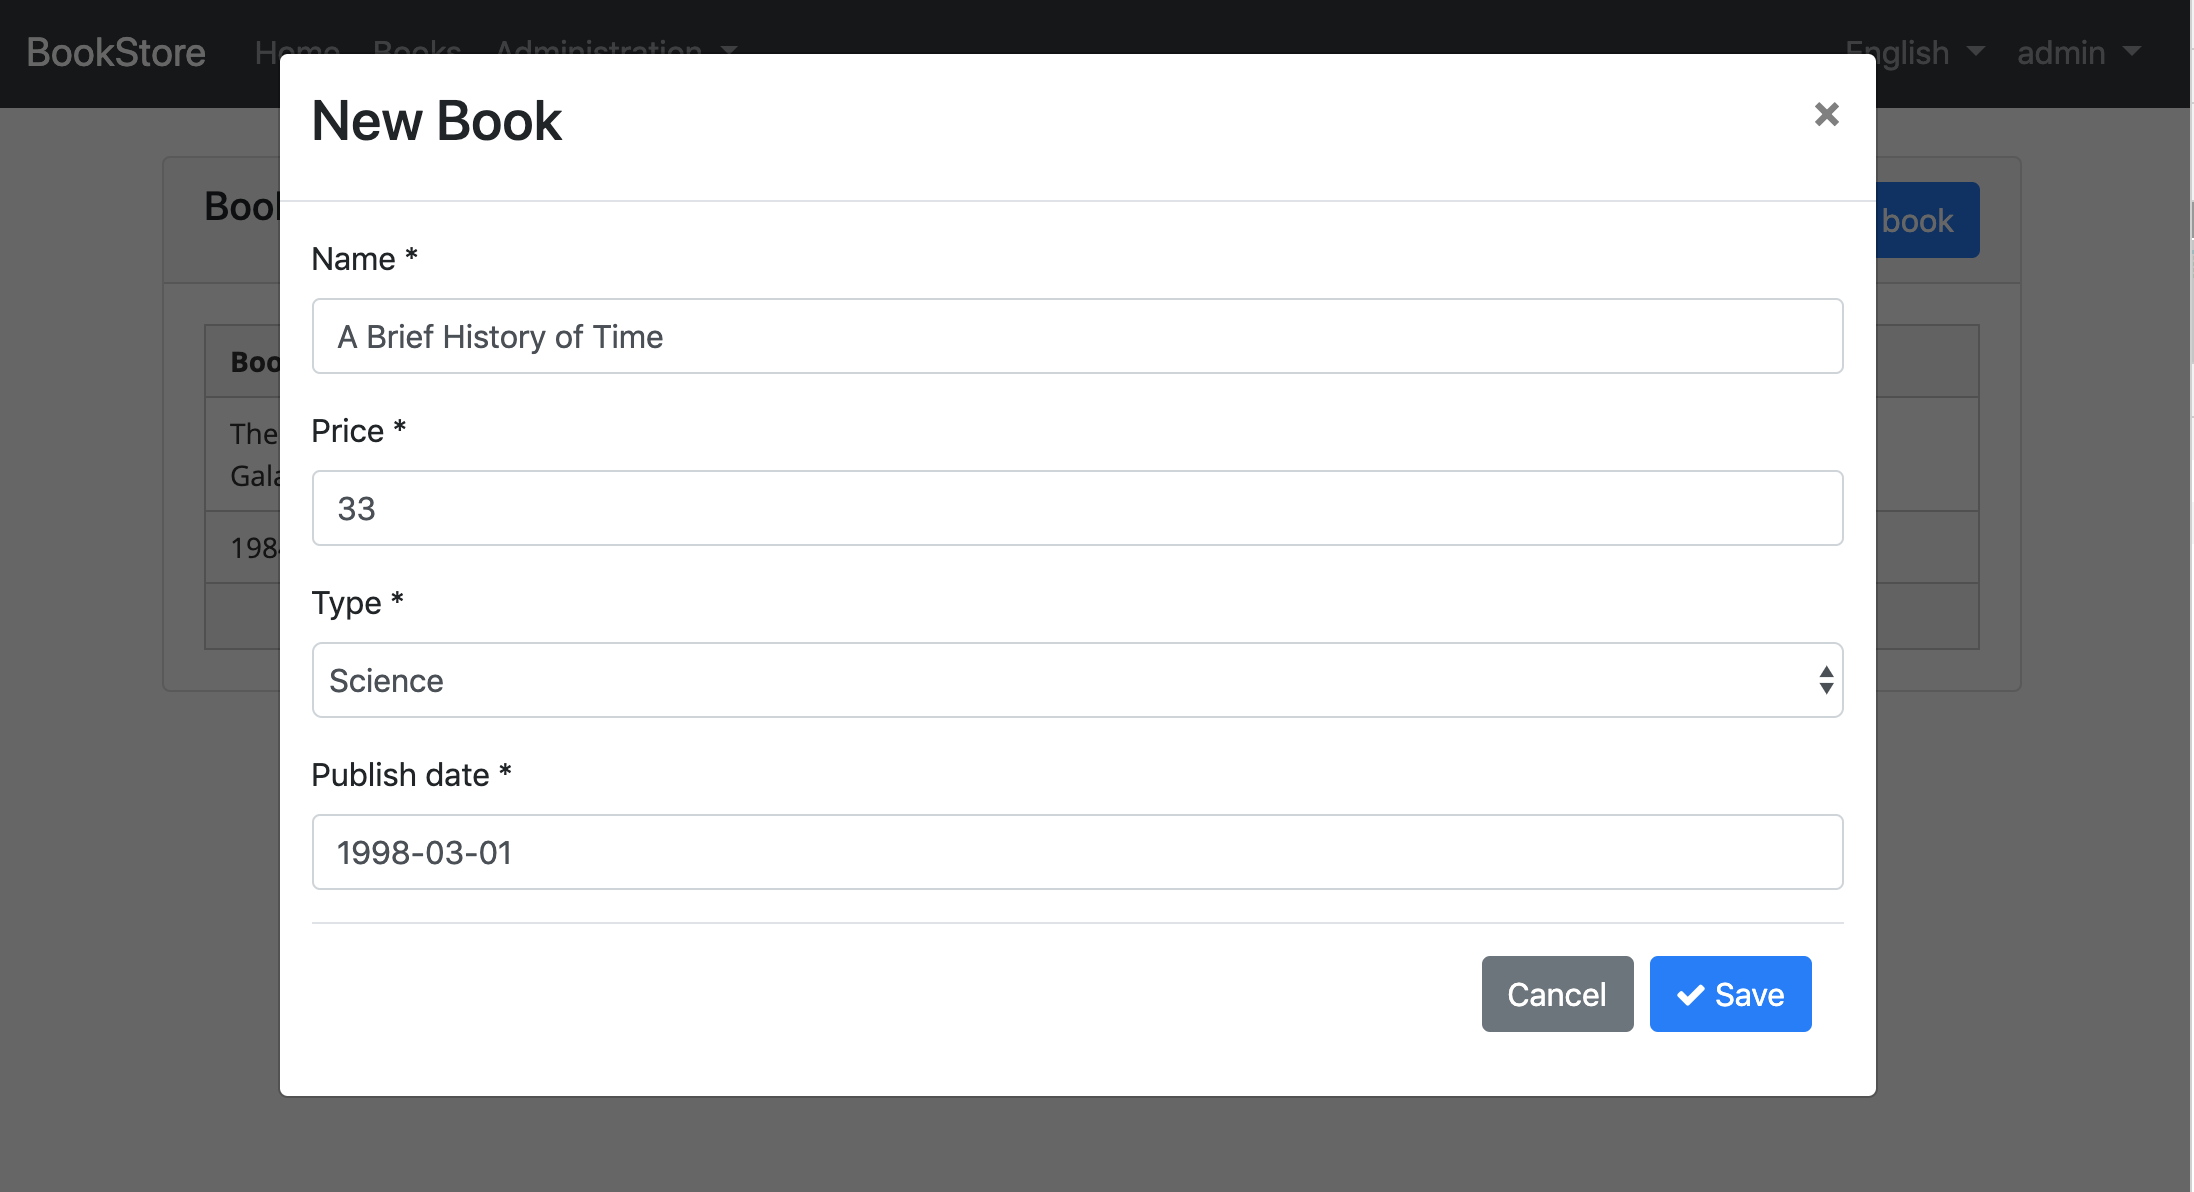
The final modal UI looks like below:
Updating a book
CreateUpdateBook action
Open the book.actions.ts in app\book\state folder and replace the content as below:
import { CreateUpdateBookDto } from '../models';

export class GetBooks {
  static readonly type = '[Book] Get';
}

export class CreateUpdateBook {
  static readonly type = '[Book] Create Update Book';
  constructor(public payload: CreateUpdateBookDto, public id?: string) {} // <== added id parameter ==>
}
- We added
idparameter to theCreateUpdateBookaction's constructor.
Open the book.state.ts in app\book\state folder and replace the save method as below:
@Action(CreateUpdateBook)
save(ctx: StateContext<BookStateModel>, action: CreateUpdateBook) {
  if (action.id) {
    return this.bookService.updateByIdAndInput(action.payload, action.id);
  } else {
    return this.bookService.createByInput(action.payload);
  }
}
BookListComponent
Open book-list.component.ts in app\book\book-list folder and inject BookService dependency by adding it to the constructor and add a variable named selectedBook.
import { Component, OnInit } from '@angular/core';
import { Select, Store } from '@ngxs/store';
import { Observable } from 'rxjs';
import { finalize } from 'rxjs/operators';
import { BookDto, BookType } from '../models';
import { GetBooks, CreateUpdateBook } from '../state/book.actions';
import { BookState } from '../state/book.state';
import { FormGroup, FormBuilder, Validators } from '@angular/forms';
import { NgbDateNativeAdapter, NgbDateAdapter } from '@ng-bootstrap/ng-bootstrap';
import { BookService } from '../services'; // <== imported BookService ==>

@Component({
  selector: 'app-book-list',
  templateUrl: './book-list.component.html',
  styleUrls: ['./book-list.component.scss'],
  providers: [{ provide: NgbDateAdapter, useClass: NgbDateNativeAdapter }],
})
export class BookListComponent implements OnInit {
  @Select(BookState.getBooks)
  books$: Observable<BookDto[]>;

  booksType = BookType;

  bookTypeArr = Object.keys(BookType).filter(
    (bookType) => typeof this.booksType[bookType] === 'number'
  );

  loading = false;

  isModalOpen = false;

  form: FormGroup;

  selectedBook = {} as BookDto; // <== declared selectedBook ==>

  constructor(private store: Store, private fb: FormBuilder, private bookService: BookService) {} //<== injected BookService ==>

  ngOnInit() {
    this.get();
  }

  get() {
    this.loading = true;
    this.store
      .dispatch(new GetBooks())
      .pipe(finalize(() => (this.loading = false)))
      .subscribe(() => {});
  }

  // <== this method is replaced ==>
  createBook() {
    this.selectedBook = {} as BookDto; // <== added ==>
    this.buildForm();
    this.isModalOpen = true;
  }

  // <== added editBook method ==>
  editBook(id: string) {
    this.bookService.getById(id).subscribe((book) => {
      this.selectedBook = book;
      this.buildForm();
      this.isModalOpen = true;
    });
  }

  // <== this method is replaced ==>
  buildForm() {
    this.form = this.fb.group({
      name: [this.selectedBook.name || '', Validators.required],
      type: [this.selectedBook.type || null, Validators.required],
      publishDate: [
        this.selectedBook.publishDate ? new Date(this.selectedBook.publishDate) : null,
        Validators.required,
      ],
      price: [this.selectedBook.price || null, Validators.required],
    });
  }

  save() {
    if (this.form.invalid) {
      return;
    }

    //<== added this.selectedBook.id ==>
    this.store
      .dispatch(new CreateUpdateBook(this.form.value, this.selectedBook.id))
      .subscribe(() => {
        this.isModalOpen = false;
        this.form.reset();
        this.get();
      });
  }
}
- We imported
BookService. - We declared a variable named
selectedBookasBookDto. - We injected
BookServiceto the constructor.BookServiceis being used to retrieve the book data which is being edited. - We added
editBookmethod. This method fetches the book with the givenIdand sets it toselectedBookobject. - We replaced the
buildFormmethod so that it creates the form with theselectedBookdata. - We replaced the
createBookmethod so it setsselectedBookto an empty object. - We added
selectedBook.idto the constructor of the newCreateUpdateBook.
Add "Actions" dropdown to the table
Open the book-list.component.html in app\book\book-list folder and replace the <div class="card-body"> tag as below:
<div class="card-body">
  <abp-table
    [value]="books$ | async"
    [abpLoading]="loading"
    [headerTemplate]="tableHeader"
    [bodyTemplate]="tableBody"
    [rows]="10"
    [scrollable]="true"
  >
  </abp-table>
  <ng-template #tableHeader>
    <tr>
      <th>{{ "::Actions" | abpLocalization }}</th>
      <th>{{ "::Name" | abpLocalization }}</th>
      <th>{{ "::Type" | abpLocalization }}</th>
      <th>{{ "::PublishDate" | abpLocalization }}</th>
      <th>{{ "::Price" | abpLocalization }}</th>
    </tr>
  </ng-template>
  <ng-template #tableBody let-data>
    <tr>
      <td>
        <div ngbDropdown container="body" class="d-inline-block">
          <button
            class="btn btn-primary btn-sm dropdown-toggle"
            data-toggle="dropdown"
            aria-haspopup="true"
            ngbDropdownToggle
          >
            <i class="fa fa-cog mr-1"></i>{{ "::Actions" | abpLocalization }}
          </button>
          <div ngbDropdownMenu>
            <button ngbDropdownItem (click)="editBook(data.id)">
              {{ "::Edit" | abpLocalization }}
            </button>
          </div>
        </div>
      </td>
      <td>{{ data.name }}</td>
      <td>{{ booksType[data.type] }}</td>
      <td>{{ data.publishDate | date }}</td>
      <td>{{ data.price }}</td>
    </tr>
  </ng-template>
</div>
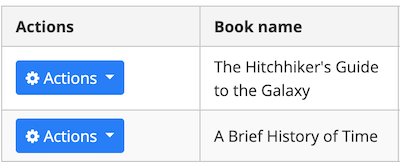
- We added a
thfor the "Actions" column. - We added
buttonwithngbDropdownToggleto open actions when clicked the button. - We have used to NgbDropdown for the dropdown menu of actions.
The final UI looks like as below:
Open book-list.component.html in app\book\book-list folder and find the <ng-template #abpHeader> tag and replace the content as below.
<ng-template #abpHeader>
    <h3>{{ (selectedBook.id ? 'AbpIdentity::Edit' : '::NewBook' ) | abpLocalization }}</h3>
</ng-template>
- This template will show Edit text for edit record operation, New Book for new record operation in the title.
Deleting a book
DeleteBook action
Open book.actions.ts in app\book\state folder and add an action named DeleteBook.
export class DeleteBook {
  static readonly type = '[Book] Delete';
  constructor(public id: string) {}
}
Open the book.state.ts in app\book\state folder and replace the content as below:
import { PagedResultDto } from '@abp/ng.core';
import { State, Action, StateContext, Selector } from '@ngxs/store';
import { GetBooks, CreateUpdateBook, DeleteBook } from './book.actions'; // <== added DeleteBook==>
import { BookService } from '../services';
import { tap } from 'rxjs/operators';
import { Injectable } from '@angular/core';
import { BookDto } from '../models';

export class BookStateModel {
  public book: PagedResultDto<BookDto>;
}

@State<BookStateModel>({
  name: 'BookState',
  defaults: { book: {} } as BookStateModel,
})
@Injectable()
export class BookState {
  @Selector()
  static getBooks(state: BookStateModel) {
    return state.book.items || [];
  }

  constructor(private bookService: BookService) {}

  @Action(GetBooks)
  get(ctx: StateContext<BookStateModel>) {
    return this.bookService.getListByInput().pipe(
      tap((booksResponse) => {
        ctx.patchState({
          book: booksResponse,
        });
      })
    );
  }

  @Action(CreateUpdateBook)
  save(ctx: StateContext<BookStateModel>, action: CreateUpdateBook) {
    if (action.id) {
      return this.bookService.updateByIdAndInput(action.payload, action.id);
    } else {
      return this.bookService.createByInput(action.payload);
    }
  }

  // <== added DeleteBook action listener ==>
  @Action(DeleteBook)
  delete(ctx: StateContext<BookStateModel>, action: DeleteBook) {
    return this.bookService.deleteById(action.id);
  }
}
We imported
DeleteBook.We added
DeleteBookaction listener to the end of the file.
Delete confirmation popup
Open book-list.component.ts inapp\book\book-list folder and inject the ConfirmationService.
Replace the constructor as below:
import { ConfirmationService } from '@abp/ng.theme.shared';
//...

constructor(
    private store: Store,
    private fb: FormBuilder,
    private bookService: BookService,
    private confirmation: ConfirmationService // <== added this line ==>
) { }
- We imported
ConfirmationService. - We injected
ConfirmationServiceto the constructor.
See the Confirmation Popup documentation
In the book-list.component.ts add a delete method :
import { GetBooks, CreateUpdateBook, DeleteBook } from '../state/book.actions' ;// <== imported DeleteBook ==>

import { ConfirmationService, Confirmation } from '@abp/ng.theme.shared'; //<== imported Confirmation ==>

//...

delete(id: string) {
    this.confirmation
        .warn('::AreYouSureToDelete', 'AbpAccount::AreYouSure')
        .subscribe(status => {
        if (status === Confirmation.Status.confirm) {
            this.store.dispatch(new DeleteBook(id)).subscribe(() => this.get());
        }
    });
}
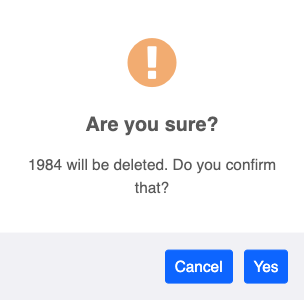
The delete method shows a confirmation popup and subscribes for the user response. DeleteBook action dispatched only if user clicks to the Yes button. The confirmation popup looks like below:
Add a delete button
Open book-list.component.html in app\book\book-list folder and modify the ngbDropdownMenu to add the delete button as shown below:
<div ngbDropdownMenu>
  <!-- added Delete button -->
    <button ngbDropdownItem (click)="delete(data.id)">
        {{ 'AbpAccount::Delete' | abpLocalization }}
    </button>
</div>
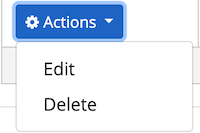
The final actions dropdown UI looks like below:
Next Part
See the next part of this tutorial.


