Add Module to Existing Microservices
This documentation introduces guidance for adding a module to a microservice for your microservice template project. Eventually, every module has its own documentation and implementation steps. However, some steps can be different for the microservice template. This guide will demonstrate the steps to add a module to an existing microservice.
Adding a module
After adding a new service to your microservice template by following the add new microservice guide, you can add any module to this service in your microservice solution by using the ABP CLI. Use the following command to add the preferred module under the newly added microservice directory:
abp add-module CmsKit
To complete the CmsKit module steps, please have a look here.
After completing the module documentation steps you can build your solution and continue with this documentation.
dotnet build
Using the static proxy
ABP Framework supports dynamic and static proxies. Both have advantages and disadvantages. By default, the static proxy is used in the microservice template to remove the coupling between services. The static proxy should be configured manually in the HttpApiClientModule of the microservice you have installed your module on as below:
public class ProductServiceHttpApiClientModule : AbpModule
{
    public override void ConfigureServices(ServiceConfigurationContext context)
    {
        //Make sure this is `AddStaticHttpClientProxies`
        context.Services.AddHttpClientProxies(typeof(ProductServiceHttpApiClientModule).Assembly,
            ProductServiceRemoteServiceConsts.RemoteServiceName);

        Configure<AbpVirtualFileSystemOptions>(options =>
        {
            options.FileSets.AddEmbedded<ProductServiceHttpApiClientModule>();
        });
    }
}
If the proxy is configured as AddStaticHttpClientProxies, you can start creating the static proxies in ProductService.HttpApi.Client by using the following command line:
abp generate-proxy --type csharp --module cms-kit --url https://localhost:44335
Note: This port is used by
Public-Web. You can check your port fromlaunchSetting.json. The Public Web calls the Public Web Gateway so it has called the related services and has generated proxy files. For more
If you have generated a new microservice with the ABP CLI by following the add new microservice guide, it should already be configured to use the static proxy.
Configure Gateways
The microservice template project has two gateway projects.
- WebGateway
- PublicWebGateway
The first one is for the admin side and the other one is for the public side. If you would like to use your module on both sides, you should configure ocelot.json in both projects. There is one example below and you need to configure it according to your requirements.
{
    "ServiceKey": "CmsKit",
    "DownstreamPathTemplate": "/api/cms-kit-public/{everything}",
    "DownstreamScheme": "https",
    "DownstreamHostAndPorts": [
        {
            "Host": "localhost",
            "Port": 44361 **This port used in ProductService**
        }
    ],
    "UpstreamPathTemplate": "/api/cms-kit-public/{everything}",
    "UpstreamHttpMethod": [ "Put", "Delete", "Get", "Post" ]
}
You can make different configurations for each method or endpoint for your service and add QoS configurations based on your business requirements. You can check the ocelot documentation for more.
Build Errors Typo
After adding your module completely, you should see some changes on the different pages to the injected dependencies. In ProductServiceDbContext the overridden method OnModelCreating may be a typo because of the parameter name. For example, the CmsKit comes with the builder parameter name but in this class, the parameter name is modelBuilder. It's enough to change it with the correct one.
[ConnectionStringName(ProductServiceDbProperties.ConnectionStringName)]
public class ProductServiceDbContext : AbpDbContext<ProductServiceDbContext>
{
    protected override void OnModelCreating(ModelBuilder builder)
    {
        //`builder` may be `modelBuilder`
        builder.ConfigureCmsKit();
    }
}
Implementing ICmsKitDbContext
After running the add module command, you should see your migration files under the Migrations in the EntityFrameworkCore project. If it's empty please make sure whether to implement IModuleDbContext or not. Once implemented, the compiler should warn you to import your entities here. Now, you're ready to create your migration properly by using the following command line:
dotnet ef migrations add "InitialCmsKit"
If you create your migrations properly, you just need to run the project. ABP Framework will handle it automatically.
[ConnectionStringName(ProductServiceDbProperties.ConnectionStringName)]
public class ProductServiceDbContext : AbpDbContext<ProductServiceDbContext>, ICmsKitDbContext
{
    public DbSet<Product> Products { get; set; } //It's already defined in the template project.
    public DbSet<Comment> Comments { get; set; }
    public DbSet<CmsUser> User { get; set; }
    //The other implemented entities come from ICmsKitDbContext
}
Now you should configure AbpDbContextOptions in the ProductServiceEntityFrameworkCoreModule under the EntityFrameworkCore project. You should already see the configuration for your service in the ConfigureServices method of your project, but you also need to configure it for the new module projects.
ProductServiceEntityFrameworkCoreModule
{
    public override void ConfigureServices(ServiceConfigurationContext context)
    {
        //The other congiurations
        Configure<AbpDbContextOptions>(options =>
        {
            //It comes via the microservice template
            options.Configure<ProductServiceDbContext>(c =>
            {
                c.UseSqlServer(b =>
                {
                    b.MigrationsHistoryTable("__ProductService_Migrations");
                });
            });
            //Need to add this configuration for the CmsKit implementation
            options.Configure<CmsKitDbContext>(c =>
            {
                c.UseSqlServer(b =>
                {
                    b.MigrationsHistoryTable("__ProductService_Migrations");
                });
            });
        });
    }
}
Using Component
If you would like to use the defined component in the module on your web page, you should add its related page on NuGet. After adding your package you should add the dependency to YourModulePublicWebModule as the following code:
abp add-package Volo.CmsKit.Web
using Volo.CmsKit.Public.Web;

[DependsOn(typeof(CmsKitPublicWebModule))]
public class PublicWebModule : AbpModule
{
    //Configurations
}
Now you can use the components on your page. For example it's added into Index.cshtml under PublicWeb\Pages\Products
@using @using Volo.CmsKit.Public.Web.Pages.CmsKit.Shared.Components.Commenting

@await Component.InvokeAsync(typeof(CommentingViewComponent),
    new {entityType = "quote", entityId = @product.Id})
Configured External User
To submit some components you need to log in to the system. You're already logged in to the system but your module database can be empty, hence you need to check IdentityService for this user.
Firstly you should add the service client to IdentityServerDataSeeder under the IdentityService.HttpApi.Host
//The other configurations
await CreateClientAsync(
    name: "SolutiontName_ProductService",
    scopes: commonScopes.Union(new[]
    {
        "IdentityService"
    }),
    grantTypes: new[] { "client_credentials" },
    secret: "1q2w3e*".Sha256(),
    permissions: new[] { IdentityPermissions.UserLookup.Default }
);
Then change your appsetting.json by adding the following code under ProductService.HttpApi.Host
"RemoteServices": {
    "AbpIdentity": {
    "BaseUrl": "https://localhost:44388" **IdentityService Port**
    }
},
"IdentityClients": {
    "Default": {
    "GrantType": "client_credentials",
    "ClientId": "SolutiontName_ProductService",
    "ClientSecret": "1q2w3e*",
    "Authority": "https://localhost:44322", **AuthServer Port**
    "Scope": "IdentityService"
    }
}
Now add the Nuget package by using the following code and implement it to the module.
dotnet add package Volo.Abp.Identity.Pro.HttpApi.Client
dotnet add package Volo.Abp.Http.Client.IdentityModel.Web
Also, add the configuration for CmsKitCommentOptions
using Volo.CmsKit.Comments;
using Volo.Abp.Identity;
using Volo.Abp.Http.Client.IdentityModel.Web;

[DependsOn(
    typeof(AbpIdentityHttpApiClientModule),
    typeof(AbpHttpClientIdentityModelWebModule)
)]
public class ProductServiceHttpApiHostModule : AbpModule
{
    Configure<CmsKitCommentOptions>(options =>
    {
        options.EntityTypes.Add(new CommentEntityTypeDefinition("quote"));
    });
}
Finally, you need to map CmsKit to ProductService in SharedHostingModule under Shared.Hosting
public override void ConfigureServices(ServiceConfigurationContext context)
{
    Configure<AbpDbConnectionOptions>(options =>
    {
        options.Databases.Configure("ProductService", database =>
        {
            database.MappedConnections.Add("CmsKit");
            database.MappedConnections.Add("ProductService");
        });
    }
}
Note: If you meet the same problem after doing these steps, please remove your volume on Docker and repeat the same steps on
IdentityServiceto get the changes.
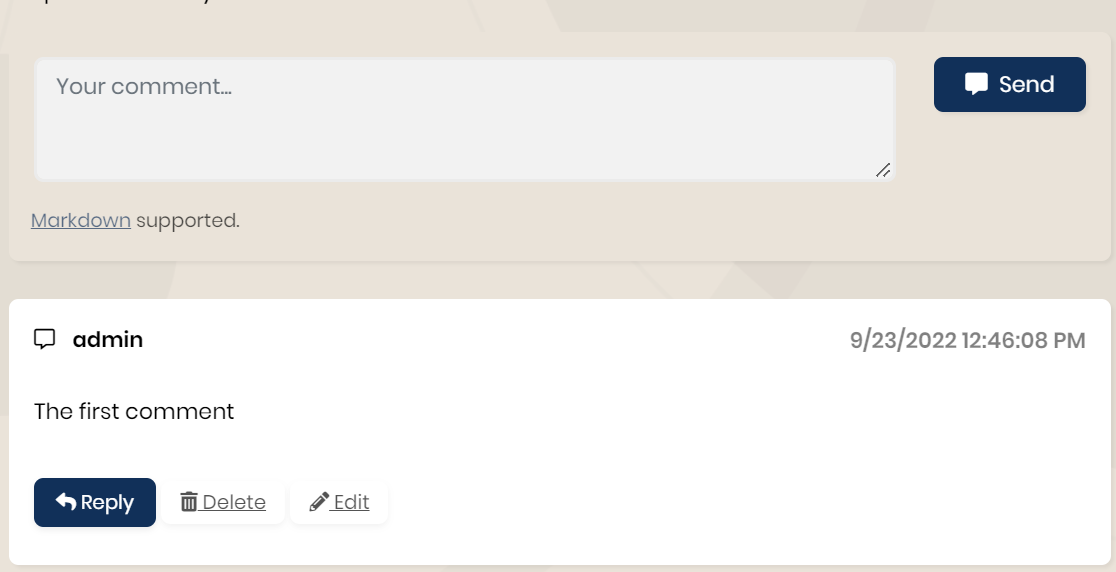
If you applied all the steps correctly, you should see the below output after clicking the Send button.