Module Entity Extensions
Module entity extension system is a high level extension system that allows you to define new properties for existing entities of the depended modules. It automatically adds properties to the entity, database, HTTP API and the user interface in a single point.
The module must be developed the Module Entity Extensions system in mind. All the official modules supports this system wherever possible.
Quick Example
Open the YourProjectNameModuleExtensionConfigurator class inside the Domain.Shared project of your solution and change the ConfigureExtraPropertiesmethod as shown below to add a SocialSecurityNumber property to the IdentityUser entity of the Identity Module.
public static void ConfigureExtraProperties()
{
    OneTimeRunner.Run(() =>
    {
        ObjectExtensionManager.Instance.Modules()
            .ConfigureIdentity(identity =>
            {
                identity.ConfigureUser(user =>
                {
                    user.AddOrUpdateProperty<string>( //property type: string
                        "SocialSecurityNumber", //property name
                        property =>
                        {
                            //validation rules
                            property.Attributes.Add(new RequiredAttribute());
                            property.Attributes.Add(
                                new StringLengthAttribute(64) {
                                    MinimumLength = 4
                                }
                            );

                            //...other configurations for this property
                        }
                    );
                });
            });
    });
}
This method is called inside the
YourProjectNameDomainSharedModuleat the beginning of the application.OneTimeRunneris a utility class that guarantees to execute this code only one time per application, since multiple calls are unnecessary.
ObjectExtensionManager.Instance.Modules()is the starting point to configure a module.ConfigureIdentity(...)method is used to configure the entities of the Identity Module.identity.ConfigureUser(...)is used to configure the user entity of the identity module. Not all entities are designed to be extensible (since it is not needed). Use the intellisense to discover the extensible modules and entities.user.AddOrUpdateProperty<string>(...)is used to add a new property to the user entity with thestringtype (AddOrUpdatePropertymethod can be called multiple times for the same property of the same entity. Each call can configure the options of the same property, but only one property is added to the entity with the same property name). You can call this method with different property names to add more properties.SocialSecurityNumberis the name of the new property.AddOrUpdatePropertygets a second argument (theproperty =>lambda expression) to configure additional options for the new property.- We can add data annotation attributes like shown here, just like adding a data annotation attribute to a class property.
Create & Update Forms
Once you define a property, it appears in the create and update forms of the related entity:
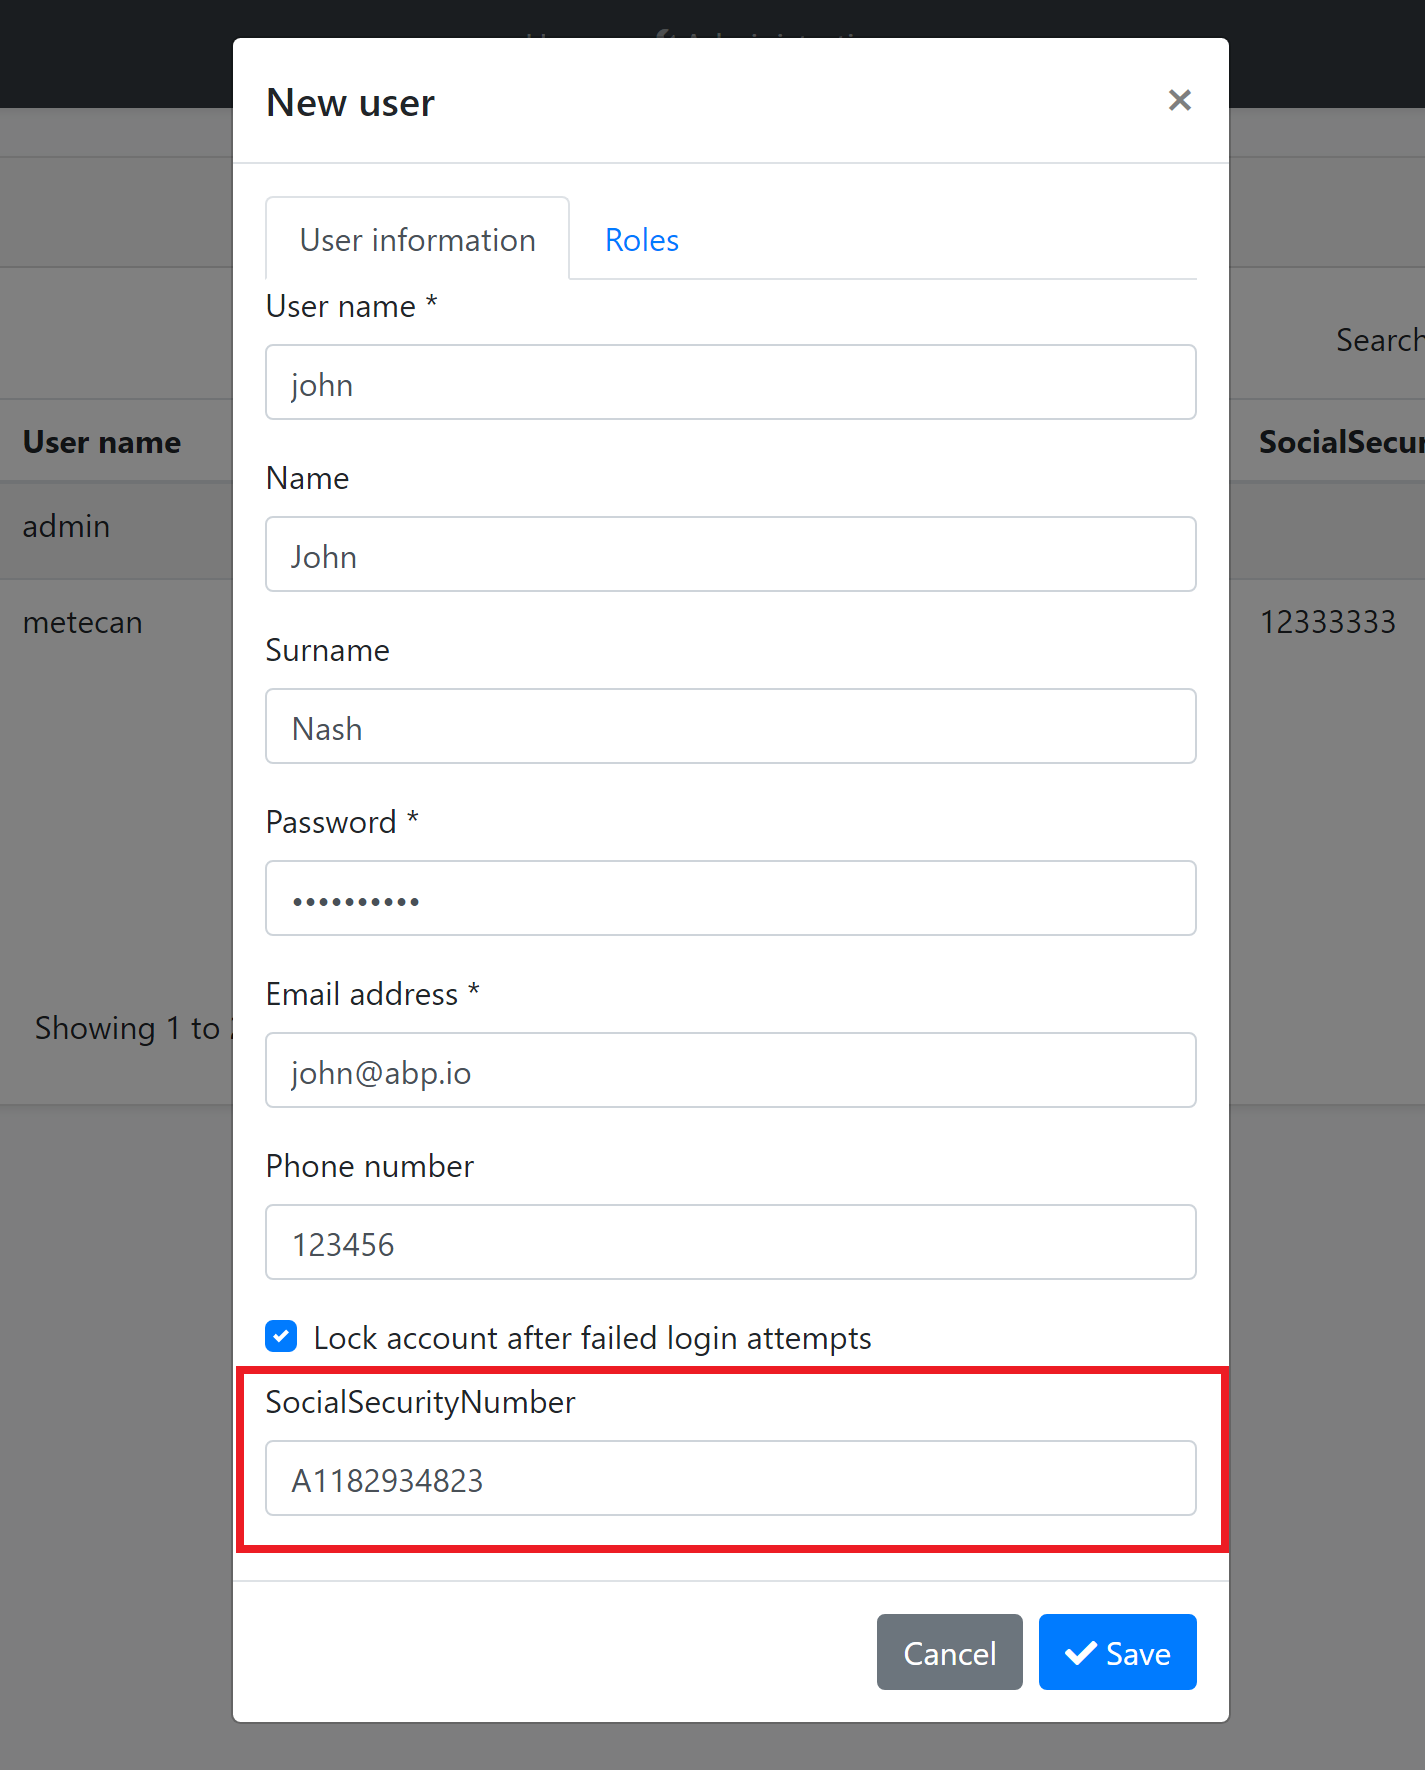
SocialSecurityNumber field comes into the form. Next sections will explain the localization and the validation for this new property.
Data Table
New properties also appear in the data table of the related page:
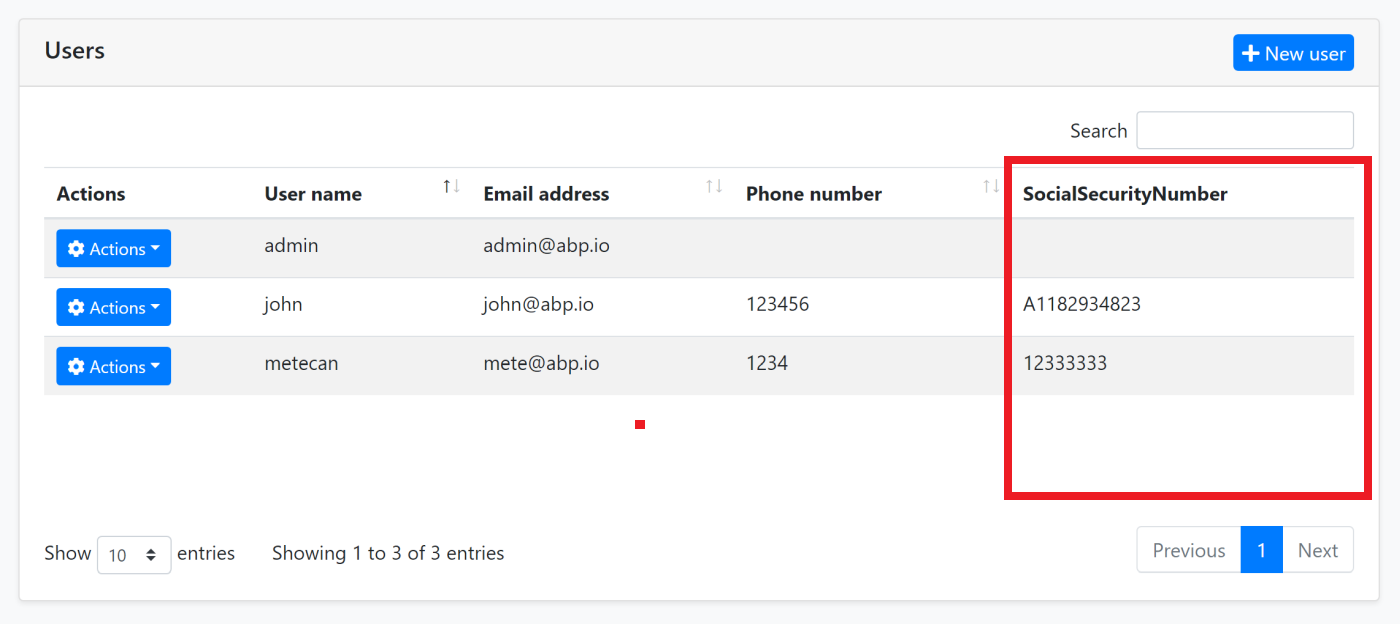
SocialSecurityNumber column comes into the table. Next sections will explain the option to hide this column from the data table.
Property Options
There are some options that you can configure while defining a new property.
Display Name
You probably want to set a different (human readable) display name for the property that is shown on the user interface.
Don't Want to Localize?
If your application is not localized, you can directly set the DisplayName for the property to a FixedLocalizableString object. Example:
property =>
{
    property.DisplayName = new FixedLocalizableString("Social security no");
}
Localizing the Display Name
If you want to localize the display name, you have two options.
Localize by Convention
Instead of setting the property.DisplayName, you can directly open your localization file (like en.json) and add the following entry to the texts section:
"SocialSecurityNumber": "Social security no"
Define the same SocialSecurityNumber key (the property name you've defined before) in your localization file for each language you support. That's all!
In some cases, the localization key may conflict with other keys in your localization files. In such cases, you can use the DisplayName: prefix for display names in the localization file (DisplayName:SocialSecurityNumber as the localization key for this example). Extension system looks for prefixed version first, then fallbacks to the non prefixed name (it then fallbacks to the property name if you haven't localized it).
This approach is recommended since it is simple and suitable for most scenarios.
Localize using the DisplayName Property
If you want to specify the localization key or the localization resource, you can still set the DisplayName option:
property =>
{
    property.DisplayName =
        LocalizableString.Create<MyProjectNameResource>(
            "UserSocialSecurityNumberDisplayName"
        );
}
MyProjectNameResourceis the localization resource andUserSocialSecurityNumberDisplayNameis the localization key in the localization resource.
See the localization document if you want to learn more about the localization system.
Default Value
A default value is automatically set for the new property, which is the natural default value for the property type, like null for string, false for bool or 0 for int.
There are two ways to override the default value:
DefaultValue Option
DefaultValue option can be set to any value:
property =>
{
    property.DefaultValue = 42;
}
DefaultValueFactory Options
DefaultValueFactory can be set to a function that returns the default value:
property =>
{
    property.DefaultValueFactory = () => DateTime.Now;
}
options.DefaultValueFactory has a higher priority than the options.DefaultValue .
Tip: Use
DefaultValueFactoryoption only if the default value may change over the time (likeDateTime.Nowin this example). If it is a constant value, then use theDefaultValueoption.
Validation
Entity extension system allows you to define validation for extension properties in a few ways.
Data Annotation Attributes
Attributes is a list of attributes associated to this property. The example code below adds two data annotation validation attributes to the property:
property =>
{
    property.Attributes.Add(new RequiredAttribute());
    property.Attributes.Add(new StringLengthAttribute(64) {MinimumLength = 4});
}
When you run the application, you see that the validation works out of the box:
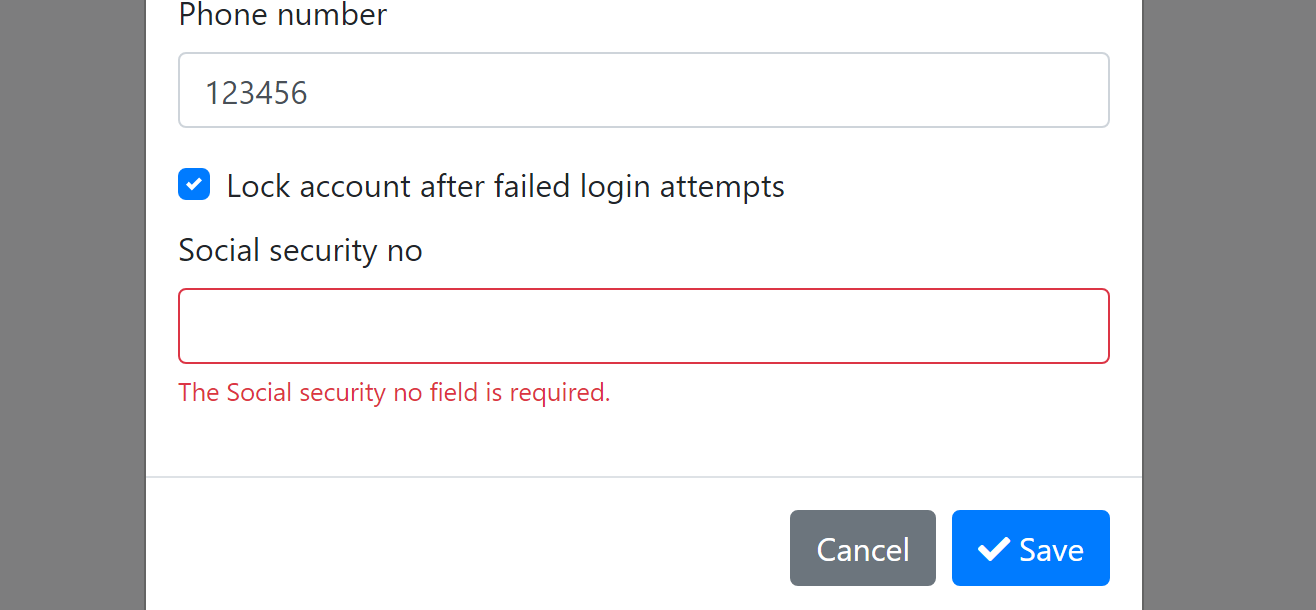
Since we've added the RequiredAttribute, it doesn't allow to left it blank. The validation system works;
- On the user interface (with automatic localization).
- On the HTTP API. Even if you directly perform an HTTP request, you get validation errors with a proper HTTP status code.
- On the
SetProperty(...)method on the entity (see the document if you wonder what is theSetProperty()method).
So, it automatically makes a full stack validation.
See the ASP.NET Core MVC Validation document to learn more about the attribute based validation.
Default Validation Attributes
There are some attributes automatically added when you create certain type of properties;
RequiredAttributeis added for non nullable primitive property types (e.g.int,bool,DateTime...) andenumtypes. If you want to allow nulls, make the property nullable (e.g.int?).EnumDataTypeAttributeis added for enum types, to prevent to set invalid enum values.
Use property.Attributes.Clear(); if you don't want these attributes.
Validation Actions
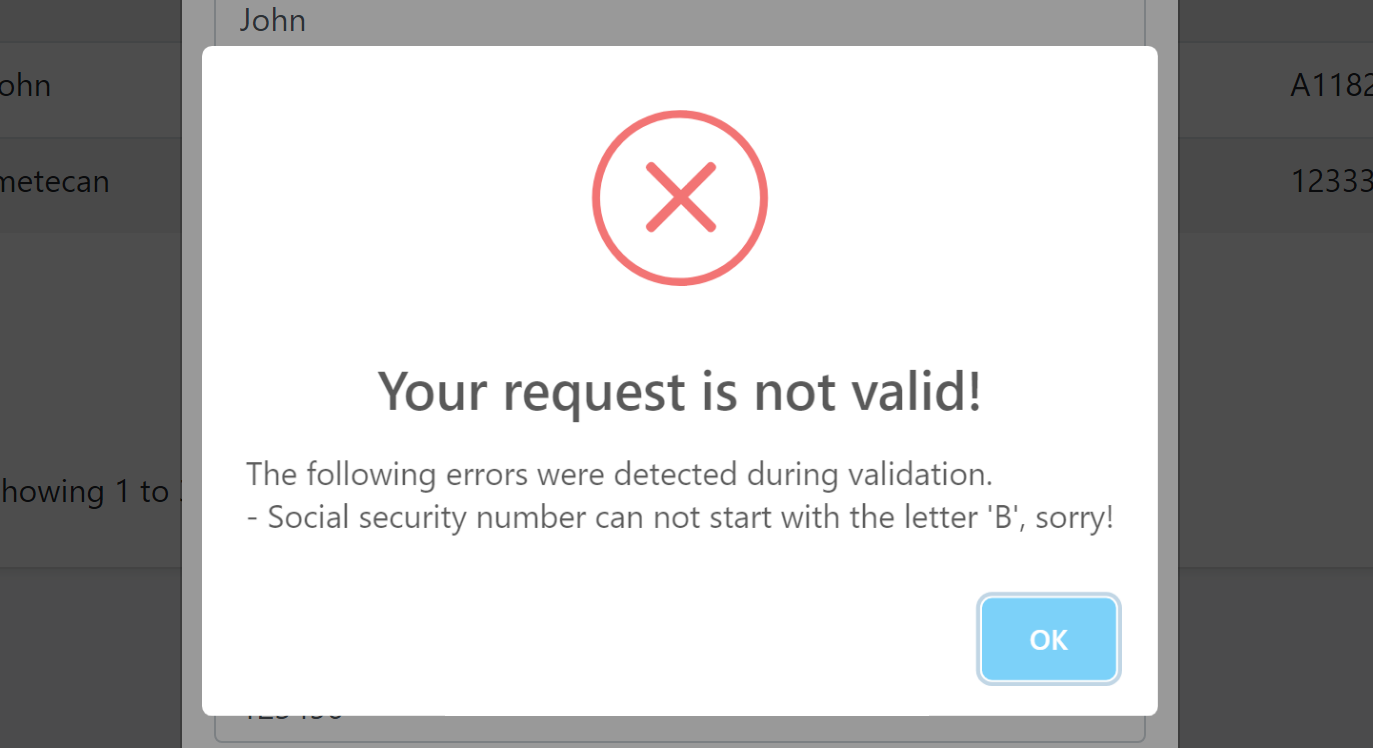
Validation actions allows you to execute a custom code to perform the validation. The example below checks if the SocialSecurityNumber starts with B and adds a validation error if so:
property =>
{
    property.Attributes.Add(new RequiredAttribute());
    property.Attributes.Add(new StringLengthAttribute(64) {MinimumLength = 4});

    property.Validators.Add(context =>
    {
        if (((string) context.Value).StartsWith("B"))
        {
            context.ValidationErrors.Add(
                new ValidationResult(
                    "Social security number can not start with the letter 'B', sorry!",
                    new[] {"extraProperties.SocialSecurityNumber"}
                )
            );
        }
    });

}
Using a RegularExpressionAttribute might be better in this case, but this is just an example. Anyway, if you enter a value starts with the letter B you get the following error while saving the form:
The Context Object
The context object has useful properties that can be used in your custom validation action. For example, you can use the context.ServiceProvider to resolve services from the dependency injection system. The example below gets the localizer and adds a localized error message:
if (((string) context.Value).StartsWith("B"))
{
    var localizer = context.ServiceProvider
        .GetRequiredService<IStringLocalizer<MyProjectNameResource>>();

    context.ValidationErrors.Add(
        new ValidationResult(
            localizer["SocialSecurityNumberCanNotStartWithB"],
            new[] {"extraProperties.SocialSecurityNumber"}
        )
    );
}
context.ServiceProvideris nullable! It can benullonly if you use theSetProperty(...)method on the object. Because DI system is not available on this time. While this is a rare case, you should perform a fallback logic whencontext.ServiceProviderisnull. For this example, you would add a non-localized error message. This is not a problem since setting an invalid value to a property generally is a programmer mistake and you mostly don't need to localization in this case. In any way, you would not be able to use localization even in a regular property setter. But, if you are serious about localization, you can throw a business exception (see the exception handling document to learn how to localize a business exception).
UI Visibility
When you define a property, it appears on the data table, create and edit forms on the related UI page. However, you can control each one individually. Example:
property =>
{
    property.UI.OnTable.IsVisible = false;
    //...other configurations
}
Use property.UI.OnCreateForm and property.UI.OnEditForm to control forms too. If a property is required, but not added to the create form, you definitely get a validation exception, so use this option carefully. But a required property may not be in the edit form if that's your requirement.
HTTP API Availability
Even if you disable a property on UI, it can be still available through the HTTP API. By default, a property is available on all APIs.
Use the property.Api options to make a property unavailable in some API endpoints.
property =>
{
    property.Api.OnUpdate.IsAvailable = false;
}
In this example, Update HTTP API will not allow to set a new value to this property. In this case, you also want to disable this property on the edit form:
property =>
{
    property.Api.OnUpdate.IsAvailable = false;
    property.UI.OnEditForm.IsVisible = false;
}
In addition to the property.Api.OnUpdate, you can set property.Api.OnCreate and property.Api.OnGet for a fine control the API endpoint.
Special Types
Enum
Module extension system naturally supports the enum types.
An example enum type:
public enum UserType
{
    Regular,
    Moderator,
    SuperUser
}
You can add enum properties just like others:
user.AddOrUpdateProperty<UserType>("Type");
An enum properties is shown as combobox (select) in the create/edit forms:

Localization
Enum member name is shown on the table and forms by default. If you want to localize it, just create a new entry on your localization file:
"UserType.SuperUser": "Super user"
One of the following names can be used as the localization key:
Enum:UserType.SuperUserUserType.SuperUserSuperUser
Localization system searches for the key with the given order. Localized text are used on the table and the create/edit forms.
Navigation Properties / Foreign Keys
It is supported to add an extension property to an entity that is Id of another entity (foreign key).
Example: Associate a department to a user
ObjectExtensionManager.Instance.Modules()
    .ConfigureIdentity(identity =>
    {
        identity.ConfigureUser(user =>
        {
            user.AddOrUpdateProperty<Guid>(
                "DepartmentId",
                property =>
                {
                    property.UI.Lookup.Url = "/api/departments";
                    property.UI.Lookup.DisplayPropertyName = "name";
                }
            );
        });
    });
UI.Lookup.Url option takes a URL to get list of departments to select on edit/create forms. This endpoint can be a typical controller, an auto API controller or any type of endpoint that returns a proper JSON response.
An example implementation that returns a fixed list of departments (in real life, you get the list from a data source):
[Route("api/departments")]
public class DepartmentController : AbpController
{
    [HttpGet]
    public async Task<ListResultDto<DepartmentDto>> GetAsync()
    {
        return new ListResultDto<DepartmentDto>(
            new[]
            {
                new DepartmentDto
                {
                    Id = Guid.Parse("6267f0df-870f-4173-be44-d74b4b56d2bd"),
                    Name = "Human Resources"
                },
                new DepartmentDto
                {
                    Id = Guid.Parse("21c7b61f-330c-489e-8b8c-80e0a78a5cc5"),
                    Name = "Production"
                }
            }
        );
    }
}
This API returns such a JSON response:
{
    "items": [{
        "id": "6267f0df-870f-4173-be44-d74b4b56d2bd",
        "name": "Human Resources"
    }, {
        "id": "21c7b61f-330c-489e-8b8c-80e0a78a5cc5",
        "name": "Production"
    }]
}
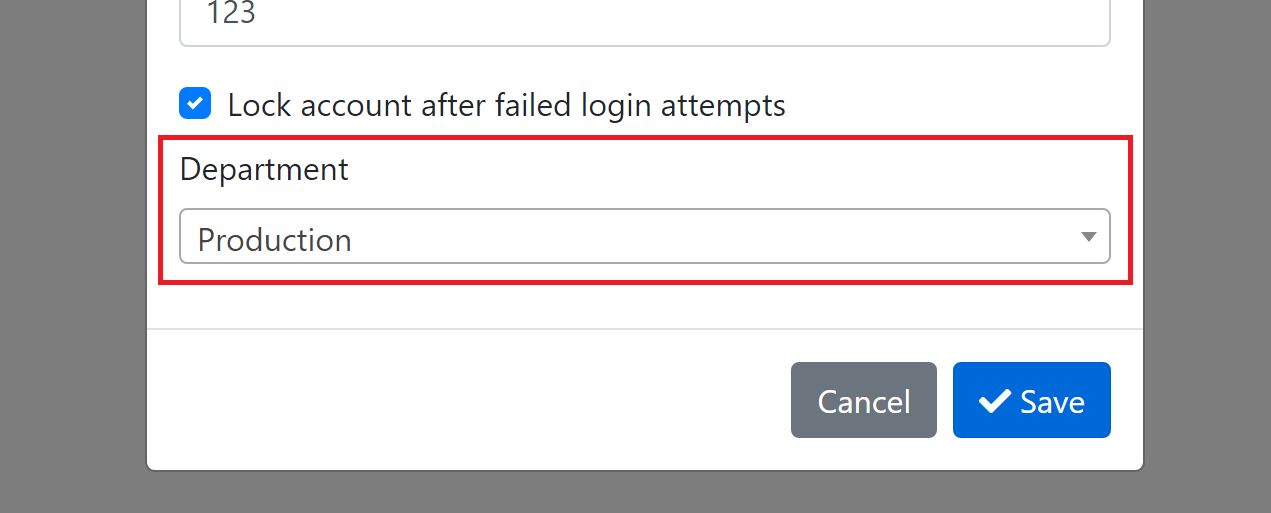
ABP can now show an auto-complete select component to pick the department while creating or editing a user:
And shows the department name on the data table:

Lookup Options
UI.Lookup has the following options to customize how to read the response returned from the Url:
Url: The endpoint to get the list of target entities. This is used on edit and create forms.DisplayPropertyName: The property in the JSON response to read the display name of the target entity to show on the UI. Default:text.ValuePropertyName: The property in the JSON response to read the Id of the target entity. Default:id.FilterParamName: ABP allows to search/filter the entity list on edit/create forms. This is especially useful if the target list contains a lot of items. In this case, you can return a limited list (top 100, for example) and allow user to search on the list. ABP sends filter text to the server (as a simple query string) with the name of this option. Default:filter.ResultListPropertyName: By default, returned JSON result should contain the entity list in anitemsarray. You can change the name of this field. Default:items.
Lookup Properties: How Display Name Works?
You may wonder how ABP shows the department name on the data table above.
It is easy to understand how to fill the dropdown on edit and create forms: ABP makes an AJAX request to the given URL. It re-requests whenever user types to filter the items.
However, for the data table, multiple items are shown on the UI and performing a separate AJAX call to get display name of the department for each row would not be so efficient.
Instead, the display name of the foreign entity is also saved as an extra property of the entity (see Extra Properties section of the Entities document) in addition to Id of the foreign entity. If you check the database, you can see the DepartmentId_Text in the ExtraProperties field in the database table:
{"DepartmentId":"21c7b61f-330c-489e-8b8c-80e0a78a5cc5","DepartmentId_Text":"Production"}
So, this is a type of data duplication. If your target entity's name changes in the database later, there is no automatic synchronization system. The system works as expected, but you see the old name on the data tables. If that's a problem for you, you should care yourself to update this information when display name of your entity changes.
Database Mapping
For relational databases, all extension property values are stored in a single field in the table:

ExtraProperties field stores the properties as a JSON object. While that's fine for some scenarios, you may want to create a dedicated field for your new property. Fortunately, it is very easy to configure.
If you are using the Entity Framework Core database provider, you can configure the database mapping as shown below:
ObjectExtensionManager.Instance
    .MapEfCoreProperty<IdentityUser, string>(
        "SocialSecurityNumber",
        (entityBuilder, propertyBuilder) =>
        {
            propertyBuilder.HasMaxLength(64);
        }
    );
Write this inside the YourProjectNameEfCoreEntityExtensionMappings class in your .EntityFrameworkCore project. Then you need to use the standard Add-Migration and Update-Database commands to create a new database migration and apply the change to your database.
Add-Migration create a new migration as shown below:
public partial class Added_SocialSecurityNumber_To_IdentityUser : Migration
{
    protected override void Up(MigrationBuilder migrationBuilder)
    {
        migrationBuilder.AddColumn<string>(
            name: "SocialSecurityNumber",
            table: "AbpUsers",
            maxLength: 128,
            nullable: true);
    }

    protected override void Down(MigrationBuilder migrationBuilder)
    {
        migrationBuilder.DropColumn(
            name: "SocialSecurityNumber",
            table: "AbpUsers");
    }
}
Once you update your database, you will see that the AbpUsers table has the new property as a standard table field:

If you first created a property without a database table field, then you later needed to move this property to a database table field, it is suggested to execute an SQL command in your migration to copy the old values to the new field.
However, if you don't make it, the ABP Framework seamlessly manages it. It uses the new database field, but fallbacks to the
ExtraPropertiesfield if it is null. When you save the entity, it moves the value to the new field.
See the Extending Entities document for more.
More
See the Customizing the Modules guide for an overall index for all the extensibility options.
Here, a few things you can do:
- You can create a second entity that maps to the same database table with the extra property as a standard class property (if you've defined the EF Core mapping). For the example above, you can add a
public string SocialSecurityNumber {get; set;}property to theAppUserentity in your application, since theAppUserentity is mapped to the sameAbpUsertable. Do this only if you need it, since it brings more complexity to your application. - You can override a domain or application service to perform custom logics with your new property.
- You can low level control how to add/render a field in the data table on the UI.


