Microservice Tutorial Part 06: Integrating the services: HTTP API Calls
In the previous part, we implemented the functionality of the Ordering microservice. However, when listing orders, we need to display the product name instead of the product ID. To achieve this, we must call the Catalog service to retrieve the product name for each order item.
In this section, we will integrate the Ordering service with the Catalog service using HTTP API calls.
The Need for the Integration Services
In a microservices architecture, each service is responsible for its own data and business logic. However, services often need to communicate with each other to fulfill their responsibilities. This communication can be synchronous or asynchronous, depending on the requirements.
In our case, the Ordering service needs to display the product name instead of the product ID. To achieve this, we need to call the Catalog service to retrieve the product details based on the product ID. This is a typical example of a synchronous communication pattern between microservices. As a solution to that problem, we will use an integration service that will handle the communication with the Catalog service. Integration service concept in ABP is designed for request/response style inter-module (in modular applications) and inter-microservice (in distributed systems) communication.
Creating a Products Integration Service
First, we need to create a service that will handle the communication with the Catalog service. This service will be responsible for fetching the product details based on the product ID.
Defining the IProductIntegrationService Interface
Open the CloudCrm.CatalogService .NET solution in your IDE. Locate the CloudCrm.CatalogService.Contracts project, and create a new folder named IntegrationServices. Inside this folder, add a new interface named IProductIntegrationService with the following code:
using System;
using System.Collections.Generic;
using System.Threading.Tasks;
using CloudCrm.CatalogService.Products;
using Volo.Abp;
using Volo.Abp.Application.Services;

namespace CloudCrm.CatalogService.IntegrationServices;

[IntegrationService]
public interface IProductIntegrationService : IApplicationService
{
    Task<List<ProductDto>> GetProductsByIdsAsync(List<Guid> ids);
}
IProductIntegrationService is very similar to a typical application service. The only difference is that it is marked with the [IntegrationService] attribute. This attribute is used to identify the service as an integration service, which allows ABP to handle the communication between services. ABP behave differently for them (for example, ABP doesn't expose integration services as HTTP APIs by default if you've configured the Auto API Controllers feature)
IProductIntegrationService contains a single method named GetProductsByIdsAsync. This method takes a list of product IDs and returns a list of ProductDto objects. This is exactly what we need in the Ordering service.
Design Tip
You may think if we can use the existing application services (like
IProductAppService) from other services instead of creating specific integration services. Technically you can use, ABP has no restriction. However, from good design and best practice points, we don't suggest it. Because, application services are designed to be consumed specifically by the presentation layer. They will have different authorization and validation logic, they will need different DTO input and output properties, they will have different performance, optimization and caching requirements, and so on. And most importantly, all these will change by the time based on UI requirements and these changes may break your integrations later. It is best to implement specific integration APIs that is designed and optimized for that purpose.We've reused the
ProductDtoobject created forIProductAppService, which can be reasonable from a maintenance point of view. But if you think your integration service results will be different from the application service results in the future, it can be good to separate them from the first day so you don't need to introduce breaking changes later.
Implementing the ProductIntegrationService Class
Now, let's implement the IProductIntegrationService interface. Create a new folder named IntegrationServices in the CloudCrm.CatalogService project. Inside this folder, add a new class named ProductIntegrationService with the following code:
using System;
using System.Collections.Generic;
using System.Threading.Tasks;
using CloudCrm.CatalogService.Localization;
using CloudCrm.CatalogService.Products;
using Volo.Abp;
using Volo.Abp.Application.Services;
using Volo.Abp.Domain.Repositories;

namespace CloudCrm.CatalogService.IntegrationServices;

[IntegrationService]
public class ProductIntegrationService : ApplicationService, IProductIntegrationService
{
    private readonly IRepository<Product, Guid> _productRepository;

    public ProductIntegrationService(IRepository<Product, Guid> productRepository)
    {
        LocalizationResource = typeof(CatalogServiceResource);
        _productRepository = productRepository;
    }

    public async Task<List<ProductDto>> GetProductsByIdsAsync(List<Guid> ids)
    {
        var products = await _productRepository.GetListAsync(
            product => ids.Contains(product.Id)
        );

        return ObjectMapper.Map<List<Product>, List<ProductDto>>(products);
    }
}
ProductIntegrationService is a typical application service class that implements the IProductIntegrationService interface. It has a constructor that takes an IRepository<Product, Guid> object. This repository is used to fetch the product details from the database.
Here, we directly used
List<T>classes, but instead, you could wrap inputs and outputs into DTOs. In that way, it can be possible to add new properties to these DTOs without changing the signature of your integration service method (and without introducing breaking changes for your client applications).
Consuming the Products Integration Service
Now that we have created the IProductIntegrationService interface and the ProductIntegrationService class, we can consume this service from the Ordering service.
Adding a Reference to the CloudCrm.OrderingService Package
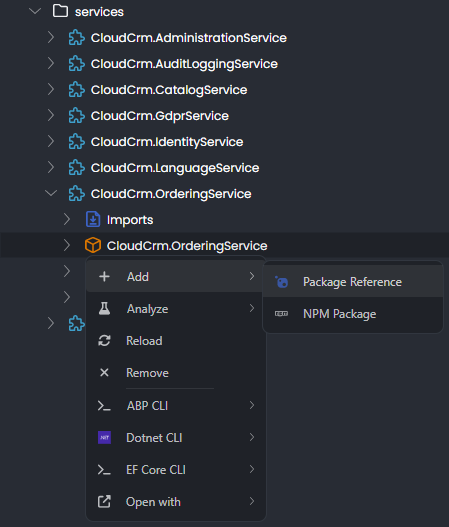
First, we need to add a reference to the CloudCrm.OrderingService package in the Ordering service. Open the ABP Studio, and stop the application(s) if it is running. Then, open the Solution Explorer and right-click on the CloudCrm.OrderingService package. Select Add -> Package Reference command:
In the Add Package Reference window, select the CloudCrm.CatalogService.Contracts package from the This solution tab. Click the OK button to add the reference:
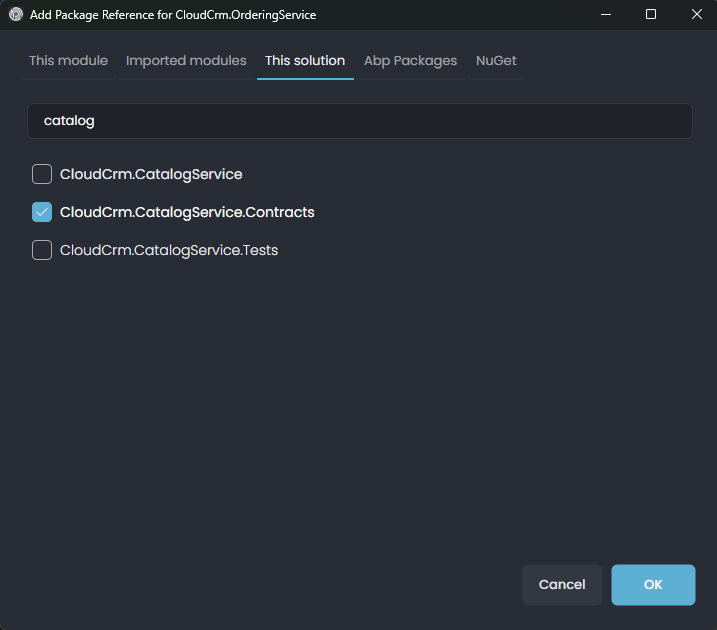
ABP Studio adds the package reference and arranges the module dependency.
Instead of directly adding such a package reference, it can be best to import the module first (right-click the
CloudCrm.OrderingService, select the Import Module command and import theCloudCrm.CatalogServicemodule), then install the package reference. In that way, it would be easy to see and keep track of inter-module dependencies.
Using the Products Integration Service
Now, we can use the IProductIntegrationService interface to fetch the product details in the OrderAppService class.
Open the OrderAppService class (the OrderAppService.cs file under the Services folder of the CloudCrm.OrderingService project of the CloudCrm.OrderingService .NET solution) and change its content as like the following code block:
using System;
using System.Collections.Generic;
using System.Linq;
using System.Threading.Tasks;
using CloudCrm.CatalogService.IntegrationServices;
using CloudCrm.OrderingService.Entities;
using CloudCrm.OrderingService.Enums;
using CloudCrm.OrderingService.Localization;
using Volo.Abp.Application.Services;
using Volo.Abp.Domain.Repositories;

namespace CloudCrm.OrderingService.Services;

public class OrderAppService : ApplicationService, IOrderAppService
{
    private readonly IRepository<Order, Guid>  _orderRepository;
    private readonly IProductIntegrationService _productIntegrationService;

    public OrderAppService(
        IRepository<Order, Guid> orderRepository,
        IProductIntegrationService productIntegrationService)
    {
        LocalizationResource = typeof(OrderingServiceResource);

        _orderRepository = orderRepository;
        _productIntegrationService = productIntegrationService;
    }

    public async Task<List<OrderDto>> GetListAsync()
    {
        var orders = await _orderRepository.GetListAsync();

        // Prepare a list of products we need
        var productIds = orders.Select(o => o.ProductId).Distinct().ToList();
        var products = (await _productIntegrationService
                .GetProductsByIdsAsync(productIds))
            .ToDictionary(p => p.Id, p => p.Name);

        var orderDtos = ObjectMapper.Map<List<Order>, List<OrderDto>>(orders);

        orderDtos.ForEach(orderDto =>
        {
            orderDto.ProductName = products[orderDto.ProductId];
        });

        return orderDtos;
    }

    public async Task CreateAsync(OrderCreationDto input)
    {
        var order = new Order
        {
            CustomerName = input.CustomerName,
            ProductId = input.ProductId,
            State = OrderState.Placed
        };

        await _orderRepository.InsertAsync(order);
    }
}
Now open the OrderDto class (the OrderDto.cs file under the Services folder of the CloudCrm.OrderingService.Contracts project of the CloudCrm.OrderingService .NET solution) and add a new property named ProductName:
using System;
using CloudCrm.OrderingService.Enums;

namespace CloudCrm.OrderingService.Services;

public class OrderDto
{
    public Guid Id { get; set; }
    public string CustomerName { get; set; }
    public Guid ProductId { get; set; }
    public string ProductName { get; set; } // New property
    public OrderState State { get; set; }
}
Lastly, open the OrderingServiceApplicationMappers class (the OrderingServiceApplicationMappers.cs file under the ObjectMapping folder of the CloudCrm.OrderingService project of the CloudCrm.OrderingService .NET solution) and ignore the ProductName property in the mapping configuration:
using Riok.Mapperly.Abstractions;
using Volo.Abp.Mapperly;

namespace CloudCrm.OrderingService.ObjectMapping;

[Mapper]
public partial class OrderingServiceApplicationMappers : MapperBase<Order, OrderDto>
{
    [MapperIgnoreTarget(nameof(OrderDto.ProductName))]
    public override partial OrderDto Map(Order source);

    [MapperIgnoreTarget(nameof(OrderDto.ProductName))]
    public override partial void Map(Order source, OrderDto destination);
}
Let's explain the changes we made:
- We added a new property named
ProductNameto theOrderDtoclass. This property will hold the product name. - We modified the
GetListAsyncmethod of theOrderAppServiceclass to fetch the product details using theIProductIntegrationServiceinterface. We first fetch the product IDs from the orders, then call theGetProductsByIdsAsyncmethod of theIProductIntegrationServiceinterface to fetch the product details. Finally, we map the product names to theOrderDtoobjects.
Generating Proxy Classes for the Integration Service
We have created the IProductIntegrationService interface and the ProductIntegrationService class in the CloudCrm.CatalogService solution. Now, we need to generate the proxy classes for the integration service in the CloudCrm.OrderingService package. First, Start the CloudCrm.CatalogService application in ABP Studio Solution Runner. Then, open the Solution Explorer and right-click on the CloudCrm.OrderingService package. Select the ABP CLI -> Generate Proxy -> C# command:
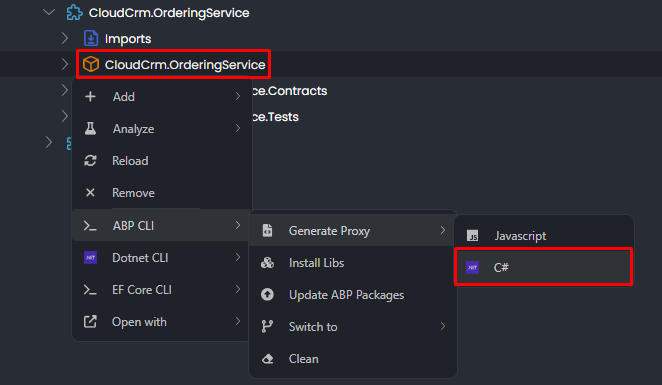
It opens the Generate C# proxies window. Select the CloudCrm.CatalogService application from the Application dropdown list. Then, choose the catalog module from the Module dropdown list and choose the integration service from the Service type dropdown list. Check the Without contracts checkbox and click the Generate button:
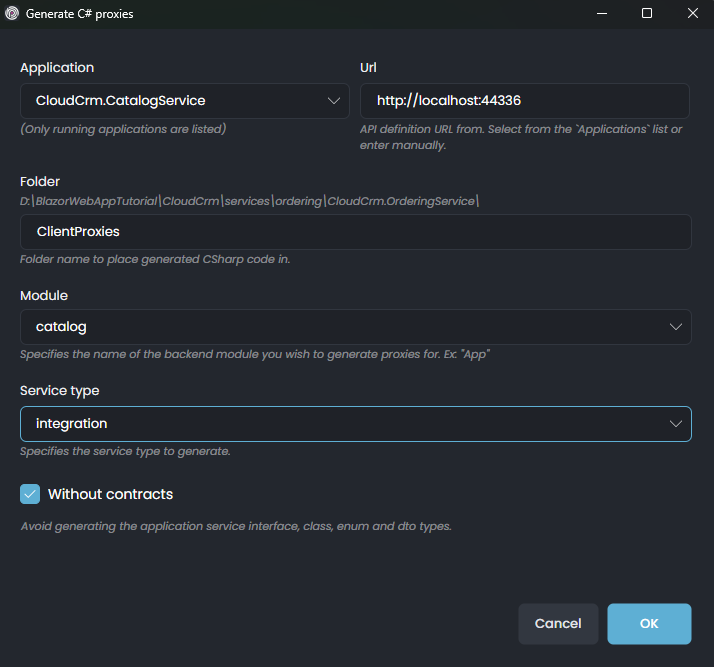
Proxy classes for the IProductIntegrationService interface have been generated.
Lastly, open the CloudCrmOrderingServiceModule class (the CloudCrmOrderingServiceModule.cs file under the CloudCrm.OrderingService project of the CloudCrm.OrderingService .NET solution) and add the following code to the ConfigureServices method:
public override void ConfigureServices(ServiceConfigurationContext context)
{
    // Other configurations...
    context.Services.AddStaticHttpClientProxies(
        typeof(CloudCrmCatalogServiceContractsModule).Assembly,
        "CatalogService");
}
Updating the UI to Display the Product Name
Open the Index.cshtml file (the Index.cshtml file under the Pages/Orders folder of the CloudCrm.Web project of the CloudCrm.Web .NET solution) and update the table content to display the product name instead of the product ID:
@page
@model CloudCrm.Web.Pages.Orders.Index

<h1>Orders</h1>

<abp-card>
    <abp-card-body>
        <abp-list-group>
            @foreach (var order in Model.Orders)
            {
                <abp-list-group-item>
                    <strong>Customer:</strong> @order.CustomerName <br />
                    <strong>Product:</strong> @order.ProductName <br />
                    <strong>State:</strong> @order.State
                </abp-list-group-item>
            }
        </abp-list-group>
    </abp-card-body>
</abp-card>
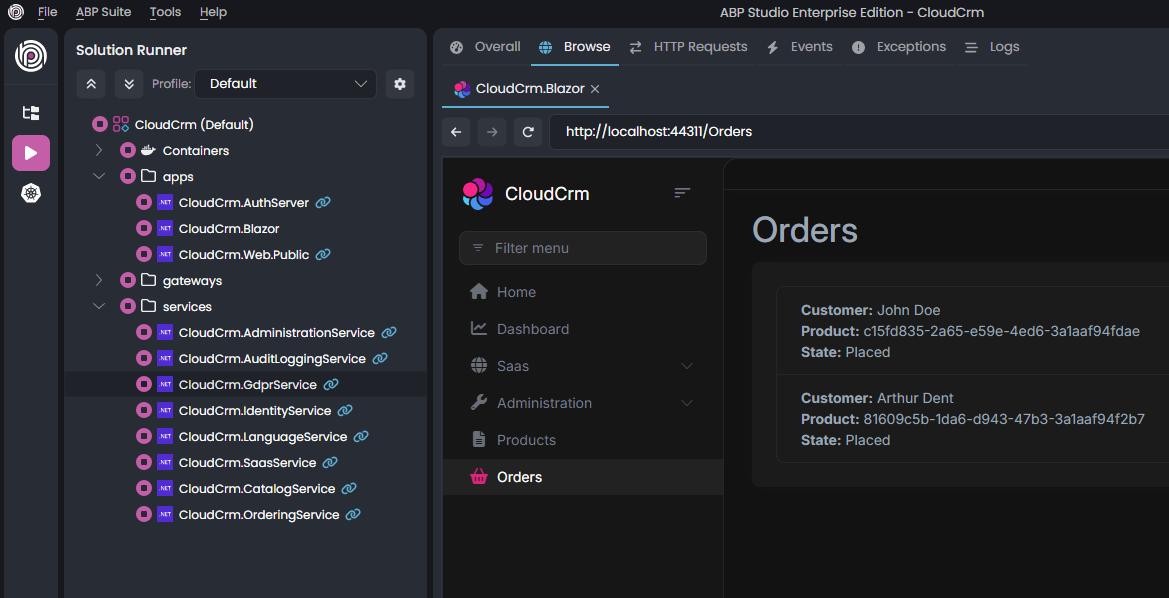
That's it! Now, you can Start the all applications and browse it in ABP Studio to see the result:
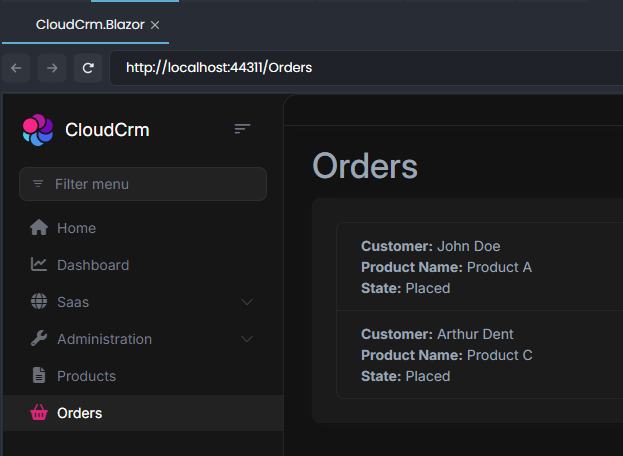
Now, the Ordering service displays the product name instead of the product ID. We have successfully integrated the Ordering service with the Catalog service using HTTP API calls.
Design Tip
It is suggested that you keep that type of communication to a minimum and not couple your services with each other. It can make your solution complicated and may also decrease your system performance. When you need to do it, think about performance and try to make some optimizations. For example, if the Ordering service frequently needs product data, you can use a kind of cache layer, so it doesn't make frequent requests to the Catalog service.
Updating the Kubernetes Configuration
ABP microservice startup template provides pre-configured Helm charts to deploy your solution to Kubernetes. When you develop your solution, you should also care about configurations of these charts if you want to keep them up to date and working.
In the section Generating Proxy Classes for the Integration Service above, we added a new configuration to the appsettings.json file of the Ordering microservice. We should configure the corresponding Helm chart configuration to keep it synchronized.
Open the etc\helm\cloudcrm\charts\ordering\templates\ordering.yaml file in a text editor, and add the following lines under the env section, just like the other values present (be careful on indents since it is critical in YAML files):
- name: "RemoteServices__CatalogService__BaseUrl"
  value: "http://{{ .Release.Name }}-catalog"
With this simple configuration, now the Ordering module can discover the catalog microservice's URL inside your Kubernetes cluster.


