Web Application Development Tutorial - Part 9: Authors: User Interface
Introduction
This part explains how to create a CRUD page for the Author entity introduced in the previous parts.
The Author Management Page
Run the following command line to create a new module, named AuthorModule in the root folder of the angular application:
yarn ng generate module author --module app --routing --route authors
This command should produce the following output:
> yarn ng generate module author --module app --routing --route authors

yarn run v1.19.1
$ ng generate module author --module app --routing --route authors
CREATE src/app/author/author-routing.module.ts (344 bytes)
CREATE src/app/author/author.module.ts (349 bytes)
CREATE src/app/author/author.component.html (21 bytes)
CREATE src/app/author/author.component.spec.ts (628 bytes)
CREATE src/app/author/author.component.ts (276 bytes)
CREATE src/app/author/author.component.scss (0 bytes)
UPDATE src/app/app-routing.module.ts (1396 bytes)
Done in 2.22s.
AuthorModule
Open the /src/app/author/author.module.ts and replace the content as shown below:
import { NgModule } from '@angular/core';
import { SharedModule } from '../shared/shared.module';
import { AuthorRoutingModule } from './author-routing.module';
import { AuthorComponent } from './author.component';
import { NgbDatepickerModule } from '@ng-bootstrap/ng-bootstrap';

@NgModule({
  declarations: [AuthorComponent],
  imports: [SharedModule, AuthorRoutingModule, NgbDatepickerModule],
})
export class AuthorModule {}
- Added the
SharedModule.SharedModuleexports some common modules needed to create user interfaces. SharedModulealready exports theCommonModule, so we've removed theCommonModule.- Added
NgbDatepickerModulethat will be used later on the author create and edit forms.
Menu Definition
Open the src/app/route.provider.ts file and add the following menu definition:
{
  path: '/authors',
  name: '::Menu:Authors',
  parentName: '::Menu:BookStore',
  layout: eLayoutType.application,
  requiredPolicy: 'BookStore.Authors',
}
Open the /src/app/route.provider.ts and add 'BookStore.Books || BookStore.Authors' to the /book-store route. The /book-store route block should be following:
{
  path: '/book-store',
  name: '::Menu:BookStore',
  iconClass: 'fas fa-book',
  order: 2,
  layout: eLayoutType.application,
  requiredPolicy: 'BookStore.Books || BookStore.Authors',
},
The final configureRoutes function declaration should be following:
function configureRoutes(routes: RoutesService) {
  return () => {
    routes.add([
      {
        path: '/',
        name: '::Menu:Home',
        iconClass: 'fas fa-home',
        order: 1,
        layout: eLayoutType.application,
      },
      {
        path: '/book-store',
        name: '::Menu:BookStore',
        iconClass: 'fas fa-book',
        order: 2,
        layout: eLayoutType.application,
        requiredPolicy: 'BookStore.Books || BookStore.Authors',
      },
      {
        path: '/books',
        name: '::Menu:Books',
        parentName: '::Menu:BookStore',
        layout: eLayoutType.application,
        requiredPolicy: 'BookStore.Books',
      },
      {
        path: '/authors',
        name: '::Menu:Authors',
        parentName: '::Menu:BookStore',
        layout: eLayoutType.application,
        requiredPolicy: 'BookStore.Authors',
      },
    ]);
  };
}
Service Proxy Generation
ABP CLI provides generate-proxy command that generates client proxies for your HTTP APIs to make easy to consume your HTTP APIs from the client side. Before running generate-proxy command, your host must be up and running.
Run the following command in the angular folder:
abp generate-proxy -t ng
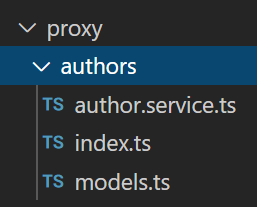
This command generates the service proxy for the author service and the related model (DTO) classes:

AuthorComponent
Open the /src/app/author/author.component.ts file and replace the content as below:
import { Component, OnInit, inject } from '@angular/core';
import { ListService, PagedResultDto } from '@abp/ng.core';
import { AuthorService, AuthorDto } from '@proxy/authors';
import { FormGroup, FormBuilder, Validators } from '@angular/forms';
import { NgbDateNativeAdapter, NgbDateAdapter } from '@ng-bootstrap/ng-bootstrap';
import { ConfirmationService, Confirmation } from '@abp/ng.theme.shared';

@Component({
  selector: 'app-author',
  templateUrl: './author.component.html',
  styleUrls: ['./author.component.scss'],
  providers: [ListService, { provide: NgbDateAdapter, useClass: NgbDateNativeAdapter }],
})
export class AuthorComponent implements OnInit {
  author = { items: [], totalCount: 0 } as PagedResultDto<AuthorDto>;

  isModalOpen = false;

  form: FormGroup;

  selectedAuthor = {} as AuthorDto;

  public readonly list = inject(ListService);
  private readonly authorService = inject(AuthorService);
  private readonly fb = inject(FormBuilder);
  private readonly confirmation = inject(ConfirmationService);

  ngOnInit(): void {
    const authorStreamCreator = (query) => this.authorService.getList(query);

    this.list.hookToQuery(authorStreamCreator).subscribe((response) => {
      this.author = response;
    });
  }

  createAuthor() {
    this.selectedAuthor = {} as AuthorDto;
    this.buildForm();
    this.isModalOpen = true;
  }

  editAuthor(id: string) {
    this.authorService.get(id).subscribe((author) => {
      this.selectedAuthor = author;
      this.buildForm();
      this.isModalOpen = true;
    });
  }

  buildForm() {
    this.form = this.fb.group({
      name: [this.selectedAuthor.name || '', Validators.required],
      birthDate: [
        this.selectedAuthor.birthDate ? new Date(this.selectedAuthor.birthDate) : null,
        Validators.required,
      ],
      shortBio: [
        this.selectedAuthor.shortBio ? this.selectedAuthor.shortBio : null,
        Validators.required,
      ],
    });
  }

  save() {
    if (this.form.invalid) {
      return;
    }

    if (this.selectedAuthor.id) {
      this.authorService
        .update(this.selectedAuthor.id, this.form.value)
        .subscribe(() => {
          this.isModalOpen = false;
          this.form.reset();
          this.list.get();
        });
    } else {
      this.authorService.create(this.form.value).subscribe(() => {
        this.isModalOpen = false;
        this.form.reset();
        this.list.get();
      });
    }
  }

  delete(id: string) {
    this.confirmation.warn('::AreYouSureToDelete', '::AreYouSure')
        .subscribe((status) => {
          if (status === Confirmation.Status.confirm) {
            this.authorService.delete(id).subscribe(() => this.list.get());
          }
	    });
  }
}
Open the /src/app/author/author.component.html and replace the content as below:
<div class="card">
  <div class="card-header">
    <div class="row">
      <div class="col col-md-6">
        <h5 class="card-title">
          {{ '::Menu:Authors' | abpLocalization }}
        </h5>
      </div>
      <div class="text-end col col-md-6">
        <div class="text-lg-end pt-2">
          <button *abpPermission="'BookStore.Authors.Create'" id="create" class="btn btn-primary" type="button" (click)="createAuthor()">
            <i class="fa fa-plus me-1"></i>
            <span>{{ '::NewAuthor' | abpLocalization }}</span>
          </button>
        </div>
      </div>
    </div>
  </div>
  <div class="card-body">
    <ngx-datatable [rows]="author.items" [count]="author.totalCount" [list]="list" default>
      <ngx-datatable-column
        [name]="'::Actions' | abpLocalization"
        [maxWidth]="150"
        [sortable]="false"
      >
        <ng-template let-row="row" ngx-datatable-cell-template>
          <div ngbDropdown container="body" class="d-inline-block">
            <button
              class="btn btn-primary btn-sm dropdown-toggle"
              data-toggle="dropdown"
              aria-haspopup="true"
              ngbDropdownToggle
            >
              <i class="fa fa-cog me-1"></i>{{ '::Actions' | abpLocalization }}
            </button>
            <div ngbDropdownMenu>
              <button *abpPermission="'BookStore.Authors.Edit'" ngbDropdownItem (click)="editAuthor(row.id)">
                {{ '::Edit' | abpLocalization }}
              </button>
              <button *abpPermission="'BookStore.Authors.Delete'" ngbDropdownItem (click)="delete(row.id)">
                {{ '::Delete' | abpLocalization }}
              </button>
            </div>
          </div>
        </ng-template>
      </ngx-datatable-column>
      <ngx-datatable-column [name]="'::Name' | abpLocalization" prop="name"></ngx-datatable-column>
      <ngx-datatable-column [name]="'::BirthDate' | abpLocalization">
        <ng-template let-row="row" ngx-datatable-cell-template>
          {{ row.birthDate | date }}
        </ng-template>
      </ngx-datatable-column>
      <ngx-datatable-column [name]="'::ShortBio' | abpLocalization" prop="shortBio"></ngx-datatable-column>
    </ngx-datatable>
  </div>
</div>

<abp-modal [(visible)]="isModalOpen">
  <ng-template #abpHeader>
    <h3>{{ (selectedAuthor.id ? '::Edit' : '::NewAuthor') | abpLocalization }}</h3>
  </ng-template>

  <ng-template #abpBody>
    <form [formGroup]="form" (ngSubmit)="save()">
      <div class="form-group">
        <label for="author-name">Name</label><span> * </span>
        <input type="text" id="author-name" class="form-control" formControlName="name" autofocus />
      </div>

      <div class="mt-2">
        <label>Birth date</label><span> * </span>
        <input
          #datepicker="ngbDatepicker"
          class="form-control"
          name="datepicker"
          formControlName="birthDate"
          ngbDatepicker
          (click)="datepicker.toggle()"
        />
      </div>
      <div class="form-group">
        <label for="author-short-bio">{{ '::Short Bio' | abpLocalization }}</label><span> * </span>
        <textarea id="author-short-bio" class="form-control" formControlName="shortBio" rows="12"></textarea>
      </div>
    </form>
  </ng-template>

  <ng-template #abpFooter>
    <button type="button" class="btn btn-secondary" abpClose>
      {{ '::Close' | abpLocalization }}
    </button>

    <button class="btn btn-primary" (click)="save()" [disabled]="form.invalid">
      <i class="fa fa-check mr-1"></i>
      {{ '::Save' | abpLocalization }}
    </button>
  </ng-template>
</abp-modal>
Localizations
This page uses some localization keys we need to declare. Open the en.json file under the Localization/BookStore folder of the Acme.BookStore.Domain.Shared project and add the following entries:
"Menu:Authors": "Authors",
"Authors": "Authors",
"AuthorDeletionConfirmationMessage": "Are you sure to delete the author '{0}'?",
"BirthDate": "Birth date",
"NewAuthor": "New author"
Run the Application
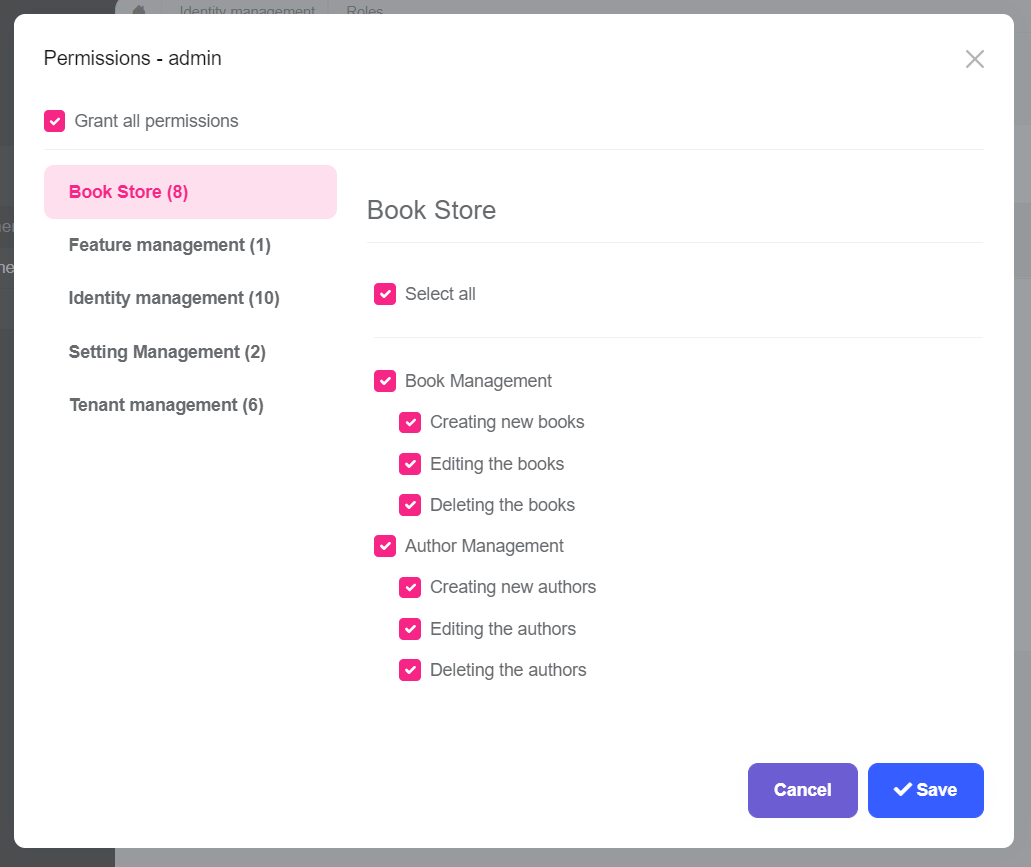
Run and login to the application. You can not see the menu item since you don't have permission yet. Go to the identity/roles page, click to the Actions button and select the Permissions action for the admin role:

As you see, the admin role has no Author Management permissions yet. Click to the checkboxes and save the modal to grant the necessary permissions. You will see the Authors menu item under the Book Store in the main menu, after refreshing the page:

That's all! This is a fully working CRUD page, you can create, edit and delete authors.
Tip: If you run the
.DbMigratorconsole application after defining a new permission, it automatically grants these new permissions to the admin role and you don't need to manually grant the permissions yourself.


