


Mobile Application Development Tutorial - React Native
React Native mobile option is available for Team or higher licenses. Therefore, if you don't have a commercial license, it's suggested to follow the article by downloading the source code of the sample application as described in the next chapter.
About This Tutorial
You must have an ABP Team or a higher license to be able to create a mobile application.
- This tutorial assumes that you have completed the Web Application Development tutorial and built an ABP based application named
Acme.BookStorewith React Native as the mobile option. Therefore, if you haven't completed the Web Application Development tutorial, you either need to complete it or download the source code from down below and follow this tutorial. - In this tutorial, we will only focus on the UI side of the
Acme.BookStoreapplication and will implement the CRUD operations. - Before starting, please make sure that the React Native Development Environment is ready on your machine.
Download the Source Code
You can use the following link to download the source code of the application described in this article:
If you encounter the "filename too long" or "unzip" error on Windows, please see this guide.
The Book List Page
There is no dynamic proxy generation for the react native application, that is why we need to create the BookAPI proxy manually under the ./src/api folder.
//./src/api/BookAPI.ts
import api from './API';

export const getList = () => api.get('/api/app/book').then(({ data }) => data);

export const get = id => api.get(`/api/app/book/${id}`).then(({ data }) => data);

export const create = input => api.post('/api/app/book', input).then(({ data }) => data);

export const update = (input, id) => api.put(`/api/app/book/${id}`, input).then(({ data }) => data);

export const remove = id => api.delete(`/api/app/book/${id}`).then(({ data }) => data);
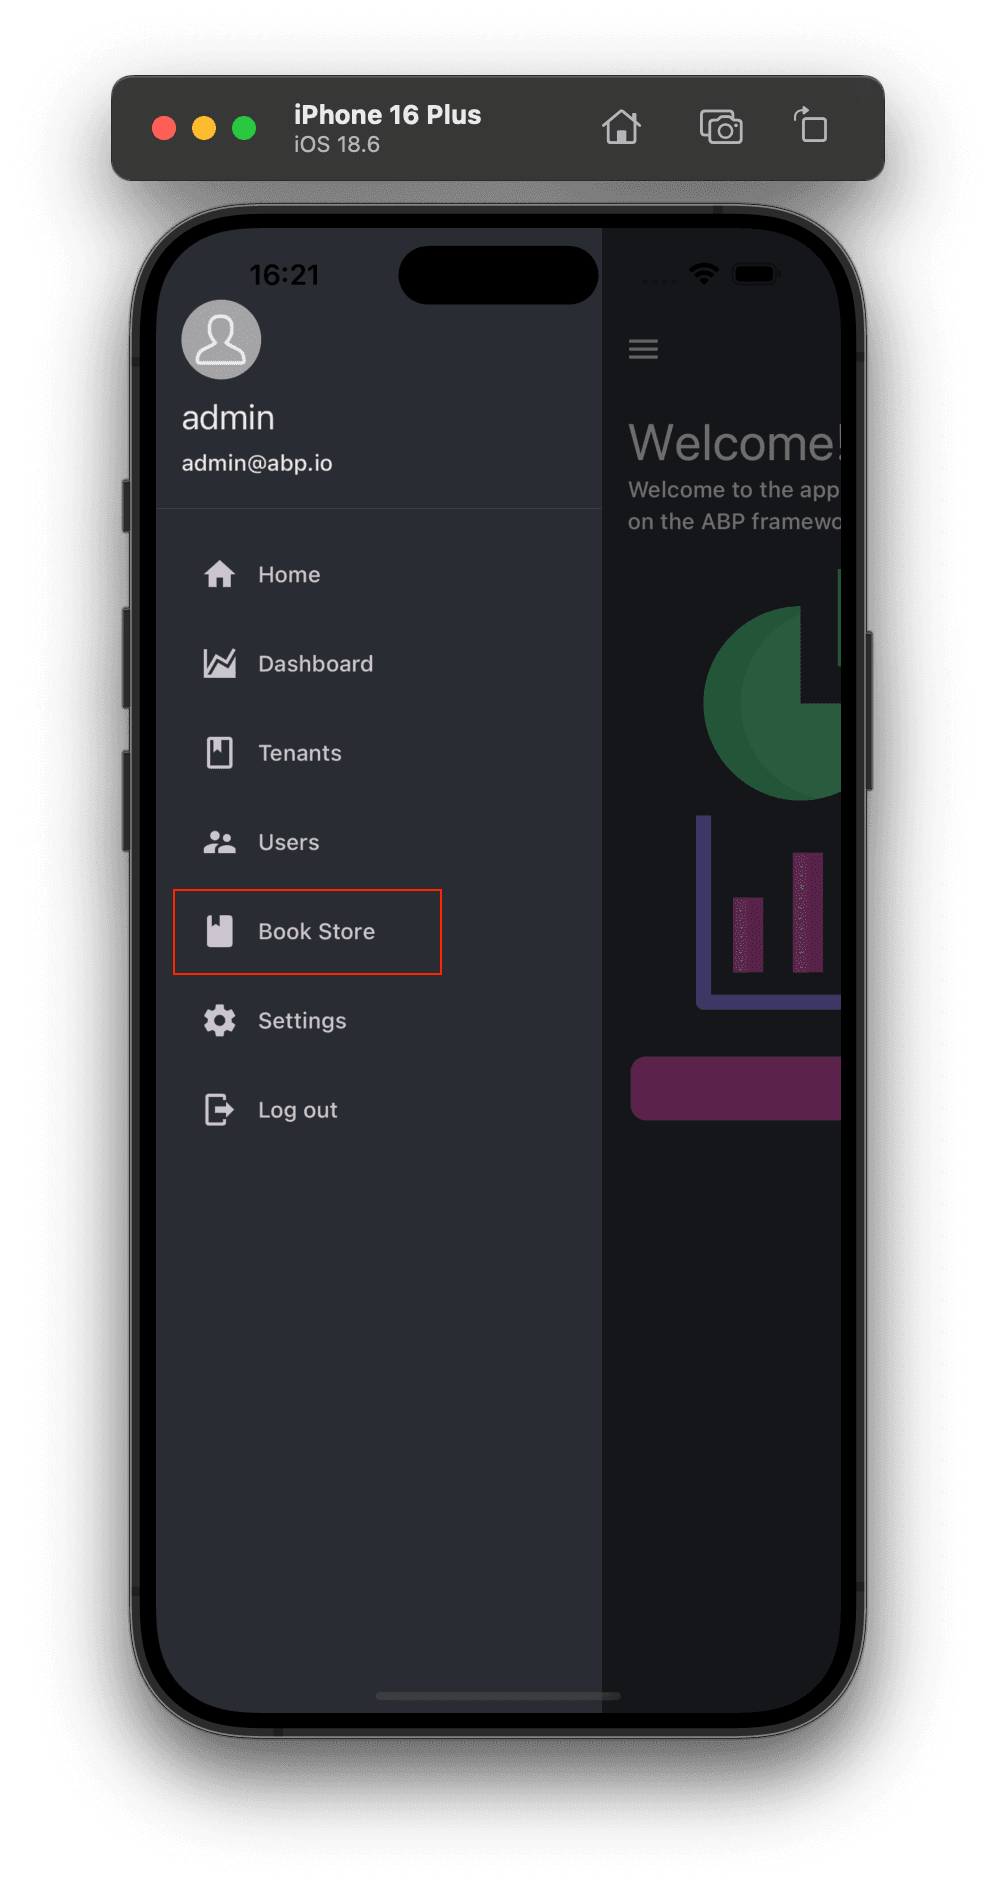
Add the Book Store menu item to the navigation
For createing a menu item, navigate to ./src/navigators/DrawerNavigator.tsx file and add BookStoreStack to Drawer.Navigator component.
//Other imports..
import BookStoreStackNavigator from './BookStoreNavigator';

const Drawer = createDrawerNavigator();

export default function DrawerNavigator() {
  return (
    <Drawer.Navigator
      initialRouteName="Home"
      drawerContent={DrawerContent}
      defaultStatus="closed"
    >
      {/*Added Screen*/}
      <Drawer.Screen
        name="BookStoreStack"
        component={BookStoreStackNavigator}
        options={{ header: () => null }}
      />
      {/*Added Screen*/}
    </Drawer.Navigator>
  );
}
Create the BookStoreStackNavigator inside ./src/navigators/BookStoreNavigator.tsx, this navigator will be used for the BookStore menu item.
import { createNativeStackNavigator } from '@react-navigation/native-stack';
import { Button } from 'react-native-paper';
import i18n from 'i18n-js';

import { BookStoreScreen, CreateUpdateAuthorScreen, CreateUpdateBookScreen } from '../screens';

import { HamburgerIcon } from '../components';
import { useThemeColors } from '../hooks';

const Stack = createNativeStackNavigator();

export default function BookStoreStackNavigator() {
  const { background, onBackground } = useThemeColors();

  return (
    <Stack.Navigator initialRouteName="BookStore">
      <Stack.Screen
        name="BookStore"
        component={BookStoreScreen}
        options={({ navigation }) => ({
          title: i18n.t('BookStore::Menu:BookStore'),
          headerLeft: () => <HamburgerIcon navigation={navigation} />,
          headerStyle: { backgroundColor: background },
          headerTintColor: onBackground,
          headerShadowVisible: false,
        })}
      />
      <Stack.Screen
        name="CreateUpdateBook"
        component={CreateUpdateBookScreen}
        options={({ route, navigation }) => ({
          title: i18n.t(route.params?.bookId ? 'BookStore::Edit' : 'BookStore::NewBook'),
          headerRight: () => (
            <Button mode="text" onPress={() => navigation.navigate('BookStore')}>
              {i18n.t('AbpUi::Cancel')}
            </Button>
          ),
          headerStyle: { backgroundColor: background },
          headerTintColor: onBackground,
          headerShadowVisible: false,
        })}
      />
    </Stack.Navigator>
  );
}
- BookStoreScreen will be used to store the
booksandauthorspage
Add the BookStoreStack to the screens object in the ./src/components/DrawerContent/DrawerContent.tsx file. The DrawerContent component will be used to render the menu items.
// Imports..
const screens = {
  HomeStack: { label: "::Menu:Home", iconName: "home" },
  DashboardStack: {
    label: "::Menu:Dashboard",
    requiredPolicy: "BookStore.Dashboard",
    iconName: "chart-areaspline",
  },
  UsersStack: {
    label: "AbpIdentity::Users",
    iconName: "account-supervisor",
    requiredPolicy: "AbpIdentity.Users",
  },
  //Add this property
  BookStoreStack: {
    label: "BookStore::Menu:BookStore",
    iconName: "book",
  },
  //Add this property
  TenantsStack: {
    label: "Saas::Tenants",
    iconName: "book-outline",
    requiredPolicy: "Saas.Tenants",
  },
  SettingsStack: {
    label: "AbpSettingManagement::Settings",
    iconName: "cog",
    navigation: null,
  },
};
// Other codes..
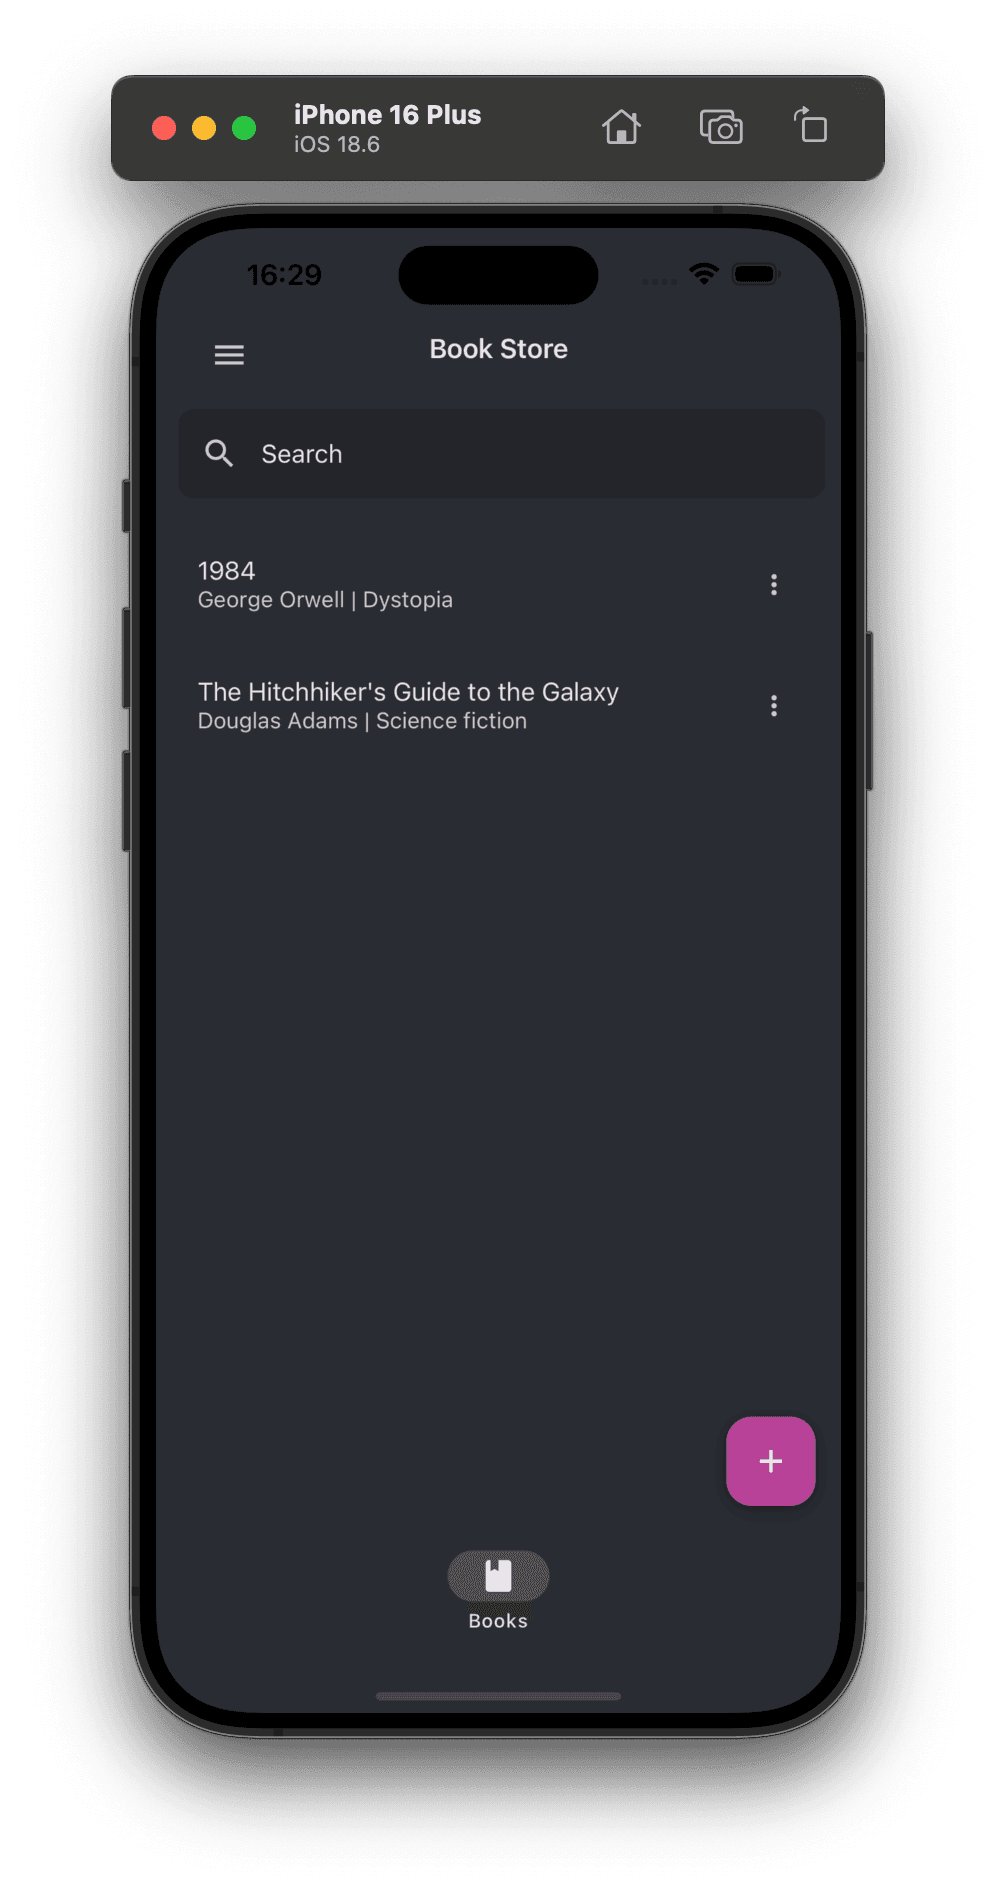
Create Book List page
Before creating the book list page, we need to create the BookStoreScreen.tsx file under the ./src/screens/BookStore folder. This file will be used to store the books and authors page.
import { useState, useEffect } from 'react';
import { useSelector } from 'react-redux';
import i18n from 'i18n-js';
import { BottomNavigation } from 'react-native-paper';

import { BooksScreen } from '../../screens';
import { useThemeColors } from '../../hooks';

const BooksRoute = nav => <BooksScreen navigation={nav} />;

function BookStoreScreen({ navigation }) {
  const [index, setIndex] = React.useState(0);
  const [routes] = React.useState([
    {
      key: "books",
      title: i18n.t("BookStore::Menu:Books"),
      focusedIcon: "book",
      unfocusedIcon: "book-outline",
    },
  ]);

  const renderScene = BottomNavigation.SceneMap({
    books: BooksRoute,
  });

  return (
    <BottomNavigation
      navigationState={{ index, routes }}
      onIndexChange={setIndex}
      renderScene={renderScene}
    />
  );
}
export default BookStoreScreen;
Create the BooksScreen.tsx file under the ./src/screens/BookStore/Books folder.
import { useSelector } from "react-redux";
import { View } from "react-native";
import { List } from "react-native-paper";
import { getBooks } from "../../api/BookAPI";
import i18n from "i18n-js";
import DataList from "../../components/DataList/DataList";
import { createAppConfigSelector } from "../../store/selectors/AppSelectors";
import { useThemeColors } from '../../../hooks';

function BooksScreen({ navigation }) {
  const { background, primary } = useThemeColors();
  const currentUser = useSelector(createAppConfigSelector())?.currentUser;

  return (
    <View style={{ flex: 1, backgroundColor: background }}>
      {currentUser?.isAuthenticated && (
        <DataList
          navigation={navigation}
          fetchFn={getBooks}
          render={({ item }) => (
            <List.Item
              key={item.id}
              title={item.name}
              description={i18n.t("BookStore::Enum:BookType." + item.type)}
            />
          )}
        />
      )}
    </View>
  );
}
export default BooksScreen;
getBooksfunction is used to fetch the books from the server.i18nAPI to localize the given key. It uses the incoming resource from theapplication-localizationendpoint.DataListcomponent takes thefetchFnproperty that we'll give to the API request function, it's used to fetch data and maintain the logic of lazy loading etc.
Creating a New Book
Add the @react-native-community/datetimepicker package for the date functionality.
yarn expo install @react-native-community/datetimepicker

//or

npx expo install @react-native-community/datetimepicker
Add the CreateUpdateBook Screen to the BookStoreNavigator
Like the BookStoreScreen we need to add the CreateUpdateBookScreen to the ./src/navigators/BookStoreNavigator.tsx file.
//Other codes

import { Button } from "react-native-paper"; //Added this line

import { CreateUpdateBookScreen } from '../screens'; //Added this line

//Other codes

export default function BookStoreStackNavigator() {
  return (
    <Stack.Navigator initialRouteName="BookStore">
      {/*Other screens*/}
      {/* Added this screen */}
      <Stack.Screen
        name="CreateUpdateBook"
        component={CreateUpdateBookScreen}
        options={({ route, navigation }) => ({
          title: i18n.t(
            route.params?.bookId ? "BookStore::Edit" : "BookStore::NewBook"
          ),
          headerRight: () => (
            <Button
              mode="text"
              onPress={() => navigation.navigate("BookStore")}
            >
              {i18n.t("AbpUi::Cancel")}
            </Button>
          ),
          headerStyle: { backgroundColor: background },
          headerTintColor: onBackground,
          headerShadowVisible: false,
        })}
      />
    </Stack.Navigator>
  );
}
To navigate to the CreateUpdateBookScreen, we need to add the CreateUpdateBook button to the BooksScreen.tsx file.
//Other imports..

import {
  // rest imports..,
  StyleSheet,
} from "react-native";

import {
  // rest imports..,
  AnimatedFAB,
} from "react-native-paper";

function BooksScreen({ navigation }) {
  //Other codes..

  return (
    <View style={{ flex: 1, backgroundColor: background }}>
      {/* Other codes..*/}

      {/* Included Code */}
      {currentUser?.isAuthenticated && (
        <AnimatedFAB
          icon={"plus"}
          label={i18n.t("BookStore::NewBook")}
          color="white"
          extended={false}
          onPress={() => navigation.navigate("CreateUpdateBook")}
          visible={true}
          animateFrom={"right"}
          iconMode={"static"}
          style={[styles.fabStyle, { backgroundColor: primary }]}
        />
      )}
      {/* Included Code */}
    </View>
  );
}

//Added lines
const styles = StyleSheet.create({
  container: {
    flexGrow: 1,
  },
  fabStyle: {
    bottom: 16,
    right: 16,
    position: "absolute",
  },
});
//Added lines

export default BooksScreen;
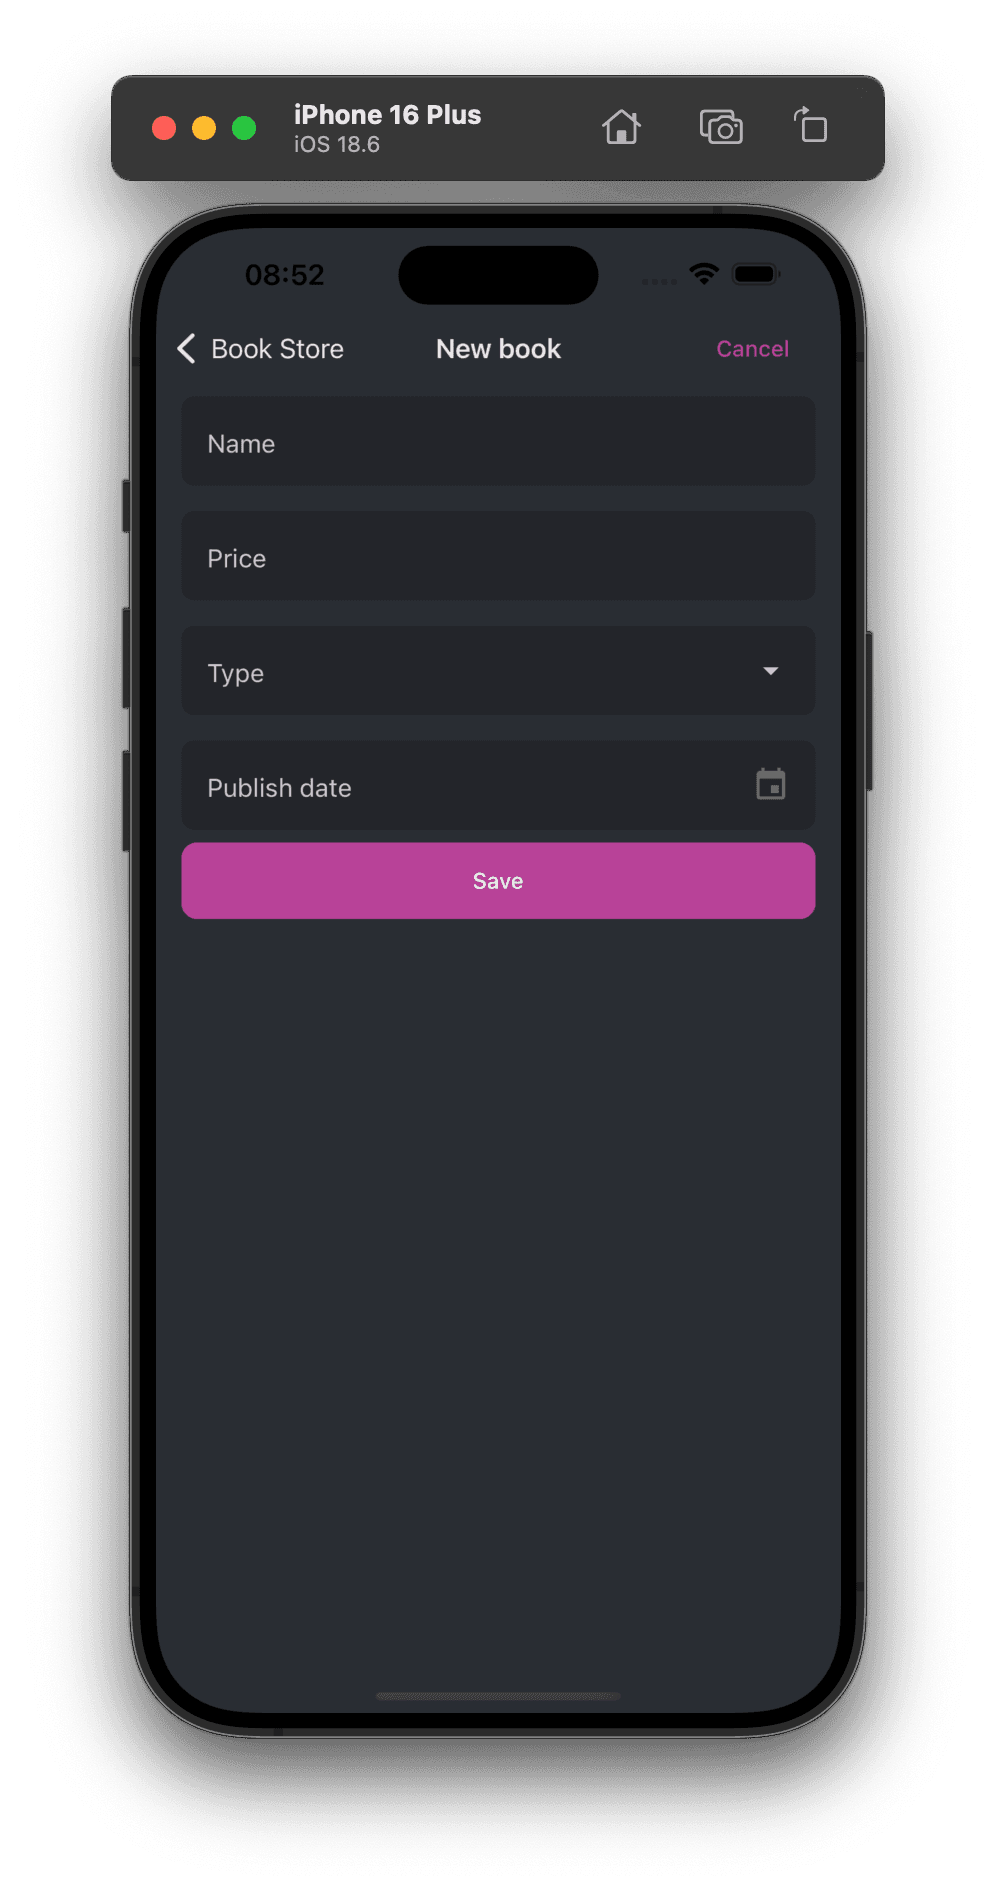
After adding the CreateUpdateBook button, we need to add the CreateUpdateBookScreen.tsx file under the ./src/screens/BookStore/Books/CreateUpdateBook folder.
import PropTypes from "prop-types";

import { create } from "../../../../api/BookAPI";
import LoadingActions from "../../../../store/actions/LoadingActions";
import { createLoadingSelector } from "../../../../store/selectors/LoadingSelectors";
import { connectToRedux } from "../../../../utils/ReduxConnect";
import CreateUpdateBookForm from "./CreateUpdateBookForm";

function CreateUpdateBookScreen({ navigation, startLoading, clearLoading }) {
  const submit = (data) => {
    startLoading({ key: "save" });

    create(data)
      .then(() => navigation.goBack())
      .finally(() => clearLoading());
  };

  return <CreateUpdateBookForm submit={submit} />;
}

CreateUpdateBookScreen.propTypes = {
  startLoading: PropTypes.func.isRequired,
  clearLoading: PropTypes.func.isRequired,
};

export default connectToRedux({
  component: CreateUpdateBookScreen,
  stateProps: (state) => ({ loading: createLoadingSelector()(state) }),
  dispatchProps: {
    startLoading: LoadingActions.start,
    clearLoading: LoadingActions.clear,
  },
});
- In this page we will store logic, send post/put requests, get the selected book data and etc.
- This page will wrap the
CreateUpdateBookFromcomponent and pass the submit function with other properties.
Create a CreateUpdateBookForm.tsx file under the ./src/screens/BookStore/Books/CreateUpdateBook folder and add the following code to it.
import * as Yup from 'yup';
import { useRef, useState } from 'react';
import { Platform, KeyboardAvoidingView, StyleSheet, View, ScrollView } from 'react-native';
import { useFormik } from 'formik';
import i18n from 'i18n-js';
import PropTypes from 'prop-types';
import { TextInput, Portal, Modal, Text, Divider, Button } from 'react-native-paper';
import DateTimePicker from '@react-native-community/datetimepicker';

import { FormButtons, ValidationMessage, AbpSelect } from '../../../../components';
import { useThemeColors } from '../../../../hooks';


const validations = {
  name: Yup.string().required("AbpValidation::ThisFieldIsRequired."),
  price: Yup.number().required("AbpValidation::ThisFieldIsRequired."),
  type: Yup.string().nullable().required("AbpValidation::ThisFieldIsRequired."),
  publishDate: Yup.string()
    .nullable()
    .required("AbpValidation::ThisFieldIsRequired."),
};

const props = {
  underlineStyle: { backgroundColor: "transparent" },
  underlineColor: "#333333bf",
};

function CreateUpdateBookForm({ submit }) {
  const { primaryContainer, background, onBackground } = useThemeColors();

  const [bookTypeVisible, setBookTypeVisible] = useState(false);
  const [publishDateVisible, setPublishDateVisible] = useState(false);

  const nameRef = useRef(null);
  const priceRef = useRef(null);
  const typeRef = useRef(null);
  const publishDateRef = useRef(null);

  const inputStyle = {
    ...styles.input,
    backgroundColor: primaryContainer,
  };
  const bookTypes = new Array(8).fill(0).map((_, i) => ({
    id: i + 1,
    displayName: i18n.t(`BookStore::Enum:BookType.${i + 1}`),
  }));

  const onSubmit = (values) => {
    if (!bookForm.isValid) {
      return;
    }

    submit({ ...values });
  };

  const bookForm = useFormik({
    enableReinitialize: true,
    validateOnBlur: true,
    validationSchema: Yup.object().shape({
      ...validations,
    }),
    initialValues: {
      name: "",
      price: "",
      type: "",
      publishDate: null,
    },
    onSubmit,
  });

  const isInvalidControl = (controlName = null) => {
    if (!controlName) {
      return;
    }

    return (
      ((!!bookForm.touched[controlName] && bookForm.submitCount > 0) ||
        bookForm.submitCount > 0) &&
      !!bookForm.errors[controlName]
    );
  };

  const onChange = (event, selectedDate) => {
    if (!selectedDate) {
      return;
    }

    setPublishDateVisible(false);

    if (event && event.type !== "dismissed") {
      bookForm.setFieldValue("publishDate", selectedDate, true);
    }
  };

  return (
    <View style={{ flex: 1, backgroundColor: background }}>
      <AbpSelect
        key="typeSelect"
        title={i18n.t("BookStore::Type")}
        visible={bookTypeVisible}
        items={bookTypes}
        hasDefualtItem={true}
        hideModalFn={() => setBookTypeVisible(false)}
        selectedItem={bookForm.values.type}
        setSelectedItem={(id) => {
          bookForm.setFieldValue("type", id, true);
          bookForm.setFieldValue(
            "typeDisplayName",
            bookTypes.find((f) => f.id === id)?.displayName || null,
            false
          );
        }}
      />

      <KeyboardAvoidingView behavior={Platform.OS === 'ios' ? 'padding' : 'height'}>
        <ScrollView keyboardShouldPersistTaps="handled">
          <View style={styles.inputContainer}>
            <TextInput
              mode="flat"
              ref={nameRef}
              error={isInvalidControl('name')}
              onSubmitEditing={() => priceRef.current.focus()}
              returnKeyType="next"
              onChangeText={bookForm.handleChange('name')}
              onBlur={bookForm.handleBlur('name')}
              value={bookForm.values.name}
              autoCapitalize="none"
              label={i18n.t('BookStore::Name')}
              style={inputStyle}
              {...props}
            />
            {isInvalidControl('name') && (
              <ValidationMessage>{bookForm.errors.name as string}</ValidationMessage>
            )}
          </View>

          <View style={styles.inputContainer}>
            <TextInput
              mode="flat"
              ref={priceRef}
              error={isInvalidControl('price')}
              onSubmitEditing={() => typeRef.current.focus()}
              returnKeyType="next"
              onChangeText={bookForm.handleChange('price')}
              onBlur={bookForm.handleBlur('price')}
              value={bookForm.values.price}
              autoCapitalize="none"
              label={i18n.t('BookStore::Price')}
              style={inputStyle}
              {...props}
            />
            {isInvalidControl('price') && (
              <ValidationMessage>{bookForm.errors.price as string}</ValidationMessage>
            )}
          </View>

          <View style={styles.inputContainer}>
            <TextInput
              ref={typeRef}
              error={isInvalidControl('type')}
              label={i18n.t('BookStore::Type')}
              right={<TextInput.Icon onPress={() => setBookTypeVisible(true)} icon="menu-down" />}
              style={inputStyle}
              editable={false}
              value={bookForm.values.typeDisplayName}
              {...props}
            />
            {isInvalidControl('type') && (
              <ValidationMessage>{bookForm.errors.type as string}</ValidationMessage>
            )}
          </View>

          <View style={styles.inputContainer}>
            <TextInput
              ref={publishDateRef}
              error={isInvalidControl('publishDate')}
              label={i18n.t('BookStore::PublishDate')}
              right={
                <TextInput.Icon
                  onPress={() => setPublishDateVisible(true)}
                  icon="calendar"
                  iconColor={bookForm.values.publishDate ? '#4CAF50' : '#666'}
                />
              }
              style={inputStyle}
              editable={false}
              value={formatDate(bookForm.values.publishDate)}
              placeholder="Select publish date"
              {...props}
            />
            {isInvalidControl('publishDate') && (
              <ValidationMessage>{bookForm.errors.publishDate as string}</ValidationMessage>
            )}
          </View>

          <Portal>
            <Modal
              visible={publishDateVisible}
              onDismiss={handleDateCancel}
              contentContainerStyle={[styles.dateModal, { backgroundColor: background }]}>
              <Text variant="titleLarge" style={styles.modalTitle}>
                {i18n.t('BookStore::PublishDate')}
              </Text>
              <Divider style={styles.divider} />
              <DateTimePicker
                testID="publishDatePicker"
                value={bookForm.values.publishDate || new Date()}
                mode="date"
                display={Platform.OS === 'ios' ? 'spinner' : 'default'}
                onChange={onChange}
                maximumDate={new Date()}
                textColor={onBackground}
              />
              <View style={styles.modalButtons}>
                <Button onPress={handleDateCancel} mode="text">
                  {i18n.t('AbpUi::Cancel')}
                </Button>
                <Button onPress={handleDateConfirm} mode="contained">
                  {i18n.t('AbpUi::Ok')}
                </Button>
              </View>
            </Modal>
          </Portal>

          <FormButtons style={styles.button} submit={bookForm.handleSubmit} />
        </ScrollView>
      </KeyboardAvoidingView>
    </View>
  );
}

const styles = StyleSheet.create({
  inputContainer: {
    margin: 8,
    marginLeft: 16,
    marginRight: 16,
  },
  input: {
    borderRadius: 8,
    borderTopLeftRadius: 8,
    borderTopRightRadius: 8,
  },
  button: {
    marginLeft: 16,
    marginRight: 16,
  },
  dateModal: {
    padding: 20,
    margin: 20,
    borderRadius: 12,
    elevation: 5,
    shadowColor: '#000',
    shadowOffset: {
      width: 0,
      height: 2,
    },
    shadowOpacity: 0.25,
    shadowRadius: 3.84,
  },
  modalTitle: {
    textAlign: 'center',
    marginBottom: 16,
    fontWeight: '600',
  },
  divider: {
    marginBottom: 16,
  },
  modalButtons: {
    flexDirection: 'row',
    justifyContent: 'space-between',
    marginTop: 20,
    paddingHorizontal: 8,
  },
});

CreateUpdateBookForm.propTypes = {
  book: PropTypes.object,
  authors: PropTypes.array.isRequired,
  submit: PropTypes.func.isRequired,
};

export default CreateUpdateBookForm;
formikwill manage the form state, validation and value changes.Yupallows for the build validation schema.AbpSelectcomponent is used to select the book type.submitmethod will pass the form values to theCreateUpdateBookScreencomponent.
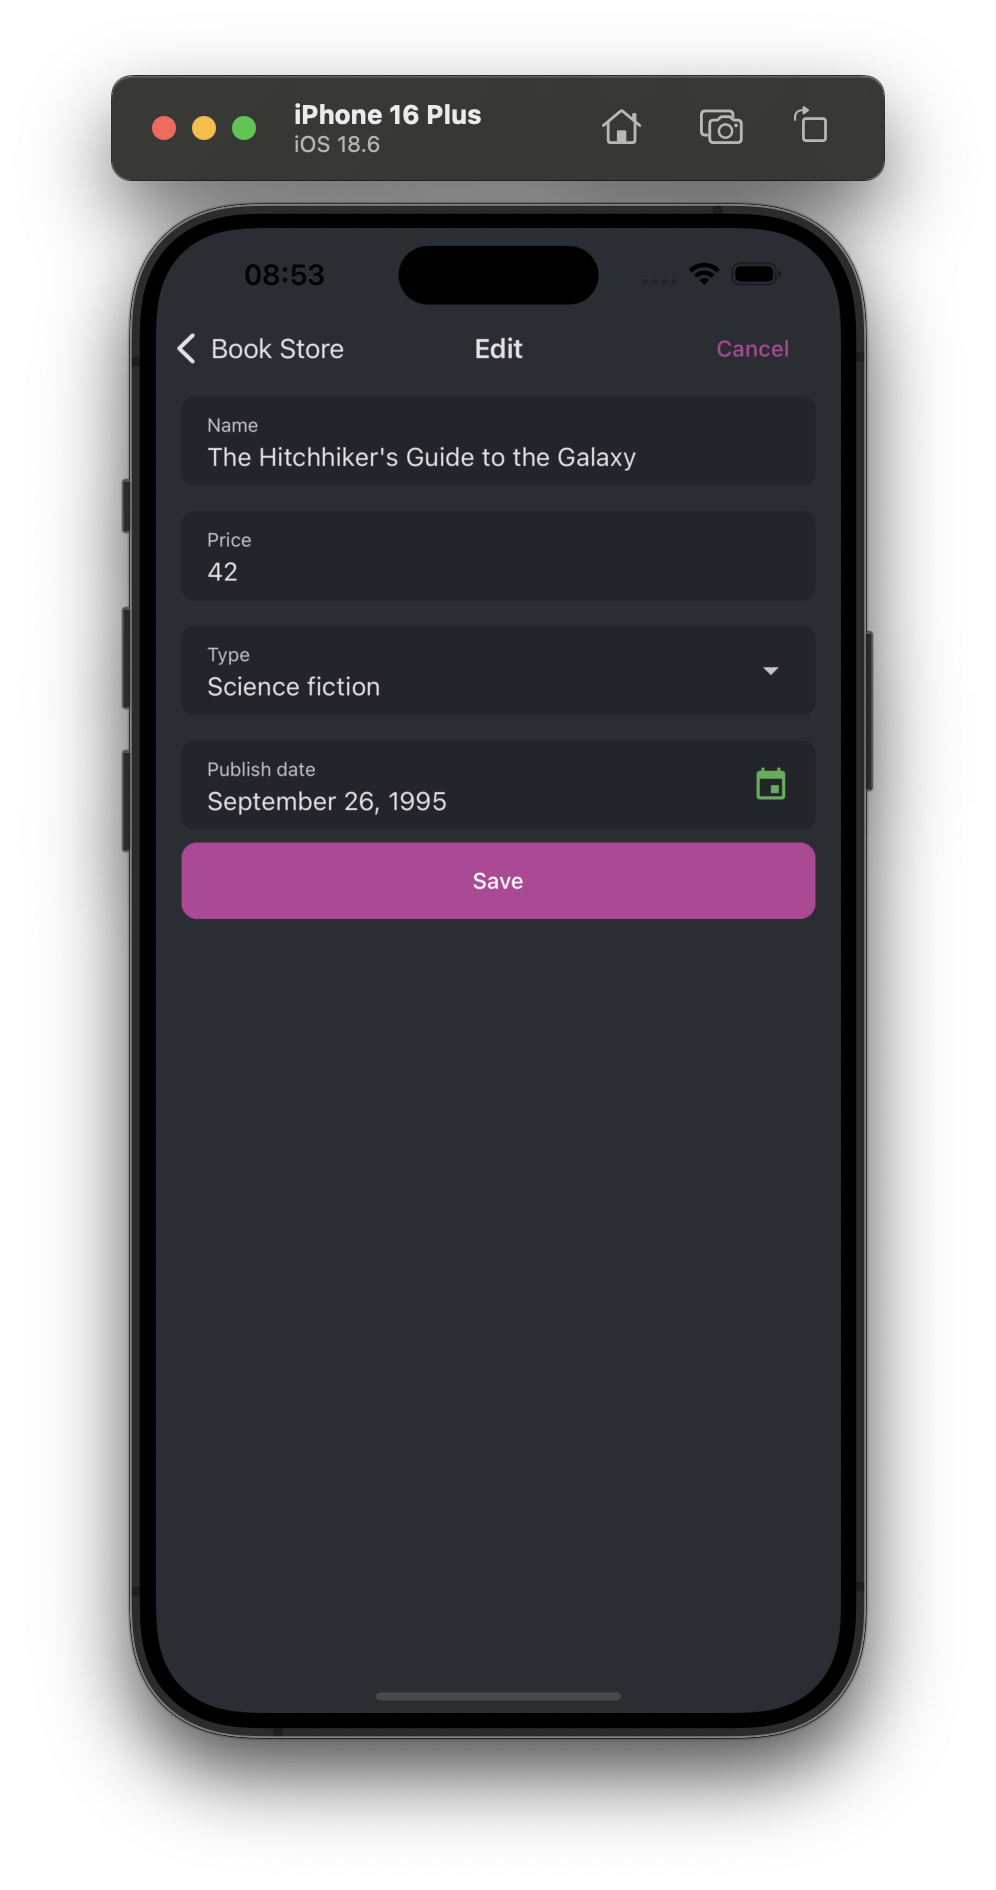
![]()
Update a Book
We need the navigation parameter for getting the bookId and then navigate it again after the create & update operations. That is why we will pass the navigation parameter to the BooksScreen component.
//Imports..

//Add navigation parameter
const BooksRoute = (nav) => <BooksScreen navigation={nav} />;

function BookStoreScreen({ navigation }) {
  //Other codes..

  const renderScene = BottomNavigation.SceneMap({
    books: () => BooksRoute(navigation), //Use this way
  });

  //Other codes..
}

export default BookStoreScreen;
Replace the code below in the BookScreen.tsx file under the ./src/screens/BookStore/Books folder.
import { useState } from 'react';
import { useSelector } from 'react-redux';
import { Alert, View, StyleSheet } from 'react-native';
import { List, IconButton, AnimatedFAB } from 'react-native-paper';
import { useActionSheet } from '@expo/react-native-action-sheet';
import i18n from 'i18n-js';
import { getList, remove } from '../../../api/BookAPI';
import { DataList } from '../../../components';
import { createAppConfigSelector } from '../../../store/selectors/AppSelectors';
import { useThemeColors } from '../../../hooks';
function BooksScreen({ navigation }) {
const { background, primary } = useThemeColors();
const currentUser = useSelector(createAppConfigSelector())?.currentUser;
const policies = useSelector(createAppConfigSelector())?.auth?.grantedPolicies;
const [refresh, setRefresh] = useState(null);
const { showActionSheetWithOptions } = useActionSheet();
const openContextMenu = (item: { id: string }) => {
const options = [];
if (policies['BookStore.Books.Delete']) {
options.push(i18n.t('AbpUi::Delete'));
}
if (policies['BookStore.Books.Edit']) {
options.push(i18n.t('AbpUi::Edit'));
}
options.push(i18n.t('AbpUi::Cancel'));
showActionSheetWithOptions(
{
options,
cancelButtonIndex: options.length - 1,
destructiveButtonIndex: options.indexOf(i18n.t('AbpUi::Delete')),
},
index => {
switch (options[index]) {
case i18n.t('AbpUi::Edit'):
edit(item);
break;
case i18n.t('AbpUi::Delete'):
removeOnClick(item);
break;
}
},
);
};
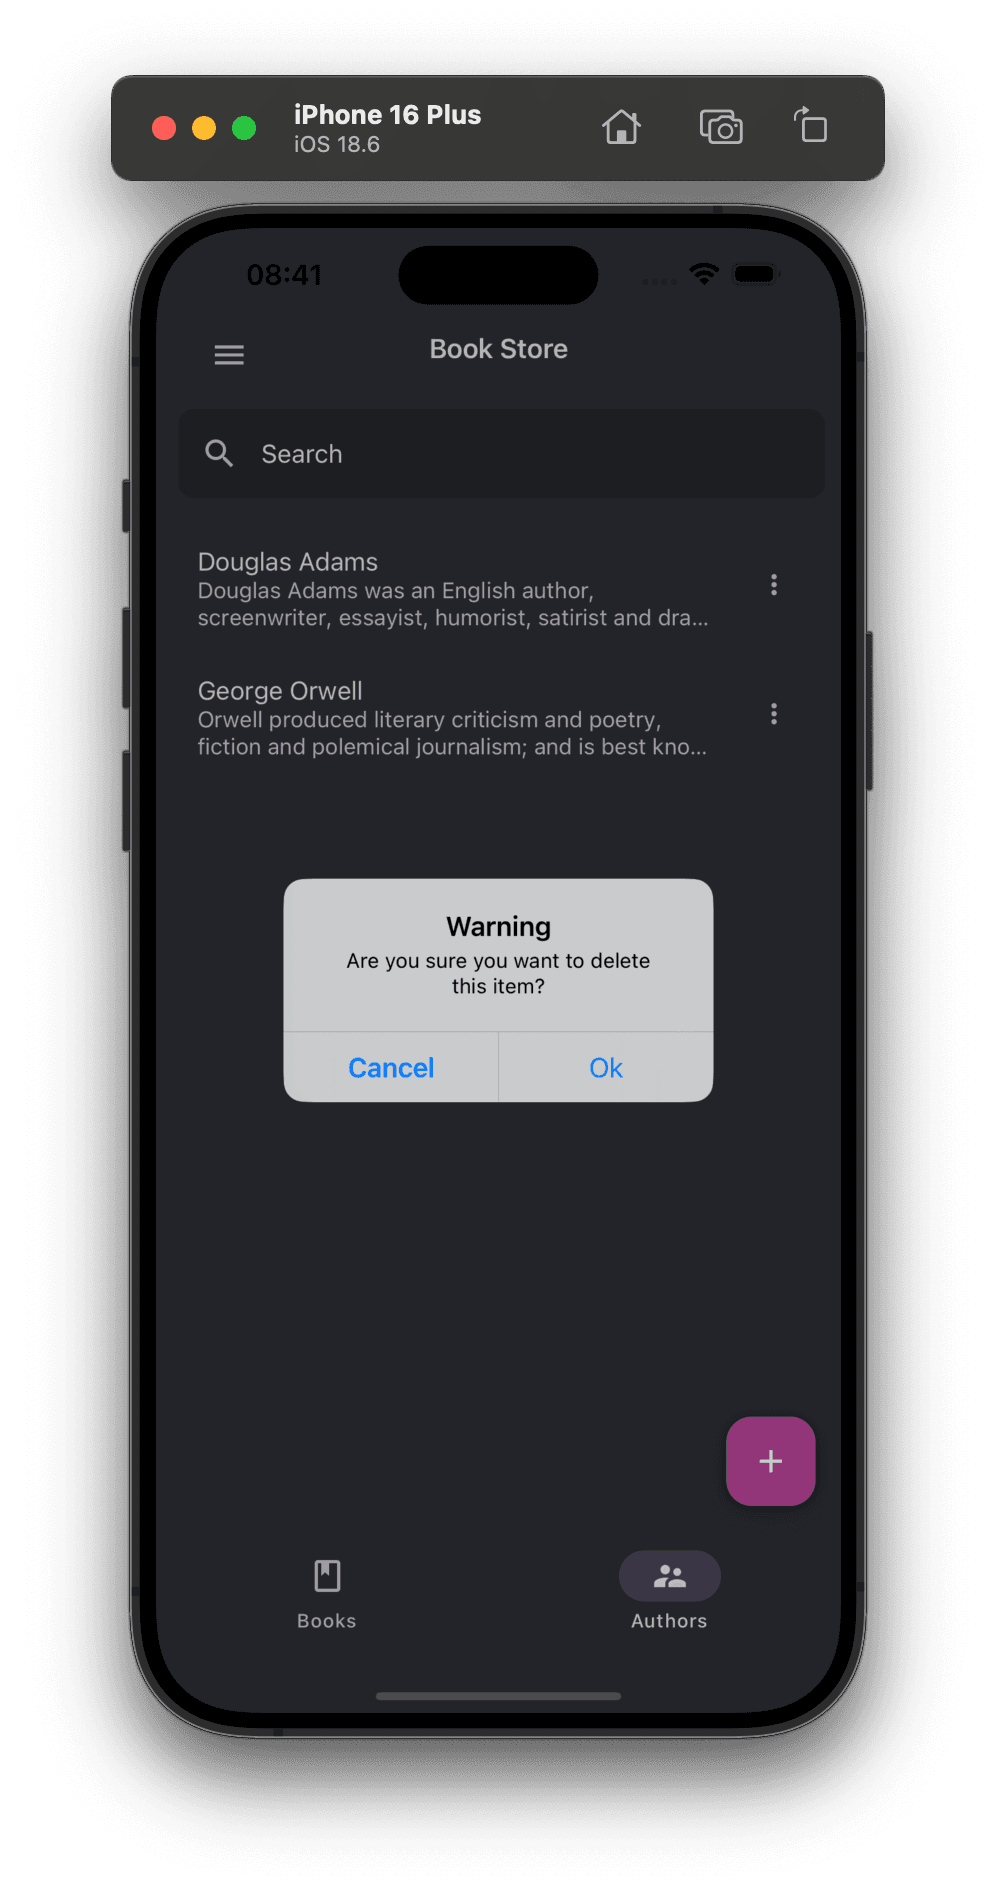
const removeOnClick = (item: { id: string }) => {
Alert.alert('Warning', i18n.t('BookStore::AreYouSureToDelete'), [
{
text: i18n.t('AbpUi::Cancel'),
style: 'cancel',
},
{
style: 'default',
text: i18n.t('AbpUi::Ok'),
onPress: () => {
remove(item.id).then(() => {
setRefresh((refresh ?? 0) + 1);
});
},
},
]);
};
const edit = (item: { id: string }) => {
navigation.navigate('CreateUpdateBook', { bookId: item.id });
};
return (
<View style={{ flex: 1, backgroundColor: background }}>
{currentUser?.isAuthenticated && (
<DataList
navigation={navigation}
fetchFn={getList}
trigger={refresh}
render={({ item }) => (
<List.Item
key={item.id}
title={item.name}
description={`${item.authorName} | ${i18n.t(
'BookStore::Enum:BookType.' + item.type,
)}`}
right={props => (
<IconButton
{...props}
icon="dots-vertical"
rippleColor={'#ccc'}
size={20}
onPress={() => openContextMenu(item)}
/>
)}
/>
)}
/>
)}
{currentUser?.isAuthenticated && !!policies['BookStore.Books.Create'] && (
<AnimatedFAB
icon={'plus'}
label={i18n.t('BookStore::NewBook')}
color="white"
extended={false}
onPress={() => navigation.navigate('CreateUpdateBook')}
visible={true}
animateFrom={'right'}
iconMode={'static'}
style={[styles.fabStyle, { backgroundColor: primary }]}
/>
)}
</View>
);
}
const styles = StyleSheet.create({
container: {
flexGrow: 1,
},
fabStyle: {
bottom: 16,
right: 16,
position: 'absolute',
},
});
export default BooksScreen;
Replace code below for CreateUpdateBookScreen.tsx file under the ./src/screens/BookStore/Books/CreateUpdateBook/
import PropTypes from 'prop-types';
import { useEffect, useState } from 'react';

import { getAuthorLookup, get, create, update } from '../../../../api/BookAPI';
import LoadingActions from '../../../../store/actions/LoadingActions';
import { createLoadingSelector } from '../../../../store/selectors/LoadingSelectors';
import { connectToRedux } from '../../../../utils/ReduxConnect';
import CreateUpdateBookForm from './CreateUpdateBookForm';

function CreateUpdateBookScreen({ navigation, route, startLoading, clearLoading }) {
  const { bookId } = route.params || {};
  const [book, setBook] = useState(null);

  const submit = (data: any) => {
    startLoading({ key: 'save' });

    (data.id ? update(data, data.id) : create(data))
      .then(() => navigation.goBack())
      .finally(() => clearLoading());
  };

  useEffect(() => {
    if (bookId) {
      startLoading({ key: 'fetchBookDetail' });

      get(bookId)
        .then((response: any) => setBook(response))
        .finally(() => clearLoading());
    }
  }, [bookId]);

  return <CreateUpdateBookForm submit={submit} book={book} />;
}

CreateUpdateBookScreen.propTypes = {
  startLoading: PropTypes.func.isRequired,
  clearLoading: PropTypes.func.isRequired,
};

export default connectToRedux({
  component: CreateUpdateBookScreen,
  stateProps: state => ({ loading: createLoadingSelector()(state) }),
  dispatchProps: {
    startLoading: LoadingActions.start,
    clearLoading: LoadingActions.clear,
  },
});
getmethod is used to fetch the book details from the server.updatemethod is used to update the book on the server.routeparameter will be used to get the bookId from the navigation.
Replace the CreateUpdateBookForm.tsx file with the code below. We will use this file for the create and update operations.
//Imports..

//validateSchema

//props

function CreateUpdateBookForm({
  submit,
  book = null, //Add book parameter with default value
}) {
  //Other codes..

  const bookForm = useFormik({
    enableReinitialize: true,
    validateOnBlur: true,
    validationSchema: Yup.object().shape({
      ...validations,
    }),
    initialValues: {
      //Update initialValues
      ...book,
      name: book?.name || "",
      price: book?.price.toString() || "",
      type: book?.type || "",
      typeDisplayName:
        book?.type && i18n.t("BookStore::Enum:BookType." + book.type),
      publishDate: (book?.publishDate && new Date(book?.publishDate)) || null,
      //Update initialValues
    },
    onSubmit,
  });

  //Others codes..
}

//Other codes..
bookis a nullable property. It will store the selected book, if the book parameter is null then we will create a new book.
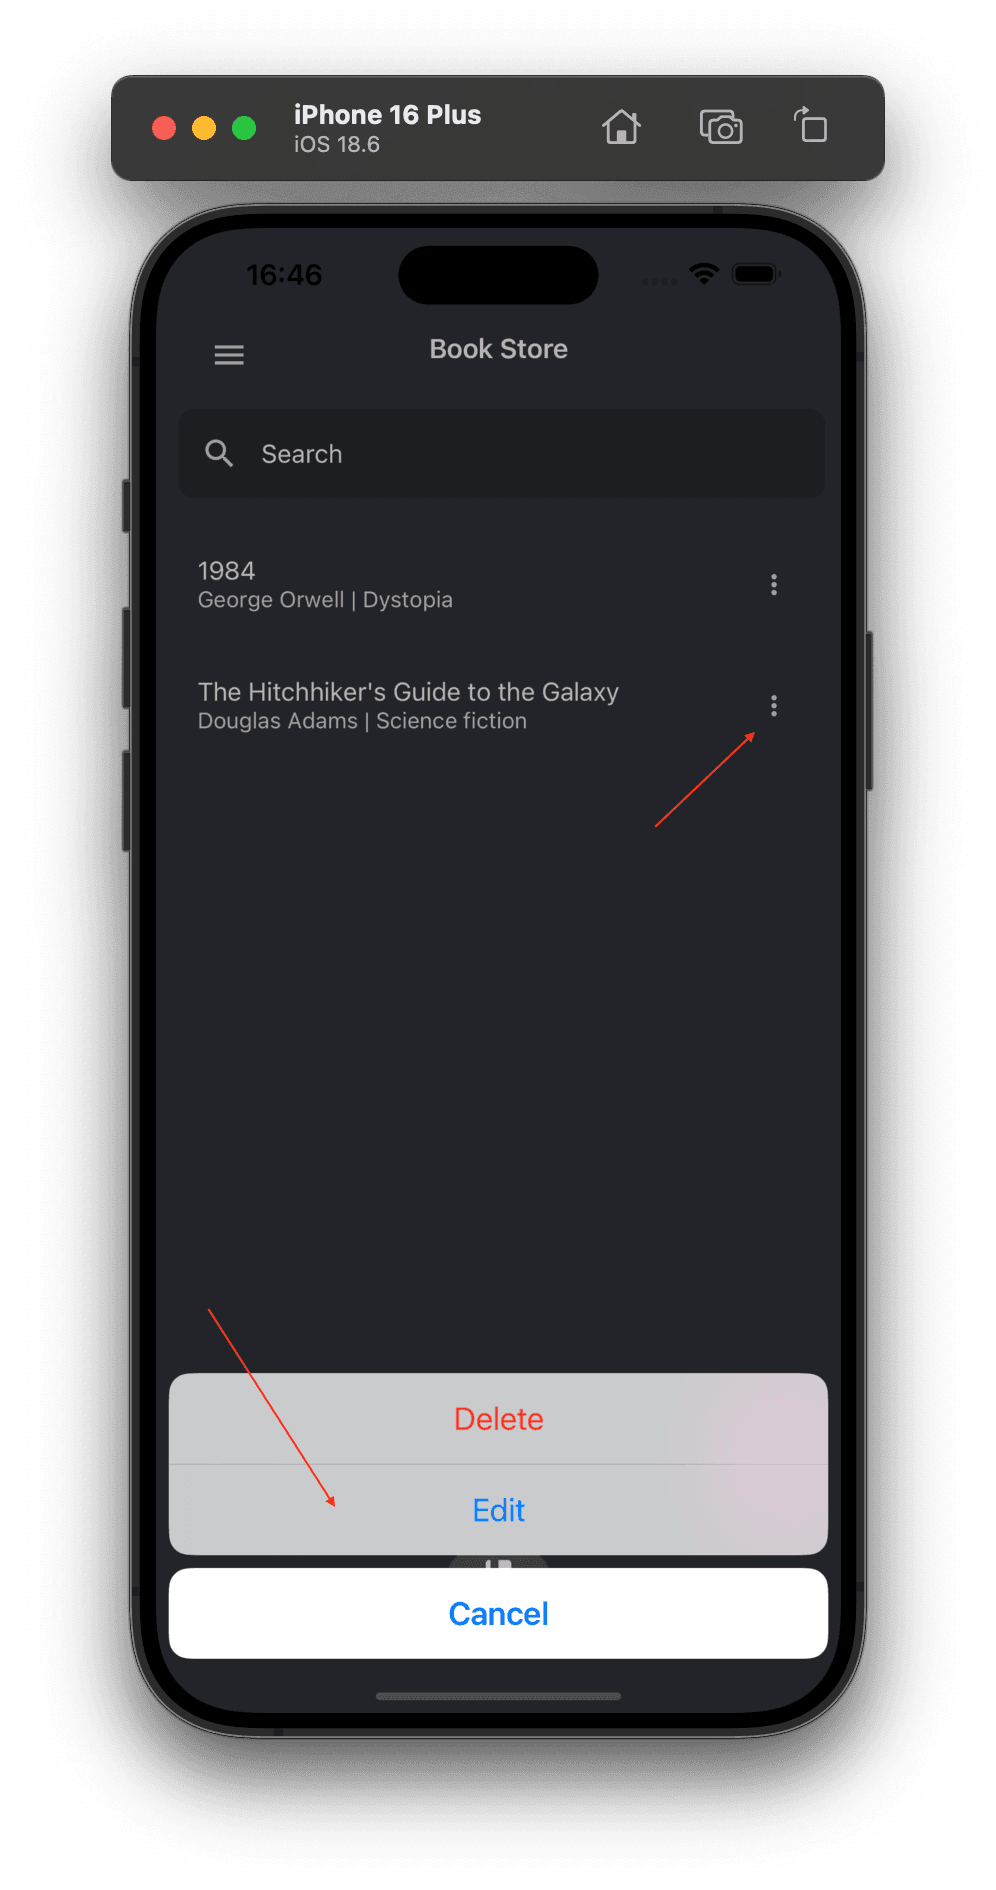
Delete a Book
Replace the code below in the BooksScreen.tsx file under the ./src/screens/BookStore/Books folder.
import { useState } from 'react';
import { useSelector } from 'react-redux';
import { Alert, View, StyleSheet } from 'react-native';
import { List, IconButton, AnimatedFAB } from 'react-native-paper';
import { useActionSheet } from '@expo/react-native-action-sheet';
import i18n from 'i18n-js';

import { getList, remove } from '../../../api/BookAPI';
import { DataList } from '../../../components';
import { createAppConfigSelector } from '../../../store/selectors/AppSelectors';
import { useThemeColors } from '../../../hooks';

function BooksScreen({ navigation }) {
  const { background, primary } = useThemeColors();
  const currentUser = useSelector(createAppConfigSelector())?.currentUser;
  const policies = useSelector(createAppConfigSelector())?.auth?.grantedPolicies;

  const [refresh, setRefresh] = useState(null);
  const { showActionSheetWithOptions } = useActionSheet();

  const openContextMenu = (item: { id: string }) => {
    const options = [];

    if (policies['BookStore.Books.Delete']) {
      options.push(i18n.t('AbpUi::Delete'));
    }

    if (policies['BookStore.Books.Edit']) {
      options.push(i18n.t('AbpUi::Edit'));
    }

    options.push(i18n.t('AbpUi::Cancel'));

    showActionSheetWithOptions(
      {
        options,
        cancelButtonIndex: options.length - 1,
        destructiveButtonIndex: options.indexOf(i18n.t('AbpUi::Delete')),
      },
      index => {
        switch (options[index]) {
          case i18n.t('AbpUi::Edit'):
            edit(item);
            break;
          case i18n.t('AbpUi::Delete'):
            removeOnClick(item);
            break;
        }
      },
    );
  };

  const removeOnClick = (item: { id: string }) => {
    Alert.alert('Warning', i18n.t('BookStore::AreYouSureToDelete'), [
      {
        text: i18n.t('AbpUi::Cancel'),
        style: 'cancel',
      },
      {
        style: 'default',
        text: i18n.t('AbpUi::Ok'),
        onPress: () => {
          remove(item.id).then(() => {
            setRefresh((refresh ?? 0) + 1);
          });
        },
      },
    ]);
  };

  const edit = (item: { id: string }) => {
    navigation.navigate('CreateUpdateBook', { bookId: item.id });
  };

  return (
    <View style={{ flex: 1, backgroundColor: background }}>
      {currentUser?.isAuthenticated && (
        <DataList
          navigation={navigation}
          fetchFn={getList}
          trigger={refresh}
          render={({ item }) => (
            <List.Item
              key={item.id}
              title={item.name}
              description={`${item.authorName} | ${i18n.t(
                'BookStore::Enum:BookType.' + item.type,
              )}`}
              right={props => (
                <IconButton
                  {...props}
                  icon="dots-vertical"
                  rippleColor={'#ccc'}
                  size={20}
                  onPress={() => openContextMenu(item)}
                />
              )}
            />
          )}
        />
      )}

      {currentUser?.isAuthenticated && !!policies['BookStore.Books.Create'] && (
        <AnimatedFAB
          icon={'plus'}
          label={i18n.t('BookStore::NewBook')}
          color="white"
          extended={false}
          onPress={() => navigation.navigate('CreateUpdateBook')}
          visible={true}
          animateFrom={'right'}
          iconMode={'static'}
          style={[styles.fabStyle, { backgroundColor: primary }]}
        />
      )}
    </View>
  );
}

const styles = StyleSheet.create({
  container: {
    flexGrow: 1,
  },
  fabStyle: {
    bottom: 16,
    right: 16,
    position: 'absolute',
  },
});

export default BooksScreen;
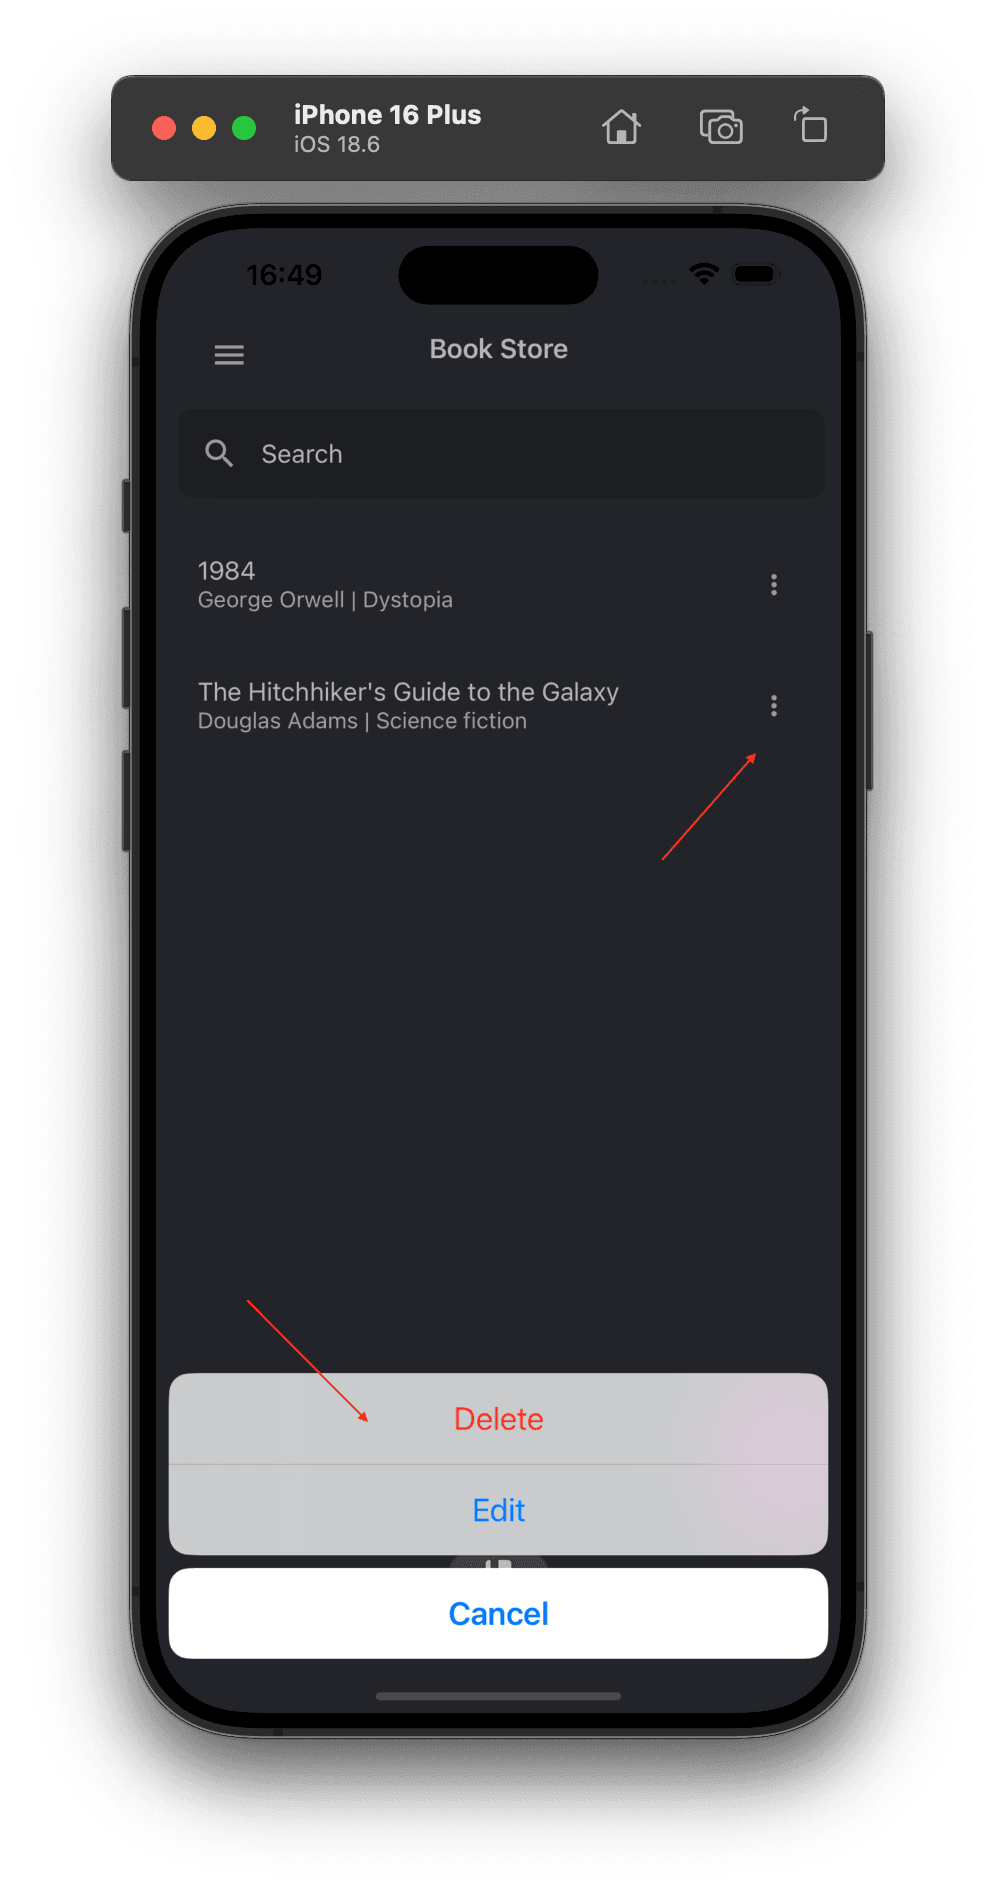
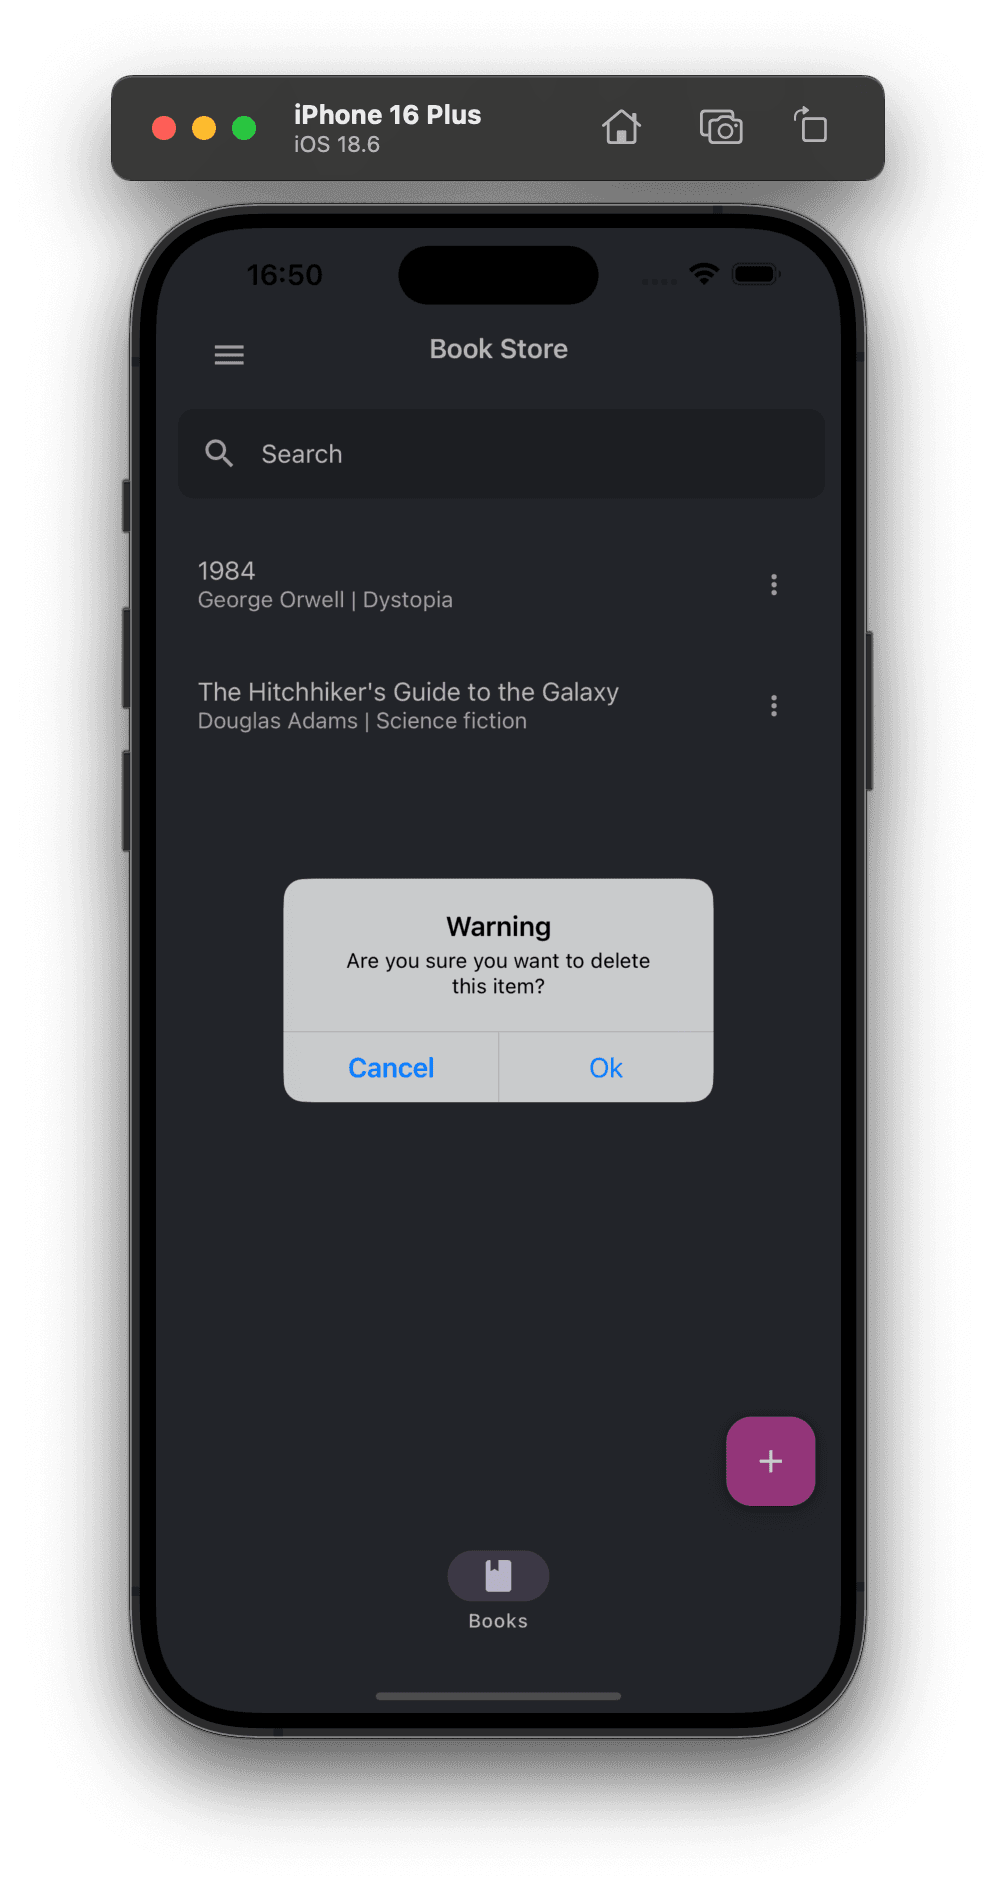
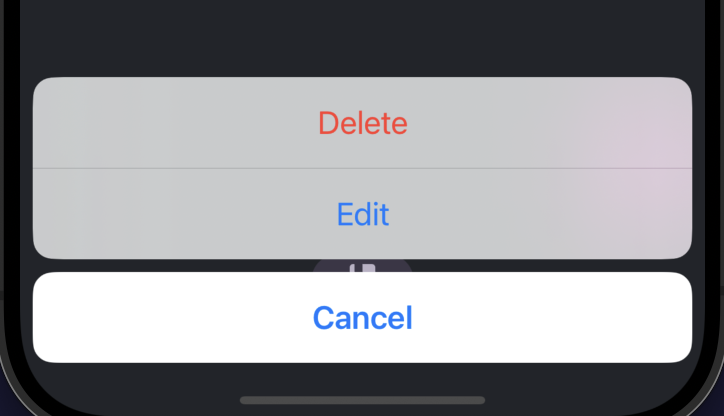
Deleteoption is added to context menu listremoveOnClickmethod will handle the delete process. It'll show an alert before the delete operation.
Authorization
Hide Books item in tab
Add grantedPolicies to the policies variable from the appConfig store
//Other imports..
import { useSelector } from "react-redux";

function BookStoreScreen({ navigation }) {
  const [index, setIndex] = React.useState(0);
  const [routes, setRoutes] = React.useState([]);

  const currentUser = useSelector((state) => state.app.appConfig.currentUser);
  const policies = useSelector(
    (state) => state.app.appConfig.auth.grantedPolicies
  );

  const renderScene = BottomNavigation.SceneMap({
    books: () => BooksRoute(navigation),
  });

  React.useEffect(() => {
    if (!currentUser?.isAuthenticated || !policies) {
      setRoutes([]);
      return;
    }

    let _routes = [];

    if (!!policies["BookStore.Books"]) {
      _routes.push({
        key: "books",
        title: i18n.t("BookStore::Menu:Books"),
        focusedIcon: "book",
        unfocusedIcon: "book-outline",
      });
    }

    setRoutes([..._routes]);
  }, [Object.keys(policies)?.filter((f) => f.startsWith("BookStore")).length]);

  return (
    routes?.length > 0 && (
      <BottomNavigation
        navigationState={{ index, routes }}
        onIndexChange={setIndex}
        renderScene={renderScene}
      />
    )
  );
}

export default BookStoreScreen;
- In the
useEffectfunction we'll check thecurrentUserandpoliciesvariables. - useEffect's conditions will be the policies of the
BookStorepermission group. Bookstab will be shown if the user has theBookStore.Bookspermission

Hide the New Book Button
New Book button is placed in the BooksScreen as a + icon button. For the toggle visibility of the button, we need to add the policies variable to the BooksScreen component like the BookStoreScreen component. Open the BooksScreen.tsx file in the ./src/screens/BookStore/Books folder and include the code below.
//Imports..

function BooksScreen({ navigation }) {
  const policies = useSelector(createAppConfigSelector())?.auth?.grantedPolicies;

  //Other codes..

  return (
    {/*Other codes..*/}

    {currentUser?.isAuthenticated &&
      !!policies['BookStore.Books.Create'] && //Add this line
      (
        <AnimatedFAB
          icon={'plus'}
          label={i18n.t('BookStore::NewBook')}
          color="white"
          extended={false}
          onPress={() => navigation.navigate('CreateUpdateBook')}
          visible={true}
          animateFrom={'right'}
          iconMode={'static'}
          style={[styles.fabStyle, { backgroundColor: primary }]}
        />
      )
    }
  )
}
- Now the
+icon button will be shown if the user has theBookStore.Books.Createpermission.
Hide the Edit and Delete Actions
Update your code as below in the ./src/screens/BookStore/Books/BooksScreen.tsx file. We'll check the policies variables for the Edit and Delete actions.
function BooksScreen() {
  //...

  const openContextMenu = (item) => {
    const options = [];

    if (policies["BookStore.Books.Delete"]) {
      options.push(i18n.t("AbpUi::Delete"));
    }

    if (policies["BookStore.Books.Update"]) {
      options.push(i18n.t("AbpUi::Edit"));
    }

    options.push(i18n.t("AbpUi::Cancel"));
  };

  //...
}
Author
Create API Proxy
//./src/api/AuthorAPI.ts

import api from './API';

export const getList = () => api.get('/api/app/author').then(({ data }) => data);

export const get = id => api.get(`/api/app/author/${id}`).then(({ data }) => data);

export const create = input => api.post('/api/app/author', input).then(({ data }) => data);

export const update = (input, id) => api.put(`/api/app/author/${id}`, input).then(({ data }) => data);

export const remove = id => api.delete(`/api/app/author/${id}`).then(({ data }) => data);
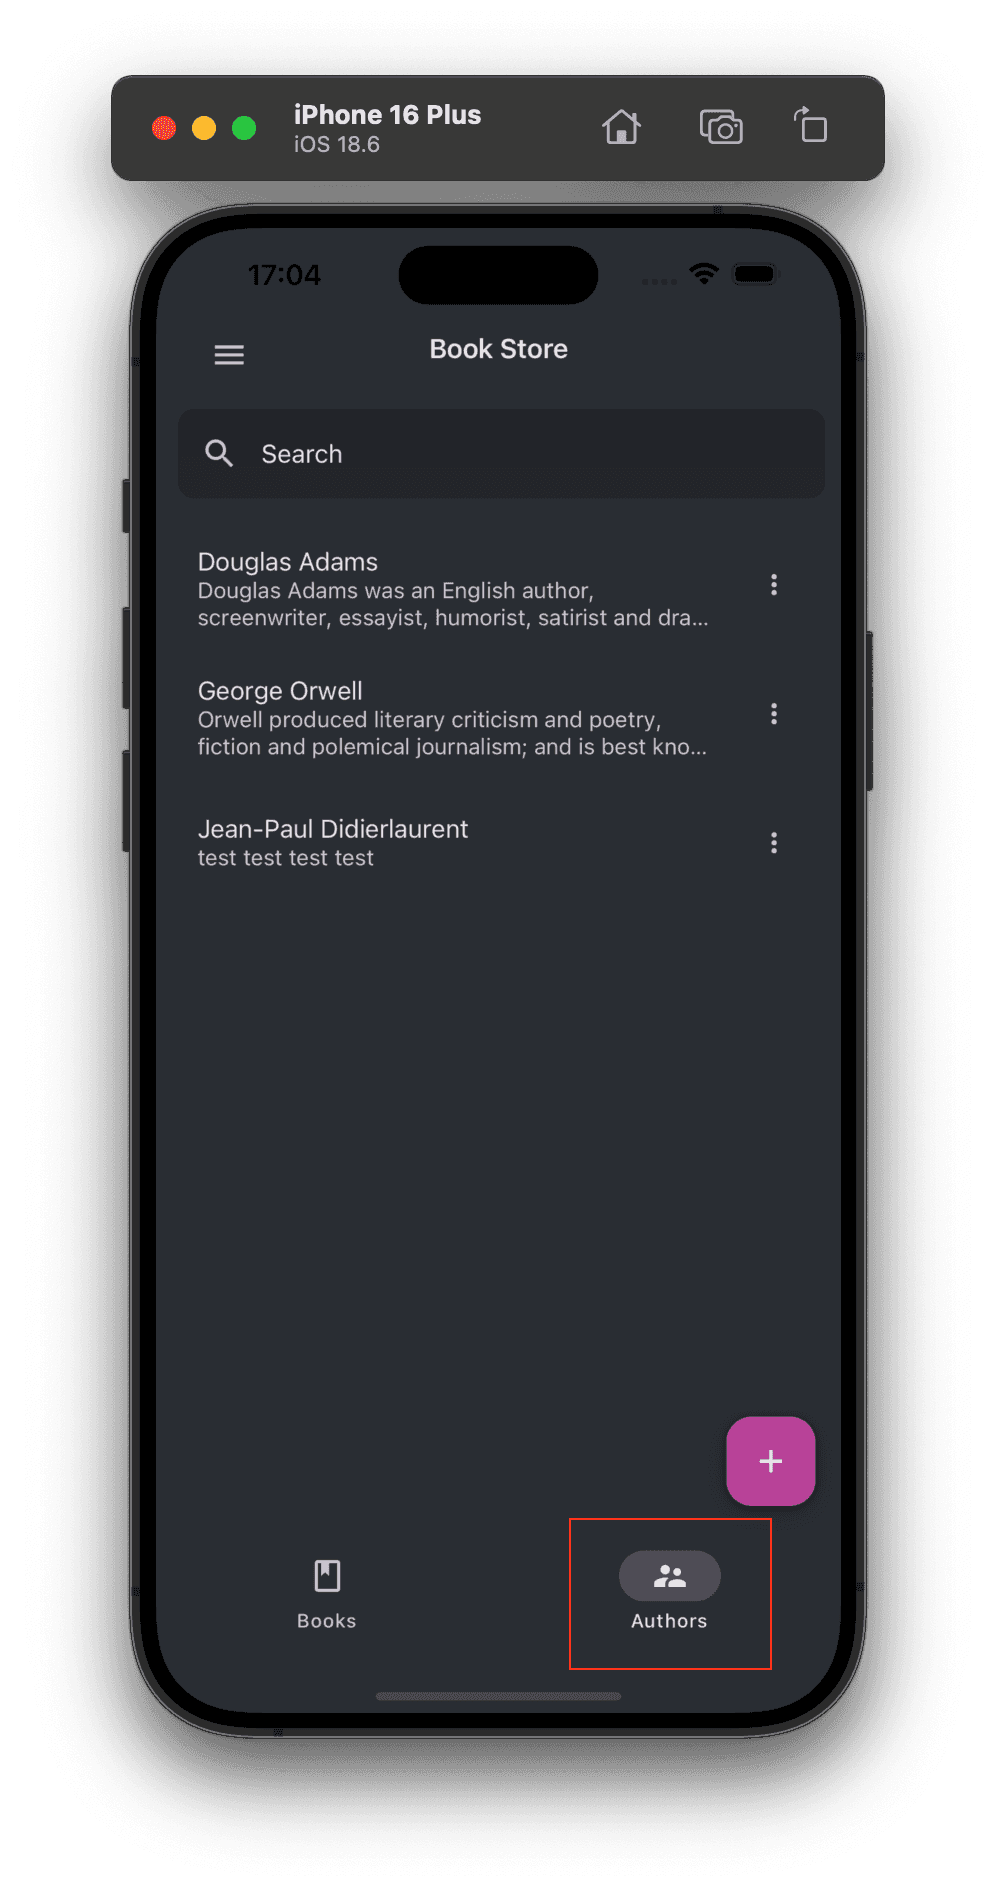
The Author List Page
Add Authors Tab to BookStoreScreen
Open the ./src/screens/BookStore/BookStoreScreen.tsx file and update it with the code below.
//Other imports
import AuthorsScreen from "./Authors/AuthorsScreen";

//Other Routes..
const AuthorsRoute = (nav) => <AuthorsScreen navigation={nav} />;

function BookStoreScreen({ navigation }) {
  //Other codes..

  const renderScene = BottomNavigation.SceneMap({
    books: () => BooksRoute(navigation),
    authors: () => AuthorsRoute(navigation), //Added this line
  });

  //Added this
  if (!!policies["BookStore.Authors"]) {
    _routes.push({
      key: "authors",
      title: i18n.t("BookStore::Menu:Authors"),
      focusedIcon: "account-supervisor",
      unfocusedIcon: "account-supervisor-outline",
    });
  }
  //Added this
}

export default BookStoreScreen;
Create a AuthorsScreen.tsx file under the ./src/screens/BookStore/Authors folder and add the code below to it.
import { useState } from 'react';
import { useSelector } from 'react-redux';
import { Alert, View, StyleSheet } from 'react-native';
import { List, IconButton, AnimatedFAB } from 'react-native-paper';
import { useActionSheet } from '@expo/react-native-action-sheet';
import i18n from 'i18n-js';
import { getList, remove } from '../../../api/AuthorAPI';
import { DataList } from '../../../components';
import { createAppConfigSelector } from '../../../store/selectors/AppSelectors';
import { useThemeColors } from '../../../hooks';
function AuthorsScreen({ navigation }) {
const { background, primary } = useThemeColors();
const currentUser = useSelector(createAppConfigSelector())?.currentUser;
const policies = useSelector(createAppConfigSelector())?.auth?.grantedPolicies;
const [refresh, setRefresh] = useState(null);
const { showActionSheetWithOptions } = useActionSheet();
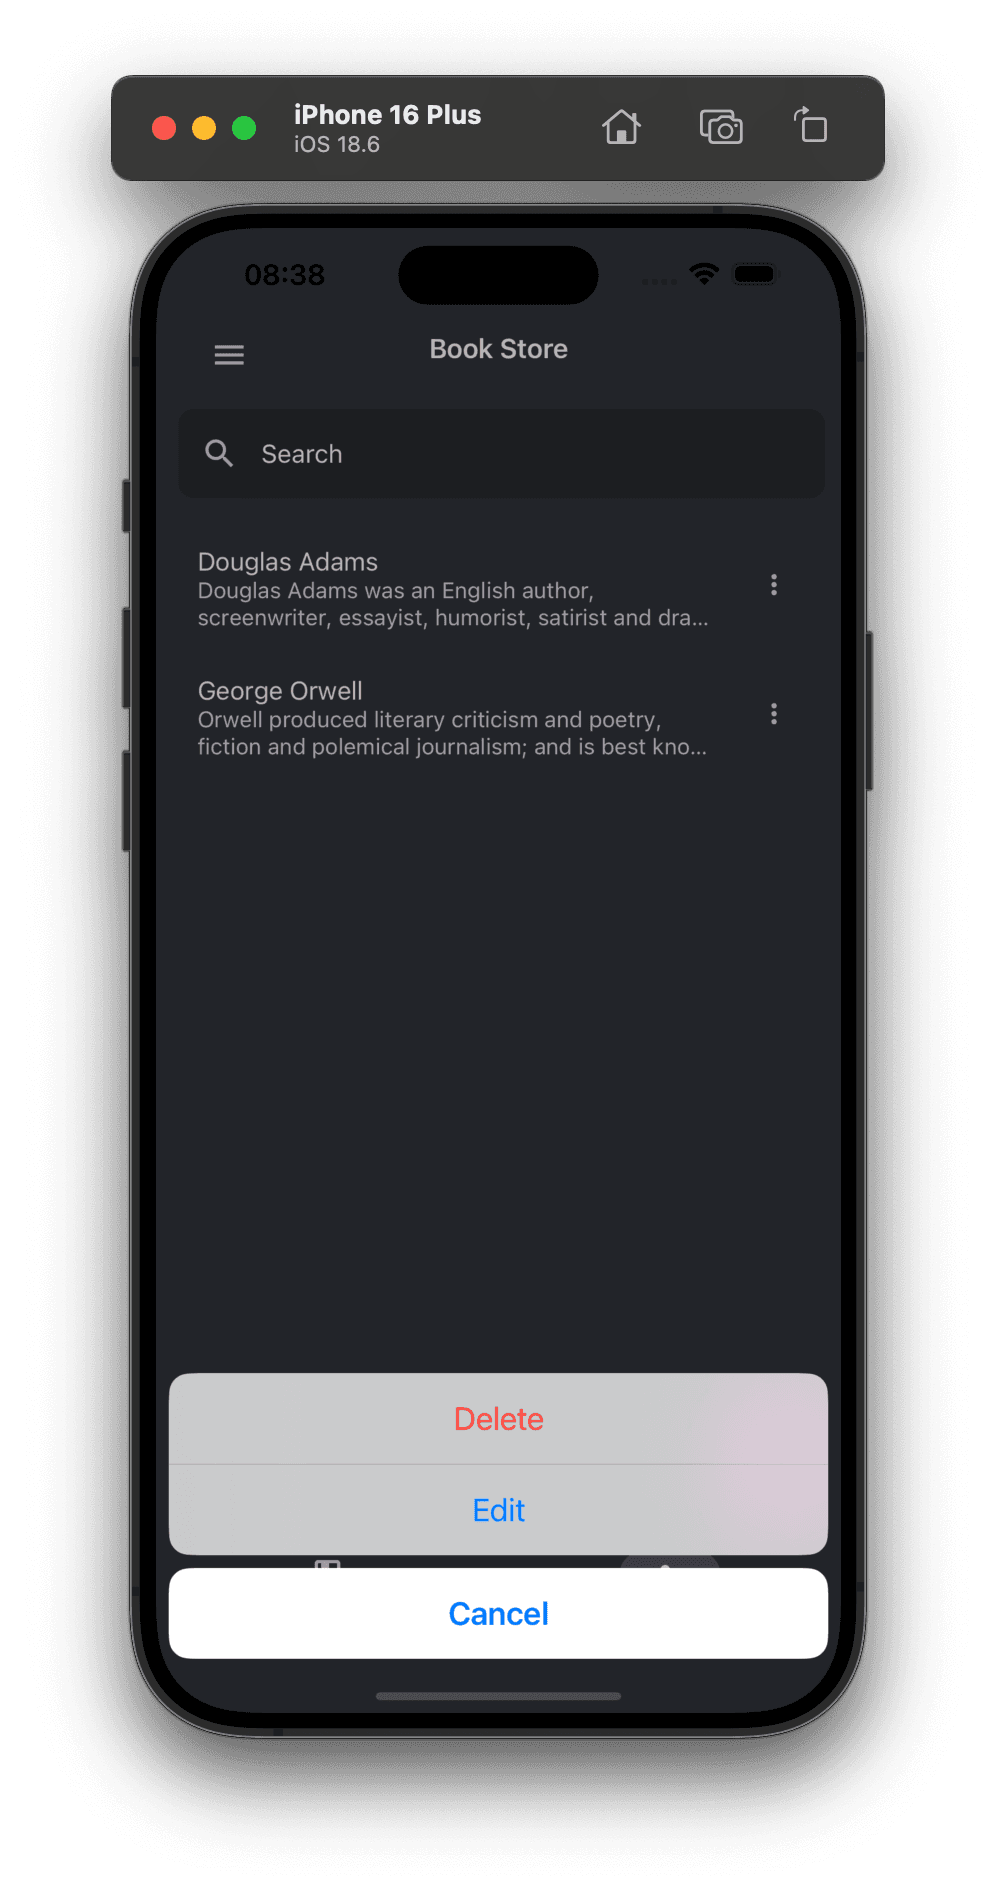
const openContextMenu = (item: { id: string }) => {
const options = [];
if (policies['BookStore.Authors.Delete']) {
options.push(i18n.t('AbpUi::Delete'));
}
if (policies['BookStore.Authors.Edit']) {
options.push(i18n.t('AbpUi::Edit'));
}
options.push(i18n.t('AbpUi::Cancel'));
showActionSheetWithOptions(
{
options,
cancelButtonIndex: options.length - 1,
destructiveButtonIndex: options.indexOf(i18n.t('AbpUi::Delete')),
},
(index: number) => {
switch (options[index]) {
case i18n.t('AbpUi::Edit'):
edit(item);
break;
case i18n.t('AbpUi::Delete'):
removeOnClick(item);
break;
}
},
);
};
const removeOnClick = ({ id }: { id: string }) => {
Alert.alert('Warning', i18n.t('BookStore::AreYouSureToDelete'), [
{
text: i18n.t('AbpUi::Cancel'),
style: 'cancel',
},
{
style: 'default',
text: i18n.t('AbpUi::Ok'),
onPress: () => {
remove(id).then(() => {
setRefresh((refresh ?? 0) + 1);
});
},
},
]);
};
const edit = ({ id }: { id: string }) => {
navigation.navigate('CreateUpdateAuthor', { authorId: id });
};
return (
<View style={{ flex: 1, backgroundColor: background }}>
{currentUser?.isAuthenticated && (
<DataList
navigation={navigation}
fetchFn={getList}
trigger={refresh}
render={({ item }) => (
<List.Item
key={item.id}
title={item.name}
description={item.shortBio || new Date(item.birthDate)?.toLocaleDateString()}
right={(props: any) => (
<IconButton
{...props}
icon="dots-vertical"
rippleColor={'#ccc'}
size={20}
onPress={() => openContextMenu(item)}
/>
)}
/>
)}
/>
)}
{currentUser?.isAuthenticated && policies['BookStore.Authors.Create'] && (
<AnimatedFAB
icon={'plus'}
label={i18n.t('BookStore::NewAuthor')}
color="white"
extended={false}
onPress={() => navigation.navigate('CreateUpdateAuthor')}
visible={true}
animateFrom={'right'}
iconMode={'static'}
style={[styles.fabStyle, { backgroundColor: primary }]}
/>
)}
</View>
);
}
const styles = StyleSheet.create({
container: {
flexGrow: 1,
},
fabStyle: {
bottom: 16,
right: 16,
position: 'absolute',
},
});
export default AuthorsScreen;
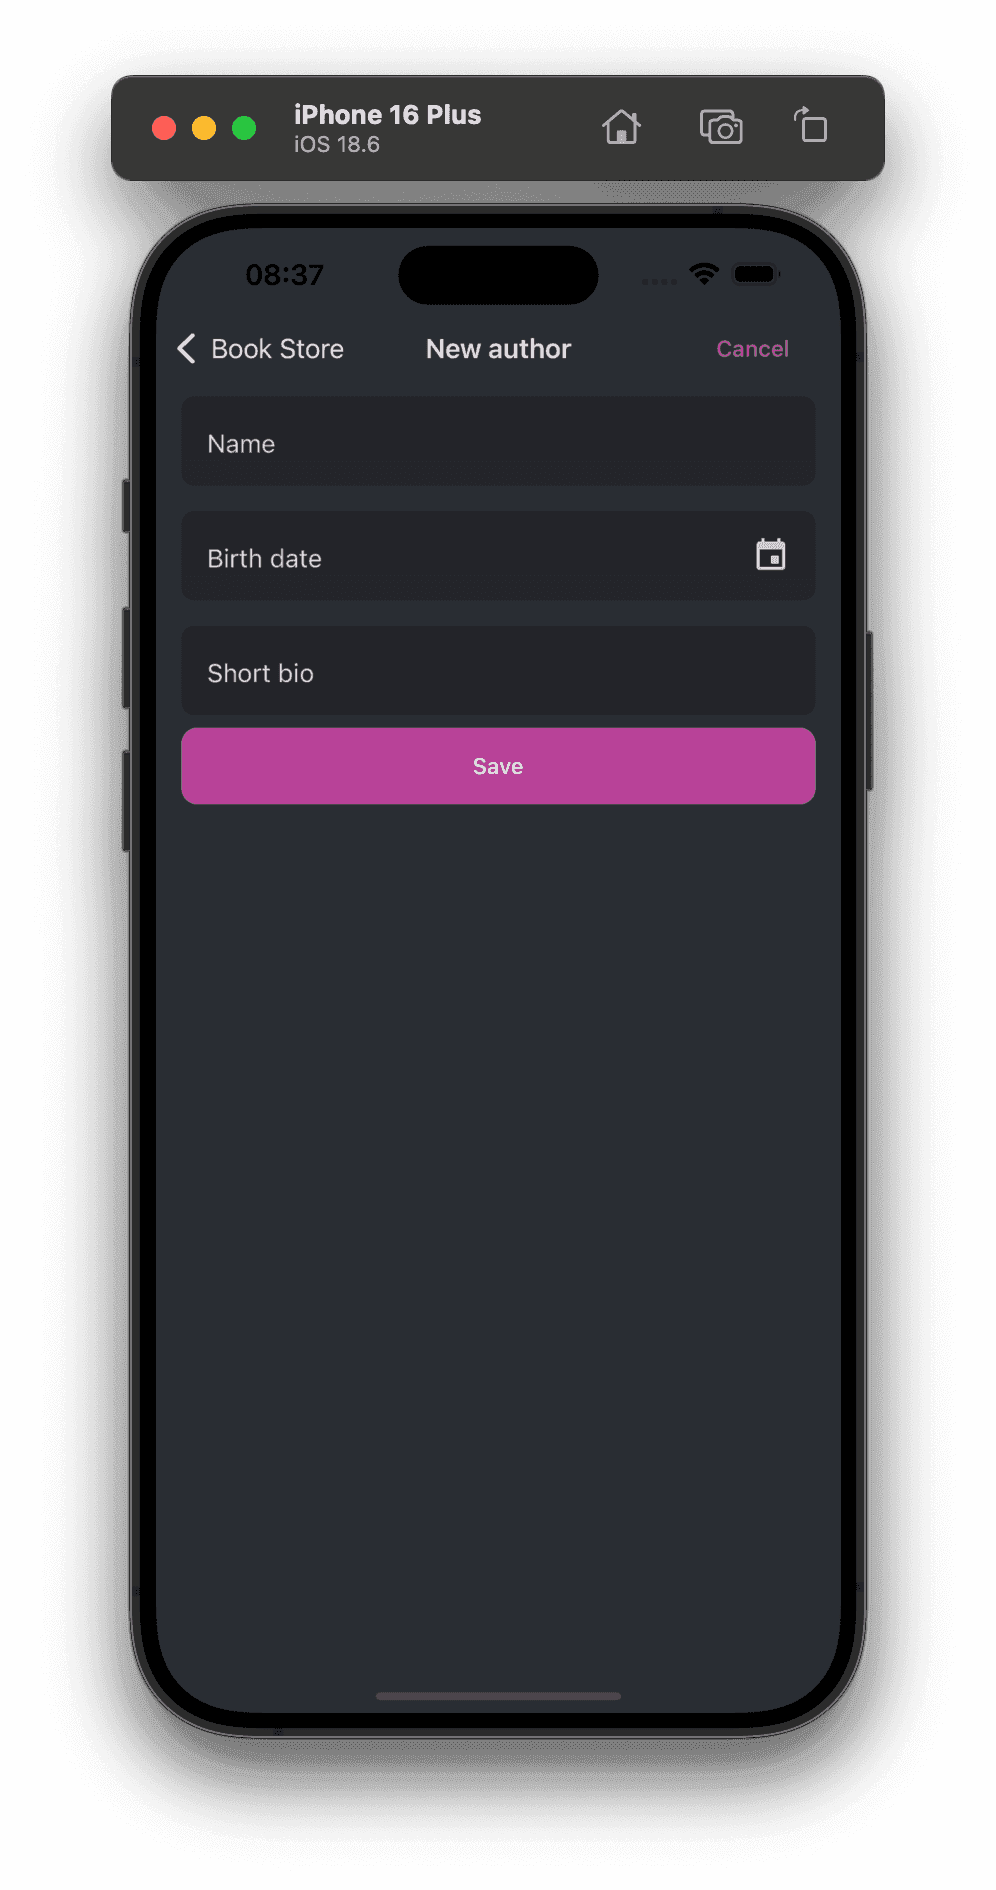
Create a CreateUpdateAuthorScreen.tsx file under the ./src/screens/BookStore/Authors/CreateUpdateAuthor folder and add the code below to it.
import PropTypes from 'prop-types';
import { useEffect, useState } from 'react';

import { get, create, update } from '../../../../api/AuthorAPI';
import LoadingActions from '../../../../store/actions/LoadingActions';
import { createLoadingSelector } from '../../../../store/selectors/LoadingSelectors';
import { connectToRedux } from '../../../../utils/ReduxConnect';
import CreateUpdateAuthorForm from './CreateUpdateAuthorForm';

function CreateUpdateAuthorScreen({ navigation, route, startLoading, clearLoading }) {
  const { authorId } = route.params || {};
  const [ author, setAuthor ] = useState(null);

  const submit = (data: any) => {
    startLoading({ key: 'save' });

    (data.id ? update(data, data.id) : create(data))
      .then(() => navigation.goBack())
      .finally(() => clearLoading());
  };

  useEffect(() => {
    if (authorId) {
      startLoading({ key: 'fetchAuthorDetail' });

      get(authorId)
        .then((response: any) => setAuthor(response))
        .finally(() => clearLoading());
    }
  }, [authorId]);

  return <CreateUpdateAuthorForm submit={submit} author={author} />;
}

CreateUpdateAuthorScreen.propTypes = {
  startLoading: PropTypes.func.isRequired,
  clearLoading: PropTypes.func.isRequired,
};

export default connectToRedux({
  component: CreateUpdateAuthorScreen,
  stateProps: (state: any) => ({ loading: createLoadingSelector()(state) }),
  dispatchProps: {
    startLoading: LoadingActions.start,
    clearLoading: LoadingActions.clear,
  },
});
Create a CreateUpdateAuthorForm.tsx file under the ./src/screens/BookStore/Authors/CreateUpdateAuthor folder and add the code below to it.
import { useRef, useState } from 'react';
import { Platform, KeyboardAvoidingView, StyleSheet, View, ScrollView } from 'react-native';
import { useFormik } from 'formik';
import i18n from 'i18n-js';
import PropTypes from 'prop-types';
import * as Yup from 'yup';
import { Divider, Portal, TextInput, Text, Button, Modal } from 'react-native-paper';
import DateTimePicker from '@react-native-community/datetimepicker';
import { useThemeColors } from '../../../../hooks';
import { FormButtons, ValidationMessage } from '../../../../components';
const validations = {
name: Yup.string().required('AbpValidation::ThisFieldIsRequired.'),
birthDate: Yup.string().nullable().required('AbpValidation::ThisFieldIsRequired.'),
};
const props = {
underlineStyle: { backgroundColor: 'transparent' },
underlineColor: '#333333bf',
};
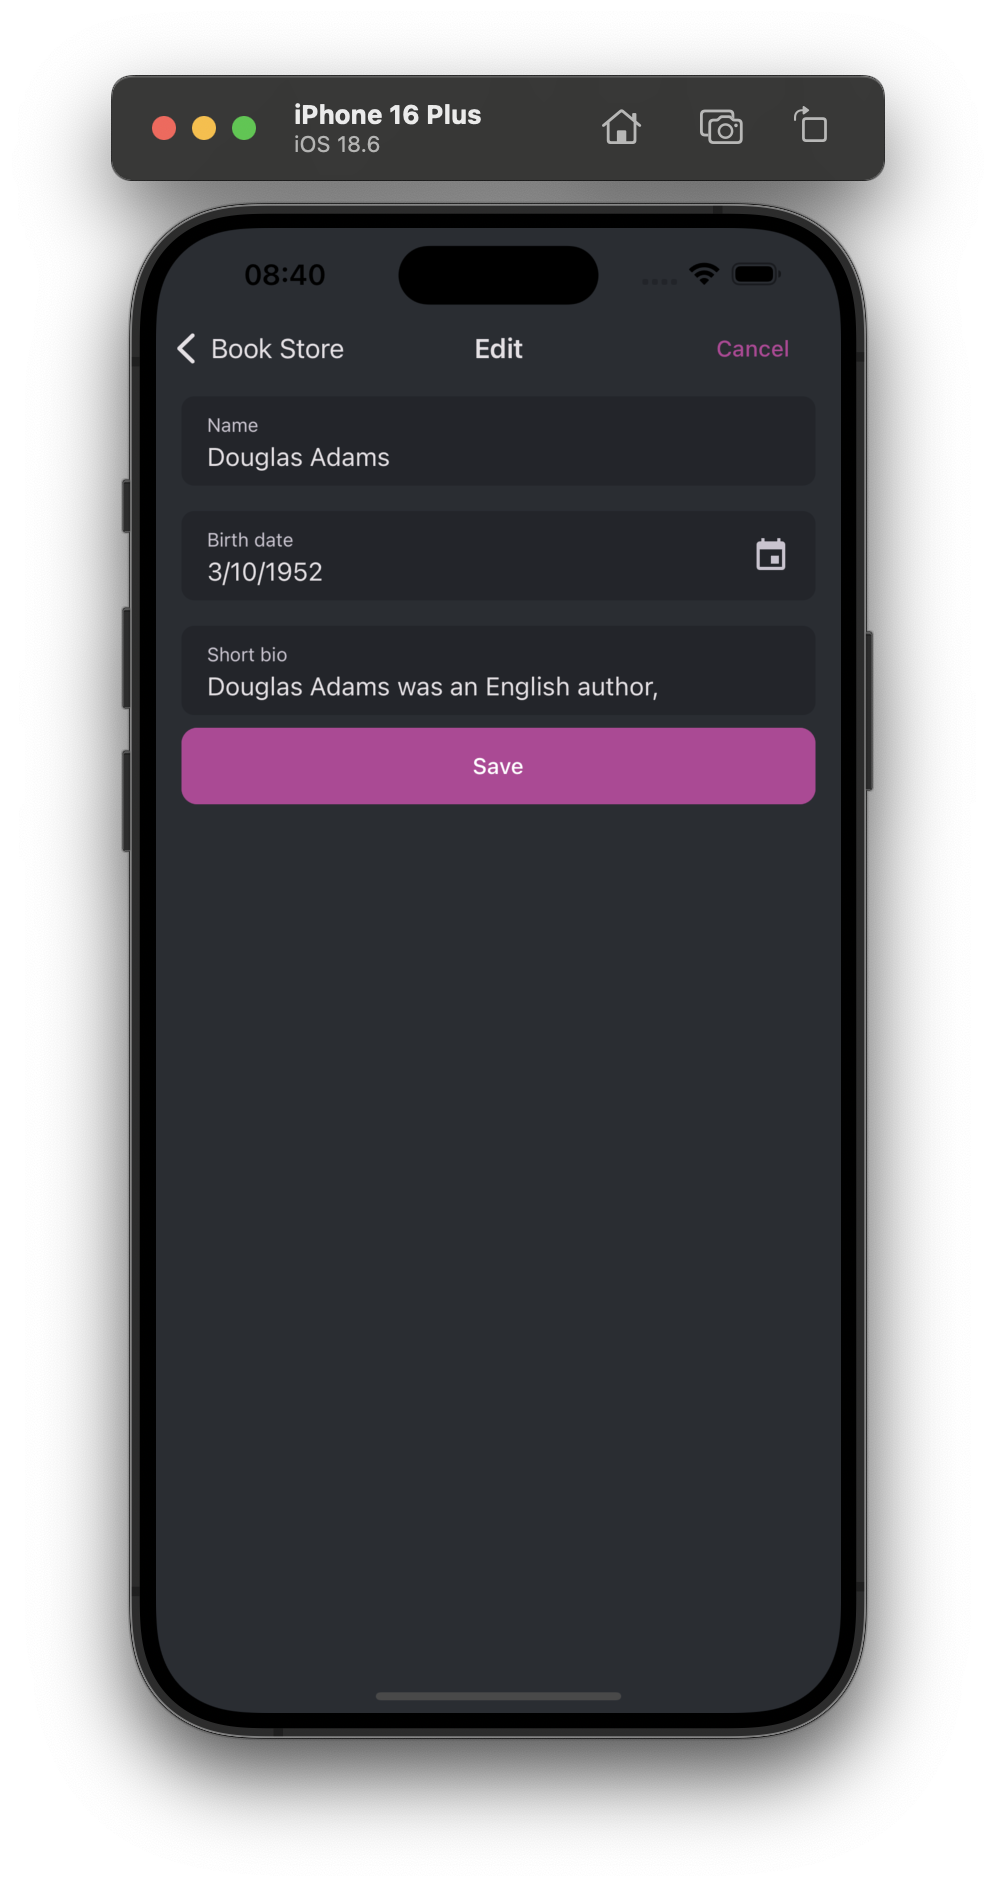
function CreateUpdateAuthorForm({ submit, author = null }) {
const { primaryContainer, background, onBackground } = useThemeColors();
const [birthDateVisible, setPublishDateVisible] = useState(false);
const nameRef = useRef(null);
const birthDateRef = useRef(null);
const shortBioRef = useRef(null);
const inputStyle = { ...styles.input, backgroundColor: primaryContainer };
const onSubmit = (values: any) => {
if (!authorForm.isValid) {
return;
}
submit({ ...values });
};
const authorForm = useFormik({
enableReinitialize: true,
validateOnBlur: true,
validationSchema: Yup.object().shape({
...validations,
}),
initialValues: {
...author,
name: author?.name || '',
birthDate: (author?.birthDate && new Date(author?.birthDate)) || null,
shortBio: author?.shortBio || '',
},
onSubmit,
});
const isInvalidControl = (controlName = null) => {
if (!controlName) {
return;
}
return (
((!!authorForm.touched[controlName] && authorForm.submitCount > 0) ||
authorForm.submitCount > 0) &&
!!authorForm.errors[controlName]
);
};
const onChange = (event: any, selectedDate: any) => {
if (!selectedDate) {
return;
}
setPublishDateVisible(false);
if (event && event.type !== 'dismissed') {
authorForm.setFieldValue('birthDate', selectedDate, true);
}
};
return (
<View style={{ flex: 1, backgroundColor: background }}>
{birthDateVisible && (
<DateTimePicker
testID="birthDatePicker"
value={authorForm.values.birthDate || new Date()}
mode={'date'}
is24Hour={true}
onChange={onChange}
/>
)}
<KeyboardAvoidingView behavior={Platform.OS === 'ios' ? 'padding' : 'height'}>
<ScrollView keyboardShouldPersistTaps="handled">
<View style={styles.inputContainer}>
<TextInput
mode="flat"
ref={nameRef}
error={isInvalidControl('name')}
onSubmitEditing={() => birthDateRef.current.focus()}
returnKeyType="next"
onChangeText={authorForm.handleChange('name')}
onBlur={authorForm.handleBlur('name')}
value={authorForm.values.name}
autoCapitalize="none"
label={i18n.t('BookStore::Name')}
style={inputStyle}
{...props}
/>
{isInvalidControl('name') && (
<ValidationMessage>{authorForm.errors.name as string}</ValidationMessage>
)}
</View>
<View style={styles.inputContainer}>
<TextInput
ref={birthDateRef}
label={i18n.t('BookStore::BirthDate')}
onSubmitEditing={() => shortBioRef.current.focus()}
right={
<TextInput.Icon onPress={() => setPublishDateVisible(true)} icon="calendar" />
}
style={inputStyle}
editable={false}
value={authorForm.values.birthDate?.toLocaleDateString()}
{...props}
/>
{isInvalidControl('birthDate') && (
<ValidationMessage>{authorForm.errors.birthDate as string}</ValidationMessage>
)}
</View>
<Portal>
<Modal
visible={birthDateVisible}
contentContainerStyle={[styles.dateModal, { backgroundColor: background }]}>
<Text variant="titleLarge" style={styles.modalTitle}>
{i18n.t('BookStore::BirthDate')}
</Text>
<Divider style={styles.divider} />
<DateTimePicker
testID="birthDatePicker"
value={authorForm.values.birthDate || new Date()}
mode="date"
display={Platform.OS === 'ios' ? 'spinner' : 'default'}
onChange={onChange}
maximumDate={new Date()}
textColor={onBackground}
/>
<View style={styles.modalButtons}>
<Button onPress={() => setPublishDateVisible(false)} mode="text">
{i18n.t('AbpUi::Cancel')}
</Button>
<Button onPress={() => setPublishDateVisible(false)} mode="contained">
{i18n.t('AbpUi::Ok')}
</Button>
</View>
</Modal>
</Portal>
<View style={styles.inputContainer}>
<TextInput
mode="flat"
ref={shortBioRef}
error={isInvalidControl('shortBio')}
onSubmitEditing={() => authorForm.handleSubmit()}
returnKeyType="next"
onChangeText={authorForm.handleChange('shortBio')}
onBlur={authorForm.handleBlur('shortBio')}
value={authorForm.values.shortBio}
autoCapitalize="none"
label={i18n.t('BookStore::ShortBio')}
style={inputStyle}
{...props}
/>
</View>
<FormButtons style={styles.button} submit={authorForm.handleSubmit} />
</ScrollView>
</KeyboardAvoidingView>
</View>
);
}
const styles = StyleSheet.create({
inputContainer: {
margin: 8,
marginLeft: 16,
marginRight: 16,
},
input: {
borderRadius: 8,
borderTopLeftRadius: 8,
borderTopRightRadius: 8,
},
button: {
marginLeft: 16,
marginRight: 16,
},
divider: {
marginBottom: 16,
},
modalButtons: {
flexDirection: 'row',
justifyContent: 'space-between',
marginTop: 20,
paddingHorizontal: 8,
},
dateModal: {
padding: 20,
margin: 20,
borderRadius: 12,
elevation: 5,
shadowColor: '#000',
shadowOffset: {
width: 0,
height: 2,
},
shadowOpacity: 0.25,
shadowRadius: 3.84,
},
modalTitle: {
textAlign: 'center',
marginBottom: 16,
fontWeight: '600',
},
});
CreateUpdateAuthorForm.propTypes = {
author: PropTypes.object,
submit: PropTypes.func.isRequired,
};
export default CreateUpdateAuthorForm;
Add Author Relation To Book
Update BookAPI proxy file and include getAuthorLookup method
import api from "./API";

export const getList = () => api.get("/api/app/book").then(({ data }) => data);

//Add this
export const getAuthorLookup = () =>
  api.get("/api/app/book/author-lookup").then(({ data }) => data);
//Add this

export const get = (id) =>
  api.get(`/api/app/book/${id}`).then(({ data }) => data);

export const create = (input) =>
  api.post("/api/app/book", input).then(({ data }) => data);

export const update = (input, id) =>
  api.put(`/api/app/book/${id}`, input).then(({ data }) => data);

export const remove = (id) =>
  api.delete(`/api/app/book/${id}`).then(({ data }) => data);
Add AuthorName to the Book List
Open BooksScreen.tsx file under the ./src/screens/BookStore/Books and update code below.
//Improts

function BooksScreen({ navigation }) {
  //Other codes..

  return (
    //Other codes
    <DataList
      navigation={navigation}
      fetchFn={getList}
      trigger={refresh}
      render={({ item }) => (
        <List.Item
          key={item.id}
          title={item.name}
          //Update here
          description={`${item.authorName} | ${i18n.t(
            "BookStore::Enum:BookType." + item.type
          )}`}
          //Update here
          right={(props) => (
            <IconButton
              {...props}
              icon="dots-vertical"
              rippleColor={"#ccc"}
              size={20}
              onPress={() => openContextMenu(item)}
            />
          )}
        />
      )}
    />
    //Other codes
  );
}
item.authorNameplaced beside book type in the book list.
Pass authors to the CreateUpdateBookForm
import {
  getAuthorLookup, //Add this line
  get,
  create,
  update,
} from "../../../../api/BookAPI";
import CreateUpdateBookForm from "./CreateUpdateBookForm";

function CreateUpdateBookScreen({
  navigation,
  route,
  startLoading,
  clearLoading,
}) {
  //Add this variable
  const [authors, setAuthors] = useState([]);

  //Fetch authors from author-lookup endpoint
  useEffect(() => {
    getAuthorLookup().then(({ items } = {}) => setAuthors(items));
  }, []);

  //Pass author list to Form
  return <CreateUpdateBookForm submit={submit} book={book} authors={authors} />;
}
//Other codes..
- We'll define
authorsprop in theCreateUpdateBookFormcomponent and it will be used for Authors dropdown. - In the useEffect function we'll fetch authors from the server and set
authorsvariable.
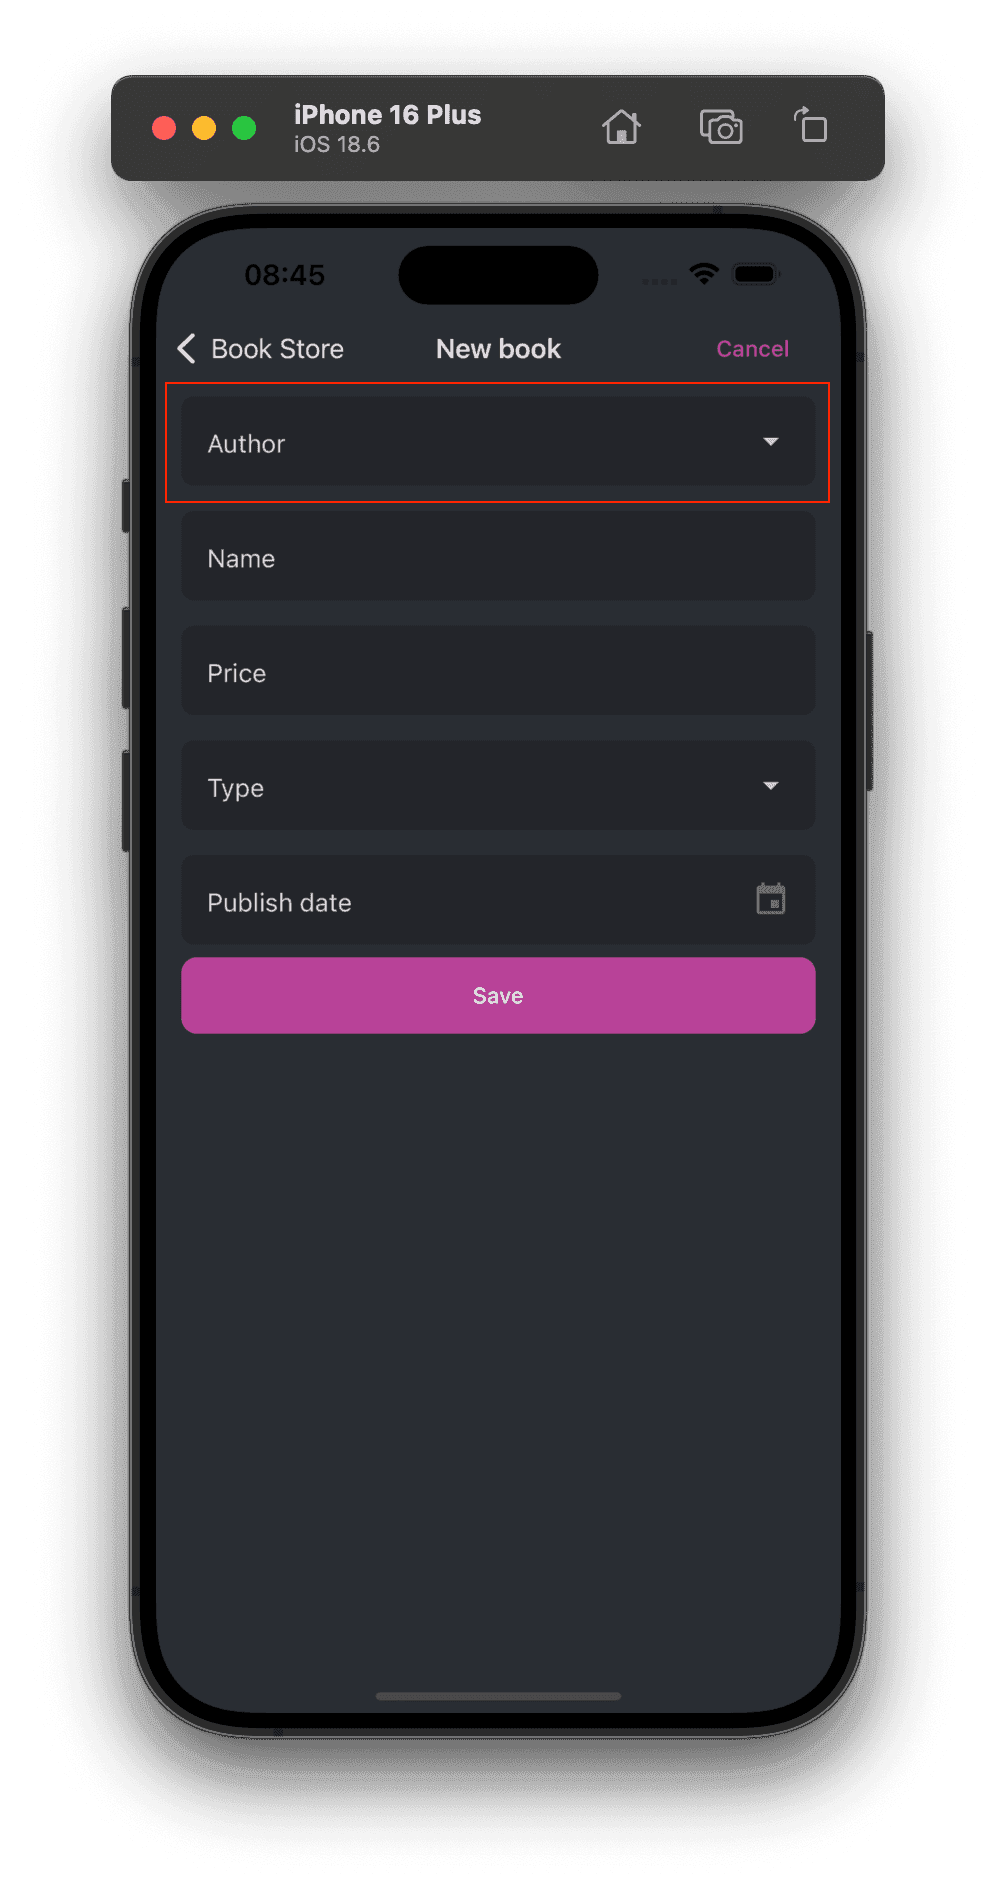
Add authorId field to Book Form
const validations = {
  authorId: Yup.string()
    .nullable()
    .required("AbpValidation::ThisFieldIsRequired."),
  //Other validators
};

//Add `authors` parameter
function CreateUpdateBookForm({ submit, book = null, authors = [] }) {
  //Add this variable for authors list
  const [authorSelectVisible, setAuthorSelectVisible] = useState(false);

  const authorIdRef = useRef(); //Add this line

  //Update form
  const bookForm = useFormik({
    enableReinitialize: true,
    validateOnBlur: true,
    validationSchema: Yup.object().shape({
      ...validations,
    }),
    initialValues: {
      //Add these
      authorId: book?.authorId || "",
      author: authors.find((f) => f.id === book?.authorId)?.name || "",
      //Add these
    },
    onSubmit,
  });

  //Other codes..

  //Add `AbpSelect` component and TextInput for authors
  return (
    <View style={{ flex: 1, backgroundColor: background }}>
      <AbpSelect
        key="authorSelect"
        title={i18n.t("BookStore::Authors")}
        visible={authorSelectVisible}
        items={authors.map(({ id, name }) => ({ id, displayName: name }))}
        hasDefualtItem={true}
        hideModalFn={() => setAuthorSelectVisible(false)}
        selectedItem={bookForm.values.authorId}
        setSelectedItem={(id) => {
          bookForm.setFieldValue("authorId", id, true);
          bookForm.setFieldValue(
            "author",
            authors.find((f) => f.id === id)?.name || null,
            false
          );
        }}
      />

      <KeyboardAvoidingView
        behavior={Platform.OS === "ios" ? "padding" : "height"}
      >
        <ScrollView keyboardShouldPersistTaps="handled">
          <View style={styles.input.container}>
            <TextInput
              ref={authorIdRef}
              error={isInvalidControl("authorId")}
              label={i18n.t("BookStore::Author")}
              right={
                <TextInput.Icon
                  onPress={() => setAuthorSelectVisible(true)}
                  icon="menu-down"
                />
              }
              style={inputStyle}
              editable={false}
              value={bookForm.values.author}
              {...props}
            />
            {isInvalidControl("authorId") && (
              <ValidationMessage>{bookForm.errors.authorId}</ValidationMessage>
            )}
          </View>
        </ScrollView>
      </KeyboardAvoidingView>
    </View>
  );
}
CreateUpdateBookForm.propTypes = {
  authors: PropTypes.array.isRequired, //Include this
};

export default CreateUpdateBookForm;
- Create authors dropdown input with
AbpSelectcomponent. - Display selected author in the
TextInput


That is all. Just run the application and try to create or edit an author.


