


Integrating the Modules: Communication via Messages (Events)
Another common approach to communicating between modules is messaging. By publishing and handling messages, a module can perform an operation when an event happens in another module.
Understanding the Event Bus Types
ABP provides two types of event buses for loosely coupled communication:
- Local Event Bus is suitable for in-process messaging. Since in a modular monolith, both of publisher and subscriber are in the same process, they can communicate in-process, without needing an external message broker.
- Distributed Event Bus is normal for inter-process messaging, like microservices, for publishing and subscribing to distributed events. However, ABP's distributed event bus works as local (in-process) by default (actually, it uses the Local Event Bus under the hood by default) unless you configure an external message broker.
If you consider converting your modular monolith to a microservice system later, it is best to use the Distributed Event Bus with default local/in-process implementation. It already supports database-level transactional event execution and has no performance penalty. If you switch to an external provider (RabbitMQ, Kafka, etc.), you don't need to change your application code.
On the other hand, if you want to publish events and always subscribe to the same module, you should use the Local Event Bus. That way, if you switch to microservices later, you don't accidentally (and unnecessarily) distribute a local event. Both event bus types can be used in the same system; just understand them and use them properly.
We will use the distributed event bus since we will use messaging (events) between different modules.
Publishing an Event
In the example scenario, we want to publish an event when a new order is placed. The Ordering module will publish the event since it knows when a new order is placed. The Catalog module will subscribe to that event and get notified when a new order is placed. This will decrease the stock count of the product related to the new order. The scenario is pretty simple; let's implement it.
Defining the Event Class
Open the ModularCrm.Ordering module in your IDE, find the ModularCrm.Ordering.Contracts project, create an Events folder and create an OrderPlacedEto class inside that folder. The final folder structure should be like this:
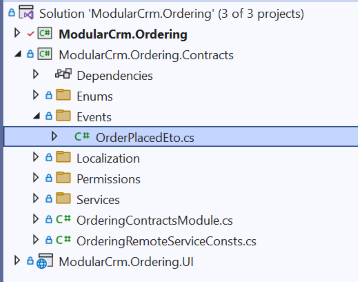
We've placed the OrderPlacedEto class inside the ModularCrm.Ordering.Contracts project since that project can be referenced and used by other modules without accessing the internal implementation of the Ordering module. The OrderPlacedEto class definition should be the following:
using System;

namespace ModularCrm.Ordering.Events;

public class OrderPlacedEto
{
    public string CustomerName { get; set; } = null!;
    public Guid ProductId { get; set; }
}
OrderPlacedEto is very simple. It is a plain C# class used to transfer data related to the event (ETO is an acronym for Event Transfer Object, a suggested naming convention by the ABP team, but not technically required). You can add more properties if needed, but for this tutorial, that is more than enough.
Using the IDistributedEventBus Service
The IDistributedEventBus service publishes events to the event bus. Open the ModularCrm.Ordering module's .NET solution, and update the OrderAppService as follows:
using System;
using System.Collections.Generic;
using System.Linq;
using System.Threading.Tasks;
using ModularCrm.Catalog.Integration;
using ModularCrm.Ordering.Events;
using Volo.Abp.Domain.Repositories;
using Volo.Abp.EventBus.Distributed;

namespace ModularCrm.Ordering;

public class OrderAppService : OrderingAppService, IOrderAppService
{
    private readonly IRepository<Order, Guid> _orderRepository;
    private readonly IProductIntegrationService _productIntegrationService;
    private readonly IDistributedEventBus _distributedEventBus;

    public OrderAppService(
        IRepository<Order, Guid> orderRepository,
        IProductIntegrationService productIntegrationService,
        IDistributedEventBus distributedEventBus)
    {
        _orderRepository = orderRepository;
        _productIntegrationService = productIntegrationService;
        _distributedEventBus = distributedEventBus;
    }

    public async Task<List<OrderDto>> GetListAsync()
    {
        var orders = await _orderRepository.GetListAsync();

        // Prepare a list of products we need
        var productIds = orders.Select(o => o.ProductId).Distinct().ToList();
        var products = (await _productIntegrationService
            .GetProductsByIdsAsync(productIds))
            .ToDictionary(p => p.Id, p => p.Name);

        var orderDtos = ObjectMapper.Map<List<Order>, List<OrderDto>>(orders);

        orderDtos.ForEach(orderDto =>
        {
            orderDto.ProductName = products[orderDto.ProductId];
        });

        return orderDtos;
    }

    public async Task CreateAsync(OrderCreationDto input)
    {
        // Create a new Order entity
        var order = new Order
        {
            CustomerName = input.CustomerName,
            ProductId = input.ProductId,
            State = OrderState.Placed
        };

        // Save it to the database
        await _orderRepository.InsertAsync(order);

        // Publish an event so other modules can be informed
        await _distributedEventBus.PublishAsync(
            new OrderPlacedEto
            {
                ProductId = order.ProductId,
                CustomerName = order.CustomerName
            });
    }
}
We've changed the CreateAsync method. Now it creates a new Order entity, saves it to the database and finally publishes an OrderPlacedEto event.
Subscribing to an Event
This section will subscribe to the OrderPlacedEto event in the Catalog module and decrease the related product's stock count once a new order is placed.
Adding a Reference of the ModularCrm.Ordering.Contracts Package
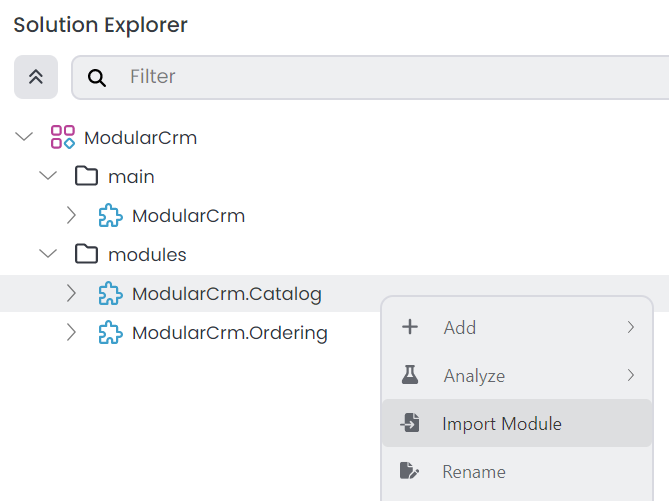
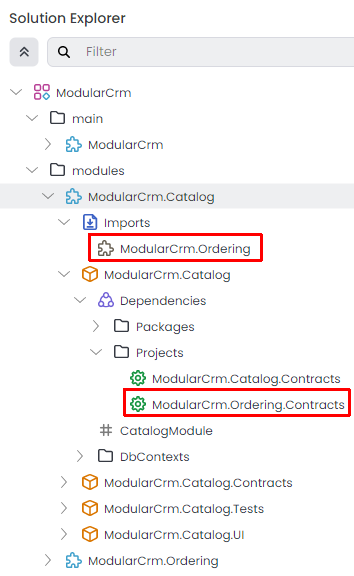
Since the OrderPlacedEto class is in the ModularCrm.Ordering.Contracts project, we must add that package's reference to the Catalog module. This time, we will use the Import Module feature of ABP Studio (as an alternative to the approach we used in the Adding a Reference to the ModularCrm.Catalog.Contracts Package section of the previous part).
Open the ABP Studio UI and stop the application if it is already running. Then open the Solution Explorer in ABP Studio, right-click the ModularCrm.Catalog module and select the Import Module command:
In the opening dialog, find and select the ModularCrm.Ordering module, check the Install this module option and click the OK button:
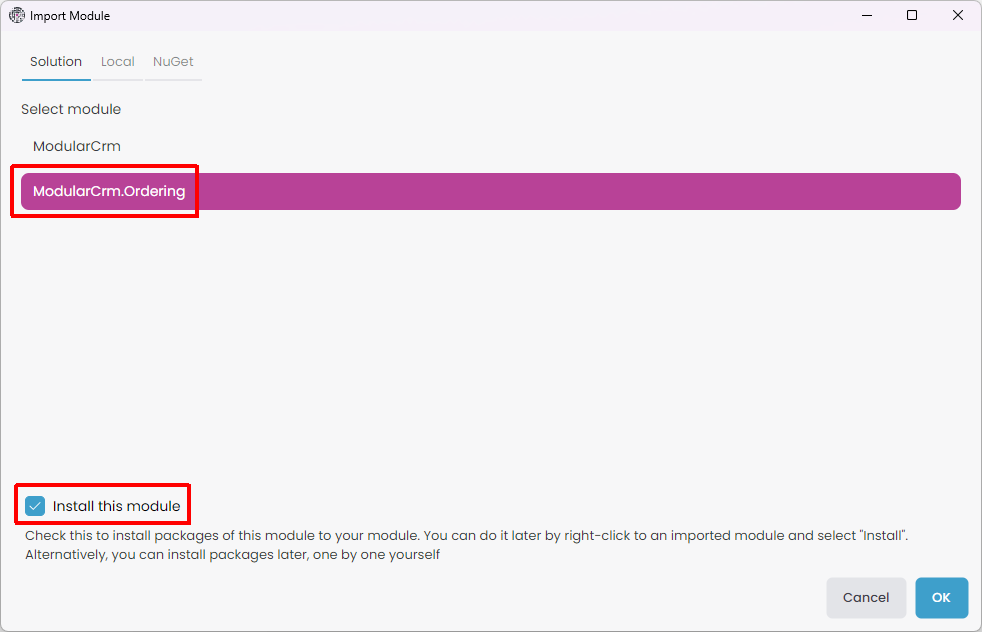
Once you click the OK button, the Ordering module is imported to the Catalog module, and an installation dialog is open:
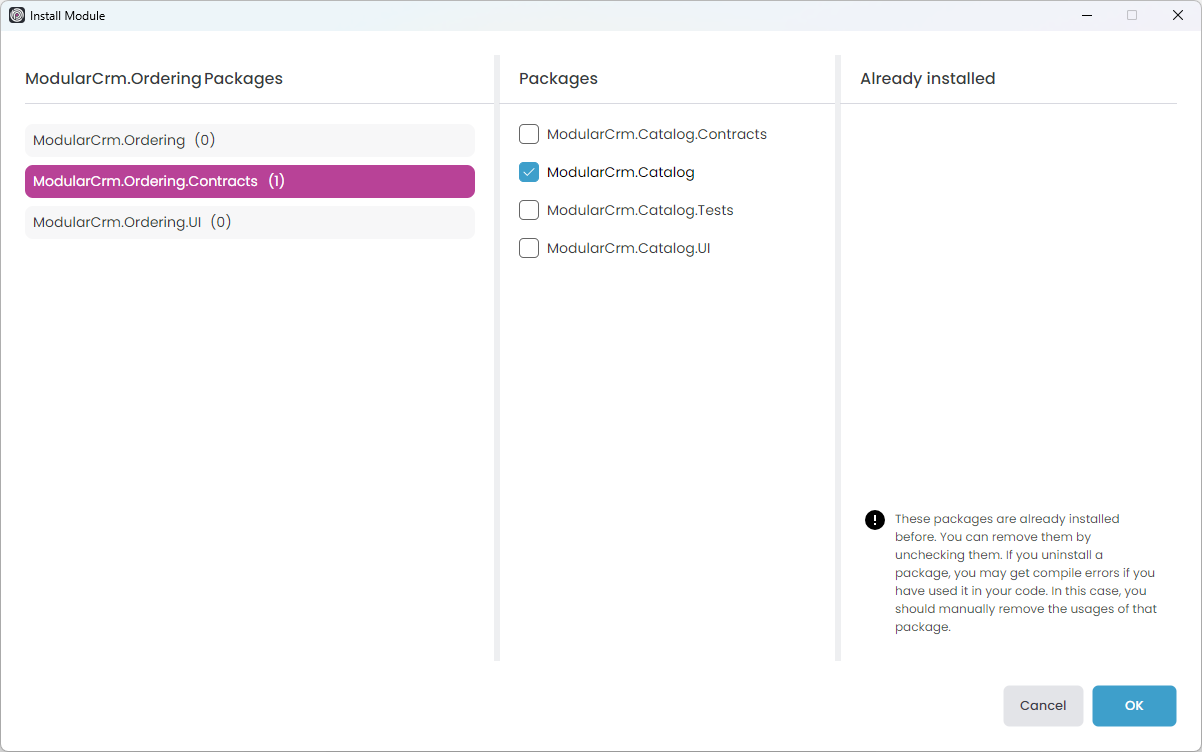
Here, select the ModularCrm.Ordering.Contracts package on the left side (because we want to add that package reference) and ModularCrm.Catalog package on the middle area (because we want to add the package reference to that project). Also, select the ModularCrm.Ordering package on the right side, and unselect all packages on the middle area (we don't need the implementation or any other packages). Then, click the OK button to finish the installation operation.
You can check the ABP Studio's Solution Explorer panel to see the module import and the project reference (dependency).
Handling the OrderPlacedEto Event
Now, it is possible to use the OrderPlacedEto class inside the Catalog module since it has the ModularCrm.Ordering.Contracts package reference.
Open the Catalog module's .NET solution in your IDE, locate the ModularCrm.Catalog project, and create a new EventHandlers folder and an OrderEventHandler class inside that folder. The final folder structure should be like this:
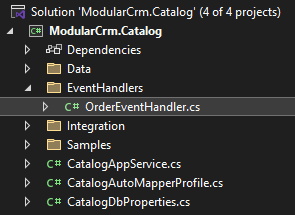
Replace the OrderEventHandler.cs file's content with the following code block:
using System;
using System.Threading.Tasks;
using ModularCrm.Ordering.Events;
using Volo.Abp.DependencyInjection;
using Volo.Abp.Domain.Repositories;
using Volo.Abp.EventBus.Distributed;

namespace ModularCrm.Catalog.EventHandlers;

public class OrderEventHandler :
    IDistributedEventHandler<OrderPlacedEto>,
    ITransientDependency
{
    private readonly IRepository<Product, Guid> _productRepository;

    public OrderEventHandler(IRepository<Product, Guid> productRepository)
    {
        _productRepository = productRepository;
    }

    public async Task HandleEventAsync(OrderPlacedEto eventData)
    {
        // Find the related product
        var product = await _productRepository.FindAsync(eventData.ProductId);
        if (product == null)
        {
            return;
        }

        // Decrease the stock count
        product.StockCount = product.StockCount - 1;

        // Update the entity in the database
        await _productRepository.UpdateAsync(product);
    }
}
OrderEventHandler implements the IDistributedEventHandler<OrderPlacedEto> interface. In that way, ABP recognizes that class and subscribes to the related event automatically. Implementing ITransientDependency registers the OrderEventHandler class to the dependency injection system as a transient object.
We inject the product repository and update the stock count in the event handler method (HandleEventAsync). That's it.
Testing the Order Creation
To keep this tutorial more focused, we will not create a UI for creating an order. You can easily create a form to create an order on your user interface. In this section, we will test it just using the Swagger UI.
Graph build the ModularCrm application, run it on the ABP Studio's Solution Runner panel and browse the application UI as demonstrated earlier.
Once the application is running and ready, manually type /swagger to the end of the URL and press the ENTER key. You should see the Swagger UI that is used to discover and test your HTTP APIs:
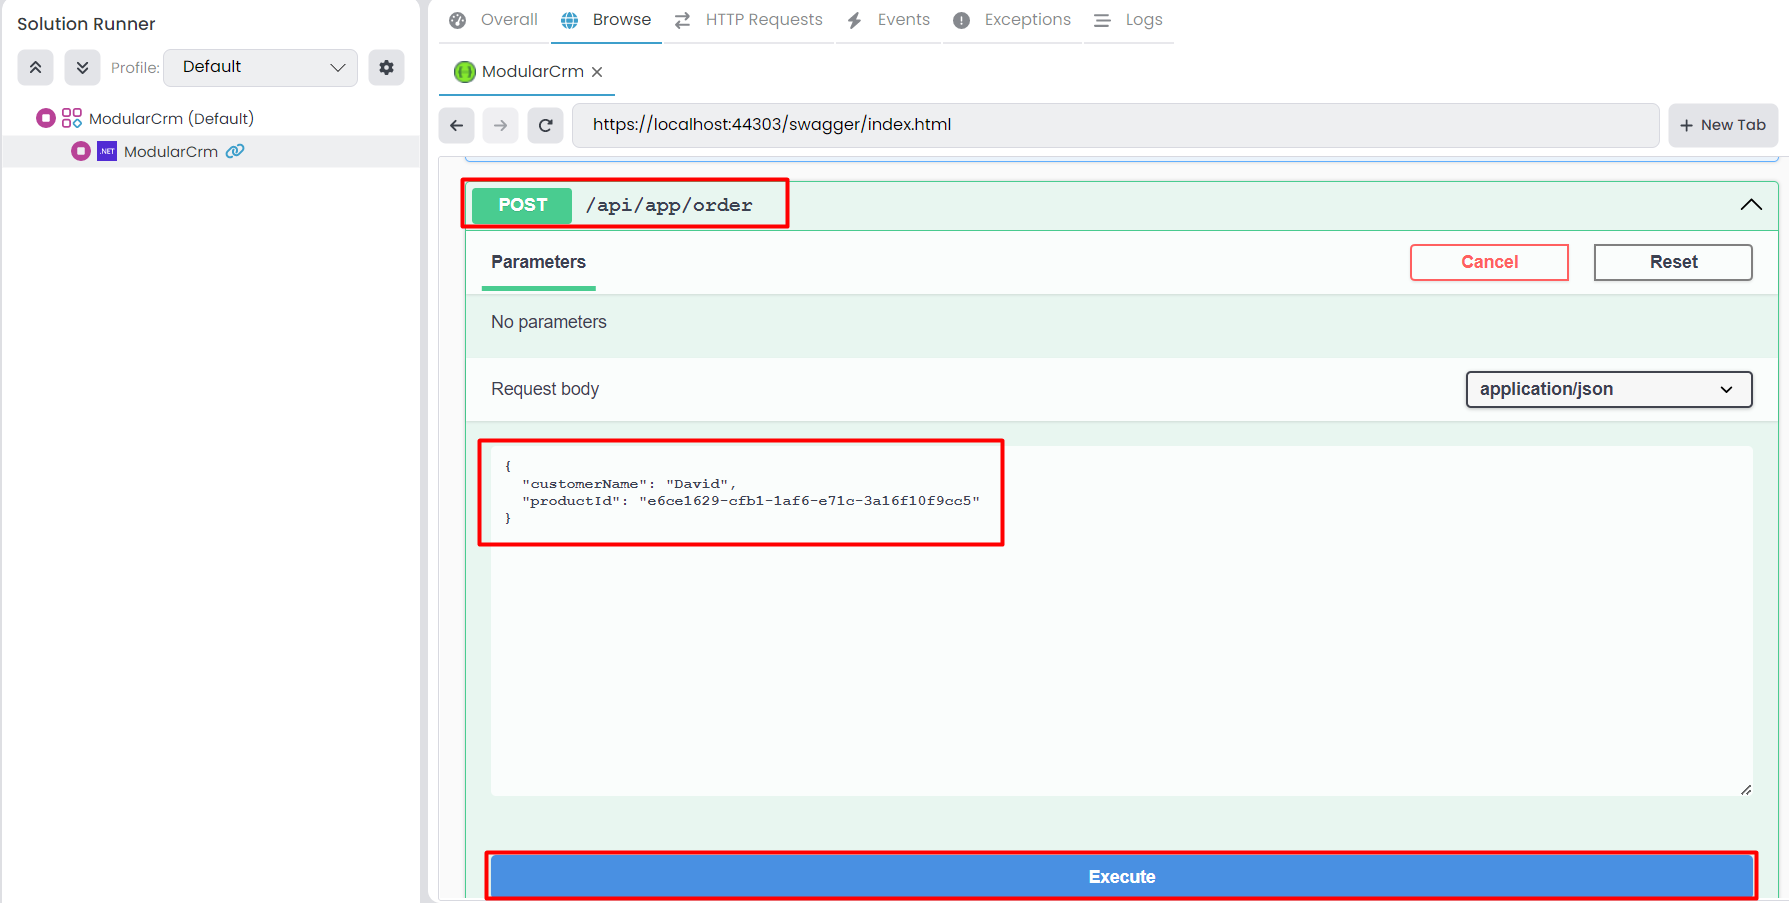
Find the Orders API, click the Try it out button, enter a sample value the the Request body:
{
  "customerName": "David",
  "productId": "e6ce1629-cfb1-1af6-e71c-3a16f10f9cc5"
}
IMPORTANT: Here, you should type a valid product Id from the CatalogProducts table of your database!
Once you press the Execute button, a new order is created. At that point, you can check the /Orders page to see if the new order is shown on the UI, and check the /Products page to see if the related product's stock count has decreased.
Here are sample screenshots from the Products and Orders pages:
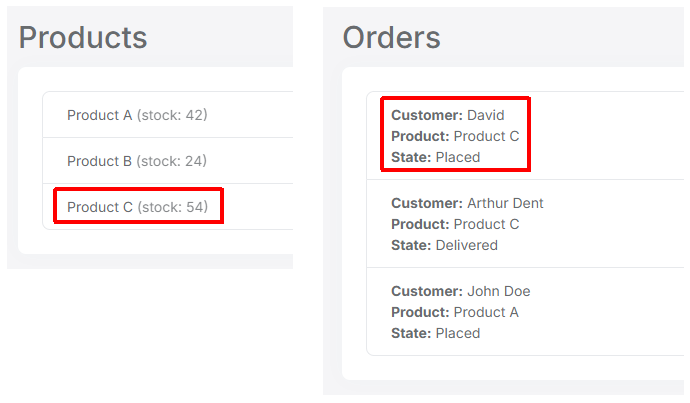
We placed a new order for Product C. As a result, Product C's stock count has decreased from 55 to 54 and a new line is added to the Orders page.
Conclusion
In this part, we've used ABP's distributed event bus to perform loosely coupled messaging between the modules. In the next part, we will execute a database query that includes product and order data as an alternative way of integrating modules' data.

