Building the Ordering Module
In the previous part, you created Ordering module and installed it into the main application. However, the Ordering module has no functionality yet. In this part, you will create an Order entity and add functionality to create and list the orders.
Creating an Order Entity
Open the ModularCrm.Ordering .NET solution in your IDE.
Tip: You can open the folder of a module's .NET solution by right-clicking the related module in ABP Studio and selecting the Open with -> Explorer command.
Adding an Order Class
Create an Order class to the ModularCrm.Ordering project:
using System;
using Volo.Abp.Domain.Entities.Auditing;

namespace ModularCrm.Ordering;

public class Order : CreationAuditedAggregateRoot<Guid>
{
    public Guid ProductId { get; set; }
    public string CustomerName { get; set; } = null!;
    public OrderState State { get; set; }
}
We allow users to place only a single product within an order. The Order entity would be much more complex in a real-world application. However, the complexity of the Order entity doesn't affect modularity. So, we keep it simple to focus on modularity in this tutorial. We are inheriting from the CreationAuditedAggregateRoot class since I want to know when an order has been created and who has created it.
Adding an OrderState Enumeration
We used an OrderState enumeration that has not yet been defined. Create a OrderState.cs file inside the ModularCrm.Ordering.Contracts project and define the following Enum:
namespace ModularCrm.Ordering;

public enum OrderState : byte
{
    Placed = 0,
    Delivered = 1,
    Canceled = 2
}
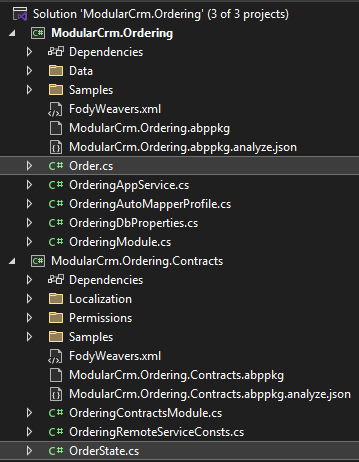
The final structure of the Ordering module should be similar to the following figure in your IDE:
Configuring the Database Mapping
The Order entity has been created. Now, you need to configure the database mapping for that entity. You will first define the database table mapping, create a database migration and update the database.
Defining the Database Mappings
Entity Framework Core requires defining a DbContext class as the main object for the database mapping. We want to use the main application's DbContext object. That way, you can control the database migrations at a single point, ensure database transactions on multi-module operations, and establish relations between database tables of different modules. However, the Ordering module can not use the main application's DbContext object because it doesn't depend on the main application, and you don't want to establish such a dependency.
As a solution, you will use DbContext interface in the Ordering module which is then implemented by the main module's DbContext.
Open your IDE, in Data folder under the ModularCrm.Ordering project, and edit IOrderingDbContext interface as shown:
using Microsoft.EntityFrameworkCore;
using Volo.Abp.Data;
using Volo.Abp.EntityFrameworkCore;

namespace ModularCrm.Ordering.Data;

[ConnectionStringName(OrderingDbProperties.ConnectionStringName)]
public interface IOrderingDbContext : IEfCoreDbContext
{
    DbSet<Order> Orders { get; set; }
}
Afterwards, create Orders DbSet for the OrderingDbContext class in the Data folder under the ModularCrm.Ordering project:
using Microsoft.EntityFrameworkCore;
using Volo.Abp.Data;
using Volo.Abp.EntityFrameworkCore;

namespace ModularCrm.Ordering.Data;

[ConnectionStringName(OrderingDbProperties.ConnectionStringName)]
public class OrderingDbContext : AbpDbContext<OrderingDbContext>, IOrderingDbContext
{
    public DbSet<Order> Orders { get; set; }

    public OrderingDbContext(DbContextOptions<OrderingDbContext> options)
        : base(options)
    {

    }

    protected override void OnModelCreating(ModelBuilder builder)
    {
        base.OnModelCreating(builder);

        builder.ConfigureOrdering();
    }
}
You can inject and use the IOrderingDbContext in the Ordering module. However, you will not usually directly use that interface. Instead, you will use ABP's repositories, which internally uses that interface.
It is best to configure the database table mapping for the Order entity in the Ordering module. You will use the OrderingDbContextModelCreatingExtensions in the same Data folder:
using Microsoft.EntityFrameworkCore;
using Volo.Abp;
using Volo.Abp.EntityFrameworkCore.Modeling;

namespace ModularCrm.Ordering.Data;

public static class OrderingDbContextModelCreatingExtensions
{
    public static void ConfigureOrdering(
        this ModelBuilder builder)
    {
        Check.NotNull(builder, nameof(builder));

        builder.Entity<Order>(b =>
        {
            //Configure table name
            b.ToTable(OrderingDbProperties.DbTablePrefix + "Orders",
                      OrderingDbProperties.DbSchema);

            //Always call this method to set base entity properties
            b.ConfigureByConvention();

            //Properties of the entity
            b.Property(q => q.CustomerName).IsRequired().HasMaxLength(120);
        });
    }
}
Configuring the Main Application
Open the main application's solution in your IDE, find the ModularCrmDbContext class under the ModularCrm project's Data folder, and follow the 3 steps below:
(1) Add the following attribute on top of the ModularCrmDbContext class:
[ReplaceDbContext(typeof(IOrderingDbContext))]
The ReplaceDbContext attribute allows the use of the ModularCrmDbContext class in the services in the Ordering module.
(2) Implement the IOrderingDbContext by the ModularCrmDbContext class:
public class ModularCrmDbContext :
    AbpDbContext<ModularCrmDbContext>,
    ICatalogDbContext,
    IOrderingDbContext //NEW: IMPLEMENT THE INTERFACE
{
    public DbSet<Product> Products { get; set; }
    public DbSet<Order> Orders { get; set; } //NEW: ADD DBSET PROPERTY
	...
}
(3) Finally, ensure that the ConfigureOrdering() extension method is called inside the OnModelCreating method (this should already be done from ABP Studio):
protected override void OnModelCreating(ModelBuilder builder)
{
    ...
    builder.ConfigureOrdering();
}
In this way, the Ordering module can use ModularCrmDbContext over the IOrderingDbContext interface. This part is only needed once for a module. Next time, you can add a new database migration, as explained in the next section.
Add a Database Migration
Now, you can add a new database migration. You can use Entity Framework Core's Add-Migration (or dotnet ef migrations add) terminal command, but in this tutorial, you will use ABP Studio's shortcut UI.
Ensure that the solution has built. You can right-click the ModularCrm (under the main folder) on ABP Studio Solution Runner and select the Dotnet CLI -> Graph Build command.
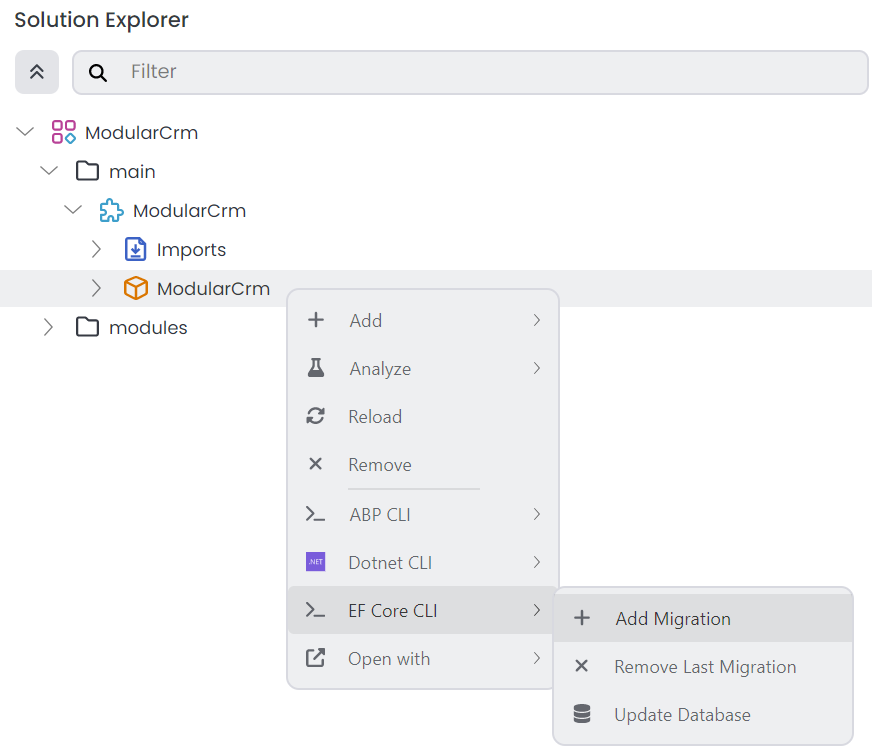
Right-click the ModularCrm package and select the EF Core CLI -> Add Migration command:
The Add Migration command opens a new dialog to get a migration name:

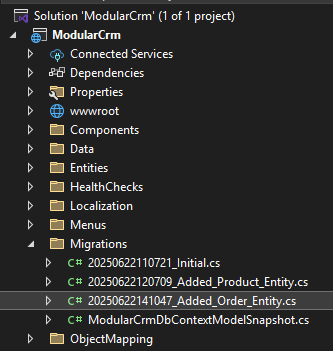
Once you click the OK button, a new database migration class is added to the Migrations folder of the ModularCrm project:
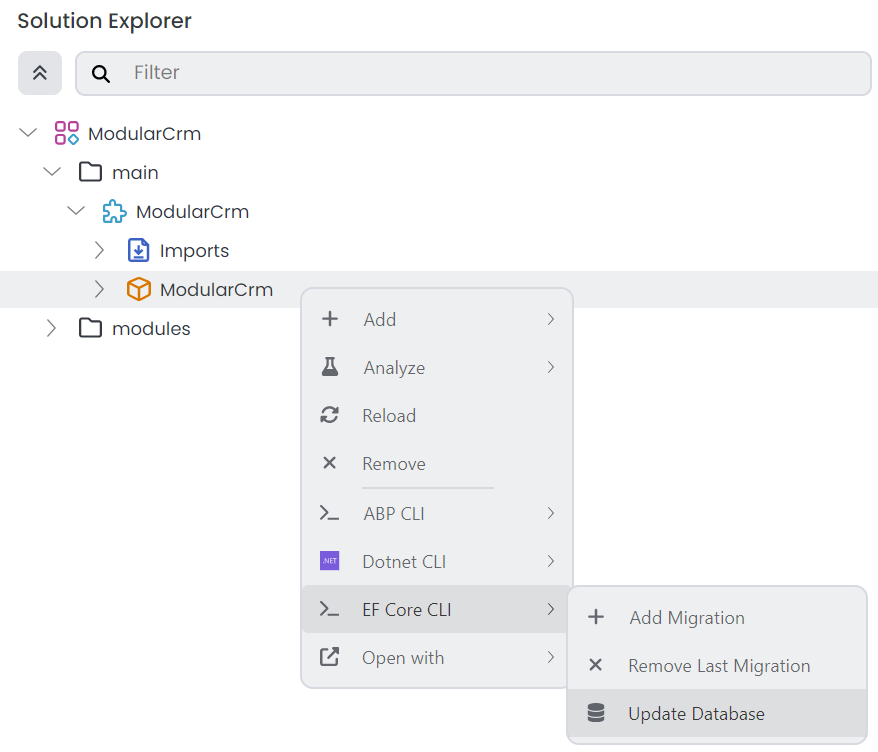
Now, you can return to ABP Studio, right-click the ModularCrm project and select the EF Core CLI -> Update Database command:
After the operation completes, you can check your database to see the new OrderingOrders table has been created:
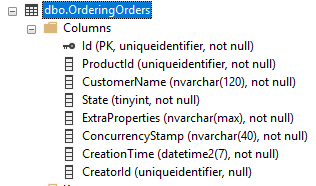
Ordering prefix is added to all table names of the Ordering module. If you want to change or remove it, see the OrderingDbProperties class in the Ordering module's .NET solution.
Creating the Application Service
You will create an application service to manage the Order entities.
Defining the Application Service Contract
You're gonna create the IOrderAppService interface under the ModularCrm.Ordering.Contracts project. Return to your IDE, open the ModularCrm.Ordering module's .NET solution and create an IOrderAppService interface in the ModularCrm.Ordering.Contracts project:
using System.Collections.Generic;
using System.Threading.Tasks;
using Volo.Abp.Application.Services;

namespace ModularCrm.Ordering;

public interface IOrderAppService : IApplicationService
{
    Task<List<OrderDto>> GetListAsync();
    Task CreateAsync(OrderCreationDto input);
}
Defining Data Transfer Objects
The GetListAsync and CreateAsync methods will use data transfer objects (DTOs) to communicate with the client. You will create two DTO classes for that purpose.
Create a OrderCreationDto class under the ModularCrm.Ordering.Contracts project:
using System;
using System.ComponentModel.DataAnnotations;

namespace ModularCrm.Ordering;

public class OrderCreationDto
{
    [Required]
    [StringLength(150)]
    public string CustomerName { get; set; } = null!;

    [Required]
    public Guid ProductId { get; set; }
}
Create a OrderDto class under the ModularCrm.Ordering.Contracts project:
using System;

namespace ModularCrm.Ordering;

public class OrderDto
{
    public Guid Id { get; set; }
    public string CustomerName { get; set; } = null!;
    public Guid ProductId { get; set; }
    public OrderState State { get; set; }
}
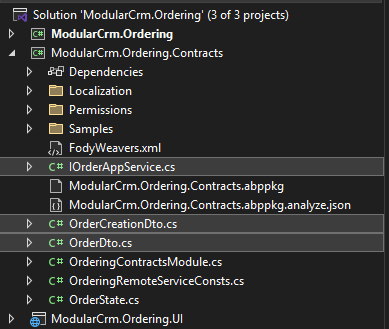
The new files under the ModularCrm.Ordering.Contracts project should be like the following figure:
Implementing the Application Service
First, create a new mapping class (under the ModularCrm.Ordering project) that implements the MapperBase<Order, OrderDto> class with the [Mapper] attribute to map Order entities to OrderDto objects as follows, because we will need it later:
[Mapper]
public partial class OrderToOrderDtoMapper : MapperBase<Order, OrderDto>
{
    public override partial OrderDto Map(Order source);

    public override partial void Map(Order source, OrderDto destination);
}
Now, you can implement the IOrderAppService interface. Create an OrderAppService class under the ModularCrm.Ordering project:
using System;
using System.Collections.Generic;
using System.Threading.Tasks;
using Volo.Abp.Domain.Repositories;

namespace ModularCrm.Ordering;

public class OrderAppService : OrderingAppService, IOrderAppService
{
    private readonly IRepository<Order, Guid> _orderRepository;

    public OrderAppService(IRepository<Order, Guid> orderRepository)
    {
        _orderRepository = orderRepository;
    }

    public async Task<List<OrderDto>> GetListAsync()
    {
        var orders = await _orderRepository.GetListAsync();
        return ObjectMapper.Map<List<Order>, List<OrderDto>>(orders);
    }

    public async Task CreateAsync(OrderCreationDto input)
    {
        var order = new Order
        {
            CustomerName = input.CustomerName,
            ProductId = input.ProductId,
            State = OrderState.Placed
        };

        await _orderRepository.InsertAsync(order);
    }
}
Exposing Application Services as HTTP API Controllers
After implementing the application service, we can create HTTP API endpoints for the ordering module using the ABP's Auto API Controllers feature. For that purpose, open the OrderingModule class in the Ordering module's .NET solution (the ModularCrm.Ordering solution), find the ConfigureServices method and add the following lines inside that method:
Configure<AbpAspNetCoreMvcOptions>(options =>
{
    options.ConventionalControllers.Create(typeof(OrderingModule).Assembly, settings =>
    {
        settings.RootPath = "ordering";
    });
});
This will tell the ABP framework to create API controllers for the application services in the ModularCrm.Ordering assembly.
Creating Example Orders
This section will create a few example orders using the Swagger UI. Thus, you will have some sample orders to show on the UI.
Open the Solution Runner panel and click the Play button near the solution root. Once the ModularCrm application runs, you can right-click it and select the Browse command to open the user interface.
Once you see the user interface of the web application, type /swagger at the end of the URL to open the Swagger UI. If you scroll down, you should see the Order API:
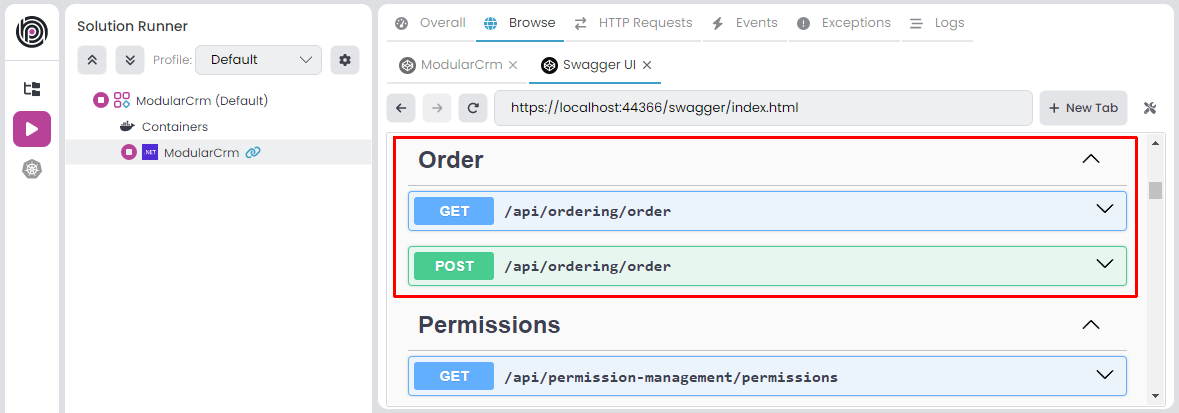
If you don't see the Order API, you may need to re-build the entire solution. Right-click the
ModularCrmunder themainfolder in the ABP Studio Solution Explorer panel and select the Dotnet CLI -> Graph Build command. This will ensure that all the modules and the main application are completely built.
Expand the POST /api/ordering/order API and click the Try it out button. Then, create a few orders by filling in the request body and clicking the Execute button:

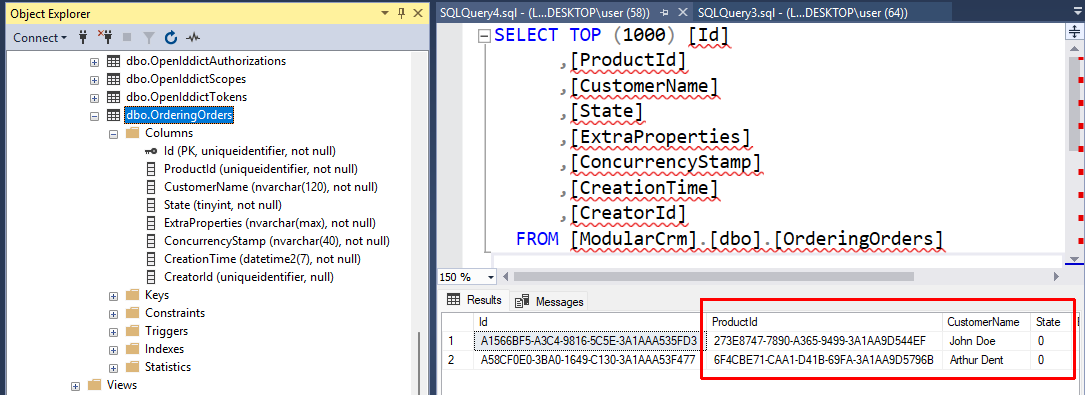
If you check the database, you should see the entities created in the Orders table:
Creating the User Interface
In this section, you will create a very simple user interface to demonstrate how to build UI in the catalog module and make it work in the main application.
As a first step, you can stop the application on ABP Studio's Solution Runner if it is currently running.
Creating the Orders Page
Replace the Index.cshtml.cs content in the Pages/Ordering folder of the ModularCrm.Ordering.UI project with the following code block:
using System.Collections.Generic;
using System.Threading.Tasks;
using Microsoft.AspNetCore.Mvc.RazorPages;

namespace ModularCrm.Ordering.UI.Pages.Ordering;

public class IndexModel : PageModel
{
    public List<OrderDto> Orders { get; set; }

    private readonly IOrderAppService _orderAppService;

    public IndexModel(IOrderAppService orderAppService)
    {
        _orderAppService = orderAppService;
    }

    public async Task OnGetAsync()
    {
        Orders = await _orderAppService.GetListAsync();
    }
}
Here, you are injecting IOrderAppService to query Order entities from the database to show on the page. Open the Index.cshtml file and replace the content with the following code block:
@page
@model ModularCrm.Ordering.UI.Pages.Ordering.IndexModel

<h1>Orders</h1>

<abp-card>
    <abp-card-body>
        <abp-list-group>
            @foreach (var order in Model.Orders)
            {
                <abp-list-group-item>
                    <strong>Customer:</strong> @order.CustomerName <br />
                    <strong>Product:</strong> @order.ProductId <br />
                    <strong>State:</strong> @order.State
                </abp-list-group-item>
            }
        </abp-list-group>
    </abp-card-body>
</abp-card>
This page shows a list of orders on the UI. You haven't created a UI to create new orders, and we will not do it to keep this tutorial simple. If you want to learn how to create advanced UIs with ABP, please follow the Book Store tutorial.
Editing the Menu Item
ABP provides a modular navigation menu system where each module can contribute to the main menu dynamically.
Edit the OrderingMenuContributor class into the ModularCrm.Ordering.UI project:
using System.Threading.Tasks;
using Volo.Abp.UI.Navigation;

namespace ModularCrm.Ordering.UI.Menus;

public class OrderingMenuContributor : IMenuContributor
{
    public async Task ConfigureMenuAsync(MenuConfigurationContext context)
    {
        if (context.Menu.Name == StandardMenus.Main)
        {
            await ConfigureMainMenuAsync(context);
        }
    }

    private Task ConfigureMainMenuAsync(MenuConfigurationContext context)
    {
        context.Menu.AddItem(
            new ApplicationMenuItem(
                OrderingMenus.Prefix, // Unique menu id
                "Orders", // Menu display text
                "~/Ordering", // URL
                "fa-solid fa-basket-shopping" // Icon CSS class
            )
        );

        return Task.CompletedTask;
    }
}
OrderingMenuContributor implements the IMenuContributor interface, which forces us to implement the ConfigureMenuAsync method. In that method, you can manipulate the menu items (add new menu items, remove existing menu items or change the properties of existing menu items). The ConfigureMenuAsync method is executed whenever the menu is rendered on the UI, so you can dynamically decide how to manipulate the menu items.
You can check the menu documentation to learn more about manipulating menu items.
Building the Application
Now, you will run the application to see the result. Please stop the application if it is already running. Then open the Solution Runner panel, right-click the ModularCrm application, and select the Build -> Graph Build command:
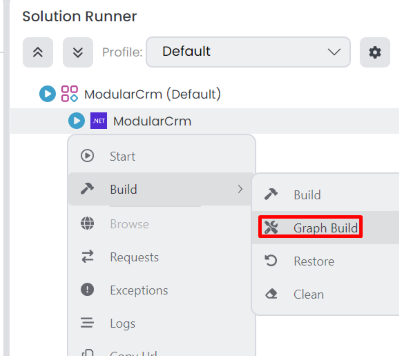
You've performed a graph build since you've made a change on a module, and more than building the main application is needed. Graph Build command also builds the depended modules if necessary. Alternatively, you could build the Ordering module first (on ABP Studio or your IDE). This approach can be faster if you have too many modules and you make a change in one of the modules. Now you can run the application by right-clicking the ModularCrm application and selecting the Start command.
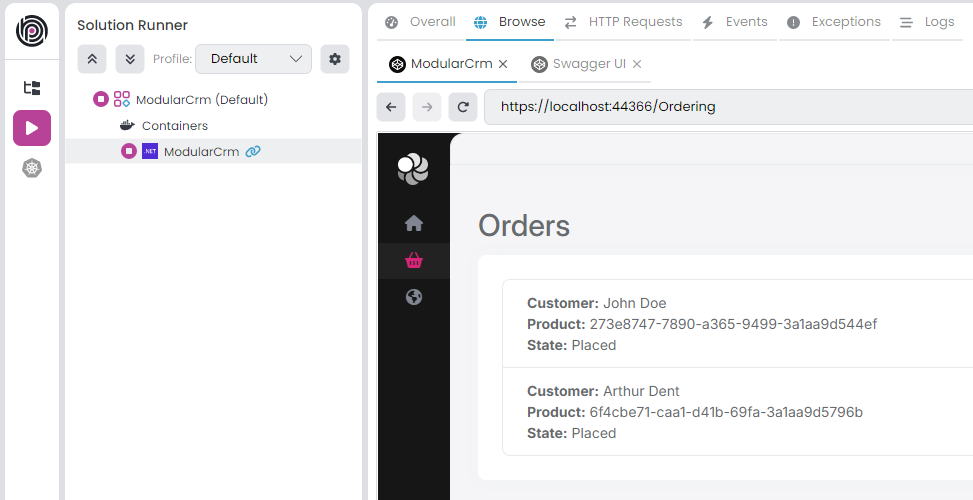
Great! We can see the list of orders. However, there is a problem: We see Product's GUID ID instead of its name. This is because the Ordering module has no integration with the Catalog module and doesn't have access to Product module's database to perform a JOIN query. We will solve this problem in the next part.
Summary
In this part of the Modular CRM tutorial, you've built the functionality inside the Ordering module you created in the previous part. In the next part, you will work on establishing communication between the Orders module and the Catalog module.


