


Payment Module (Pro)
You must have an ABP Team or a higher license to use this module.
Payment module implements payment gateway integration of an application. It provides one time payment and recurring payment options.
See the module description page for an overview of the module features.
How to Install
The Payment module is not installed in the startup templates. So, it needs to be installed manually. There are two ways of installing a module into your application.
Using ABP CLI
ABP CLI allows adding a module to a solution using add-module command. You can check its documentation for more information. So, payment module can be added using the command below;
abp add-module Volo.Payment
Manual Installation
If you modified your solution structure, adding a module using ABP CLI might not work for you. In such cases, the Payment module can be added to a solution manually.
In order to do that, add packages listed below to matching project on your solution. For example, Volo.Payment.Application package to your {ProjectName}.Application.csproj like below;
<PackageReference Include="Volo.Payment.Application" Version="x.x.x" />
After adding the package reference, open the module class of the project (eg: {ProjectName}ApplicationModule) and add the below code to the DependsOn attribute.
[DependsOn(
  //...
  typeof(AbpPaymentApplicationModule)
)]
If you are using Blazor Web App, you need to add the
Volo.Payment.Admin.Blazor.WebAssemblypackage to the {ProjectName}.Blazor.Client.csproj project and add theVolo.Payment.Admin.Blazor.Serverpackage to the {ProjectName}.Blazor.csproj project.
For Blazor UI public pages (payment gateway selection, pre-payment, and post-payment pages), see the Blazor UI section below for detailed installation and configuration instructions.
Supported Gateway Packages
In order to use a Payment Gateway, you need to add related NuGet packages to your related project as explained in Manual Installation section above and add DependsOn to your related module. For example, if you don't want to use PayU, you don't have to use its NuGet packages.
After adding packages of a payment gateway to your application, you also need to configure global payment module options and options for the payment modules you have added. See the Options section below.
Creating Custom Payment Gateways
If you require a different payment gateway than existing ones, you can create a custom payment gateway by your own. 2 steps are required to create a custom payment gateway. First is creating a payment gateway object that implements IPaymentGateway. This interface exposes core payment operations without any UI. Second step is creating UI for the payment gateway. This UI is used to redirect user to payment gateway and validate payment.
Follow the instructions here to create a custom payment gateway.
Packages
This module follows the module development best practices guide and consists of several NuGet and NPM packages. See the guide if you want to understand the packages and relations between them.
You can visit Payment module package list page to see list of packages related with this module.
User Interface
The Payment module provides both public pages (for payment processing) and admin pages (for managing payment plans and requests). The UI is available for MVC/Razor Pages, Blazor, and Angular applications. See the UI-specific sections below for installation and configuration details.
MVC / Razor Pages UI
For MVC/Razor Pages applications, the abp add-module Volo.Payment command automatically adds the required packages (Volo.Payment.Web and gateway-specific Web packages) and the necessary DependsOn statements to your module. The only thing you need to do is configure PaymentWebOptions as explained in the PaymentWebOptions section.
Blazor UI
For Blazor applications, the abp add-module Volo.Payment command automatically adds the required packages (Volo.Payment.Blazor.Server or Volo.Payment.Blazor.WebAssembly and gateway-specific Blazor packages) and the necessary DependsOn statements to your module. The only thing you need to do is configure PaymentBlazorOptions as explained below.
Installation
Note: If you used the
abp add-module Volo.Paymentcommand to install the Payment module, the following packages and module dependencies are automatically added to your project. You can skip to the Gateway-Specific Blazor Packages section. The information below is provided for reference or manual installation scenarios.
To use the Payment module's public pages in a Blazor application, you need to install the core Blazor packages and the gateway-specific Blazor packages for each payment gateway you want to support.
Core Blazor Packages
For Blazor Server applications, add the following package to your {ProjectName}.Blazor.Server.csproj (or {ProjectName}.Blazor.csproj for Blazor Web App):
<PackageReference Include="Volo.Payment.Blazor.Server" Version="x.x.x" />
For Blazor WebAssembly applications, add the following package to your {ProjectName}.Blazor.csproj (or {ProjectName}.Blazor.Client.csproj for Blazor Web App):
<PackageReference Include="Volo.Payment.Blazor.WebAssembly" Version="x.x.x" />
Gateway-Specific Blazor Packages
Each payment gateway requires its own Blazor package. Add the packages for the gateways you want to support:
Stripe:
- Blazor Server:
Volo.Payment.Stripe.Blazor.Server - Blazor WebAssembly:
Volo.Payment.Stripe.Blazor.WebAssembly
PayPal:
- Blazor Server:
Volo.Payment.PayPal.Blazor.Server - Blazor WebAssembly:
Volo.Payment.PayPal.Blazor.WebAssembly
PayU:
- Blazor Server:
Volo.Payment.PayU.Blazor.Server - Blazor WebAssembly:
Volo.Payment.PayU.Blazor.WebAssembly
Iyzico:
- Blazor Server:
Volo.Payment.Iyzico.Blazor.Server - Blazor WebAssembly:
Volo.Payment.Iyzico.Blazor.WebAssembly - HttpApi (required for callbacks):
Volo.Payment.Iyzico.HttpApi
Important: Iyzico requires the
Volo.Payment.Iyzico.HttpApipackage because Blazor cannot directly handle POST requests from external payment gateways. This package provides an API endpoint to receive the POST callback from Iyzico and redirect to the Blazor post-payment page.
Alipay:
- Blazor Server:
Volo.Payment.Alipay.Blazor.Server - Blazor WebAssembly:
Volo.Payment.Alipay.Blazor.WebAssembly
TwoCheckout:
- Blazor Server:
Volo.Payment.TwoCheckout.Blazor.Server - Blazor WebAssembly:
Volo.Payment.TwoCheckout.Blazor.WebAssembly
Module Dependencies
After adding the package references, add the module dependencies to your Blazor module class. For example, for a Blazor Server application with Stripe and PayPal:
[DependsOn(
    // ... other dependencies
    typeof(AbpPaymentBlazorServerModule),
    typeof(AbpPaymentStripeBlazorServerModule),
    typeof(AbpPaymentPayPalBlazorServerModule)
)]
public class YourBlazorModule : AbpModule
{
    // ...
}
For Blazor WebAssembly:
[DependsOn(
    // ... other dependencies
    typeof(AbpPaymentBlazorWebAssemblyModule),
    typeof(AbpPaymentStripeBlazorWebAssemblyModule),
    typeof(AbpPaymentPayPalBlazorWebAssemblyModule)
)]
public class YourBlazorModule : AbpModule
{
    // ...
}
Configuration
Configure PaymentBlazorOptions in your Blazor module's ConfigureServices method:
Configure<PaymentBlazorOptions>(options =>
{
    options.RootUrl = configuration["App:SelfUrl"];
    options.CallbackUrl = configuration["App:SelfUrl"] + "/PaymentSucceed";
    options.GatewaySelectionCheckoutButtonStyle = "btn btn-primary"; // Optional CSS class
});
You can also configure these options in your appsettings.json file:
{
  "Payment": {
    "Blazor": {
      "RootUrl": "https://localhost:44300",
      "CallbackUrl": "https://localhost:44300/PaymentSucceed",
      "GatewaySelectionCheckoutButtonStyle": "btn btn-primary"
    }
  }
}
Gateway-Specific Blazor Options
Each payment gateway has its own Blazor options for customizing the UI. These options can be configured in appsettings.json:
{
  "Payment": {
    "Blazor": {
      "Payu": {
        "PrePaymentCheckoutButtonStyle": "btn btn-success",
        "Recommended": true,
        "ExtraInfos": ["Fast checkout", "Secure payment"]
      },
      "TwoCheckout": {
        "Recommended": false,
        "ExtraInfos": ["International payments"]
      },
      "PayPal": {
        "Recommended": true,
        "ExtraInfos": ["Pay with PayPal balance", "Buyer protection"]
      },
      "Stripe": {
        "Recommended": true,
        "ExtraInfos": ["Credit/Debit cards", "Apple Pay", "Google Pay"]
      },
      "Iyzico": {
        "PrePaymentCheckoutButtonStyle": "btn btn-primary",
        "Recommended": false,
        "ExtraInfos": ["Turkish payment gateway"]
      },
      "Alipay": {
        "PrePaymentCheckoutButtonStyle": "btn btn-info",
        "Recommended": false,
        "ExtraInfos": ["Chinese payment gateway", "CNY only"]
      }
    }
  }
}
Creating Payments in Blazor
To initiate a payment in a Blazor component, inject IPaymentRequestAppService and NavigationManager, create a payment request, and navigate to the gateway selection page:
@page "/"
@using Microsoft.AspNetCore.Components
@using Volo.Payment
@using Volo.Payment.Requests
@inject IPaymentRequestAppService PaymentRequestAppService
@inject NavigationManager NavigationManager

<button class="btn btn-primary" @onclick="StartPaymentAsync">
    Pay Now
</button>

@code {
    private async Task StartPaymentAsync()
    {
        var paymentRequest = await PaymentRequestAppService.CreateAsync(
            new PaymentRequestCreateDto
            {
                Currency = "USD",
                Products = new List<PaymentRequestProductCreateDto>
                {
                    new PaymentRequestProductCreateDto
                    {
                        Code = "Product_01",
                        Name = "LEGO Super Mario",
                        Count = 2,
                        UnitPrice = 60,
                        TotalPrice = 120
                    }
                }
            });

        NavigationManager.NavigateTo($"/Payment/GatewaySelection?paymentRequestId={paymentRequest.Id}");
    }
}
Passing Extra Parameters
Some payment gateways require additional parameters. You can pass these as extra properties when creating the payment request:
var paymentRequest = await PaymentRequestAppService.CreateAsync(
    new PaymentRequestCreateDto
    {
        Currency = "USD",
        Products = new List<PaymentRequestProductCreateDto>
        {
            new PaymentRequestProductCreateDto
            {
                Code = "Product_01",
                Name = "LEGO Super Mario",
                Count = 1,
                UnitPrice = 60,
                TotalPrice = 60
            }
        },
        ExtraProperties = new ExtraPropertyDictionary
        {
            // For Iyzico - Customer information
            { "Name", "John" },
            { "Surname", "Doe" },
            { "Email", "john.doe@example.com" },
            { "Address", "123 Main St" },
            { "City", "Istanbul" },
            { "Country", "Turkey" },
            { "ZipCode", "34000" },

            // For PayU - Customer information
            { "BuyerName", "John" },
            { "BuyerSurname", "Doe" },
            { "BuyerEmail", "john.doe@example.com" }
        }
    });
Handling the Callback (Optional)
When a user completes a payment on the external payment gateway, the following flow occurs:
- The user is redirected to the PostPayment page (handled internally by the payment module)
- The PostPayment page validates the payment with the gateway and updates the payment request status to Completed
- If a
CallbackUrlis configured inPaymentBlazorOptions, the user is then redirected to that URL with thepaymentRequestIdas a query parameter
Create a page to handle this callback and perform any application-specific actions:
@page "/PaymentSucceed"
@using Microsoft.AspNetCore.WebUtilities

<h3>Payment Successful!</h3>
<p>Thank you for your purchase.</p>
<p>Payment Request ID: @PaymentRequestId</p>

@code {
    [Parameter]
    [SupplyParameterFromQuery]
    public Guid? PaymentRequestId { get; set; }

    protected override async Task OnInitializedAsync()
    {
        if (PaymentRequestId.HasValue)
        {
            // The payment is already completed at this point.
            // Perform application-specific actions here:
            // e.g., activate subscription, send confirmation email,
            // update order status, grant access to purchased content, etc.
        }
    }
}
Note: By the time the user reaches your callback page, the payment request status has already been set to Completed by the PostPayment page. Your callback page is for performing additional application-specific logic. It is also your responsibility to handle if a payment request is used more than once. If you have already delivered your product for a given
PaymentRequestId, you should not deliver it again when the callback URL is visited a second time.
Angular UI
For Angular applications, you need to read and apply the steps explained in the following sections:
Configurations
In order to configure the application to use the payment module, you first need to import PaymentAdminConfigModule from @volo/abp.ng.payment/admin/config to the root configuration. PaymentAdminConfigModule has a static forRoot method which you should call for a proper configuration:
// app.config.ts
import { ApplicationConfig, importProvidersFrom } from '@angular/core';
import { PaymentAdminConfigModule } from '@volo/abp.ng.payment/admin/config';

export const appConfig: ApplicationConfig = {
  providers: [
    // ...
    importProvidersFrom([
      PaymentAdminConfigModule.forRoot()
    ]),
  ],
};
The payment admin module should be imported and lazy-loaded in your routing array as below:
// app.routes.ts
const APP_ROUTES: Routes = [
  // ...
  {
  path: 'payment',
  loadChildren: () =>
    import('@volo/abp.ng.payment/admin').then(c => c.createRoutes()),
  },
];
Pages
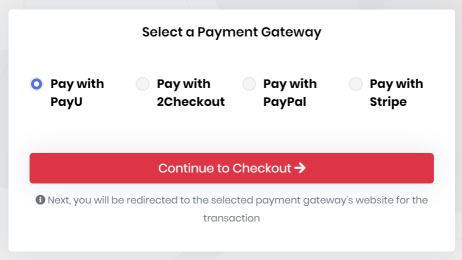
Public Pages
Payment Gateway Selection
This page allows selecting a payment gateway. If there is only one payment gateway configured for the application, this page will be skipped.
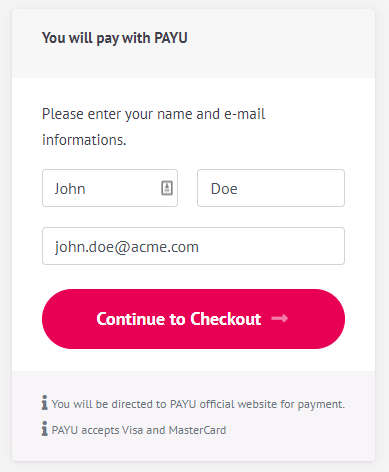
PrePayment Page
Some payment gateways require additional information before redirecting to the payment gateway. For example, PayU and Iyzico require customer information (Name, Surname, Email Address, etc.) before processing the payment.
Admin Pages
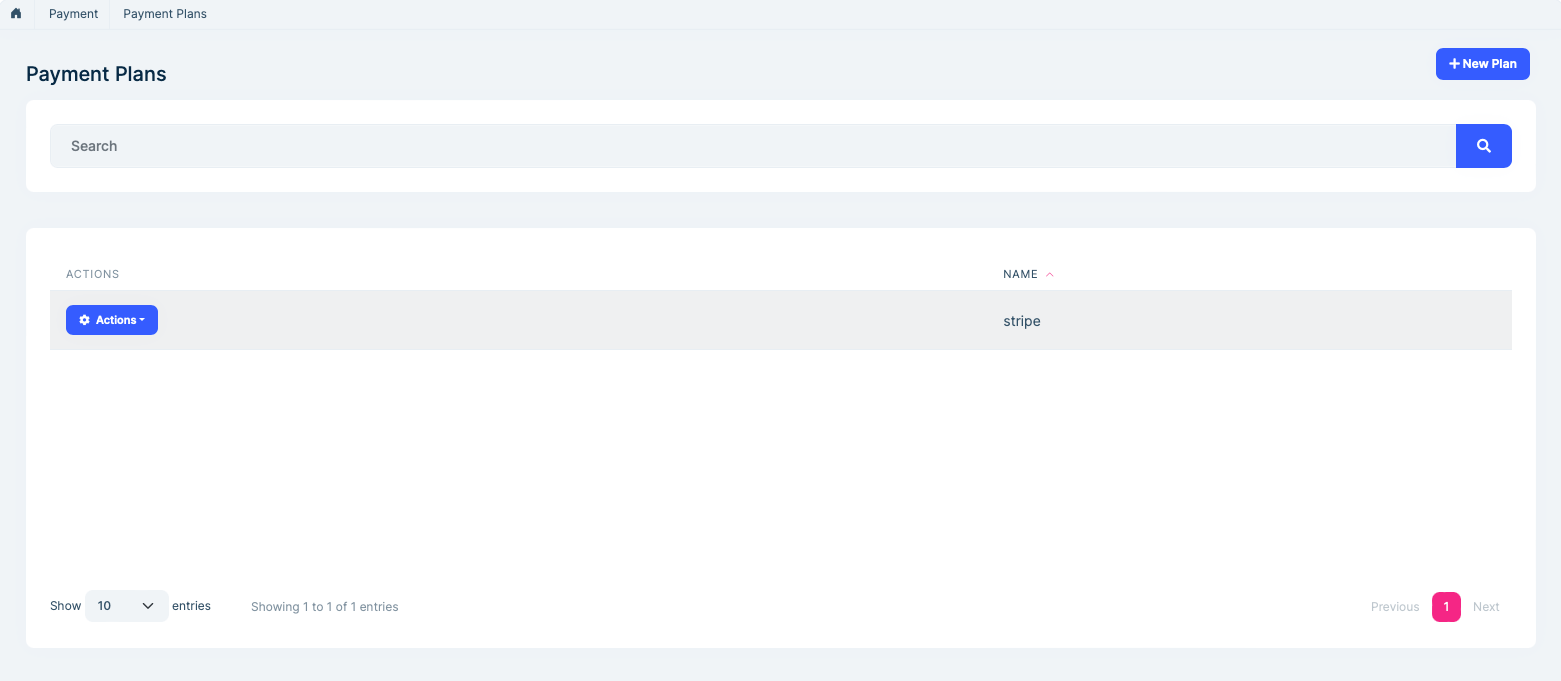
Payment Plans Page
Payment plans for subscriptions can be managed on this page. You can connect external subscriptions for each gateway to a plan.
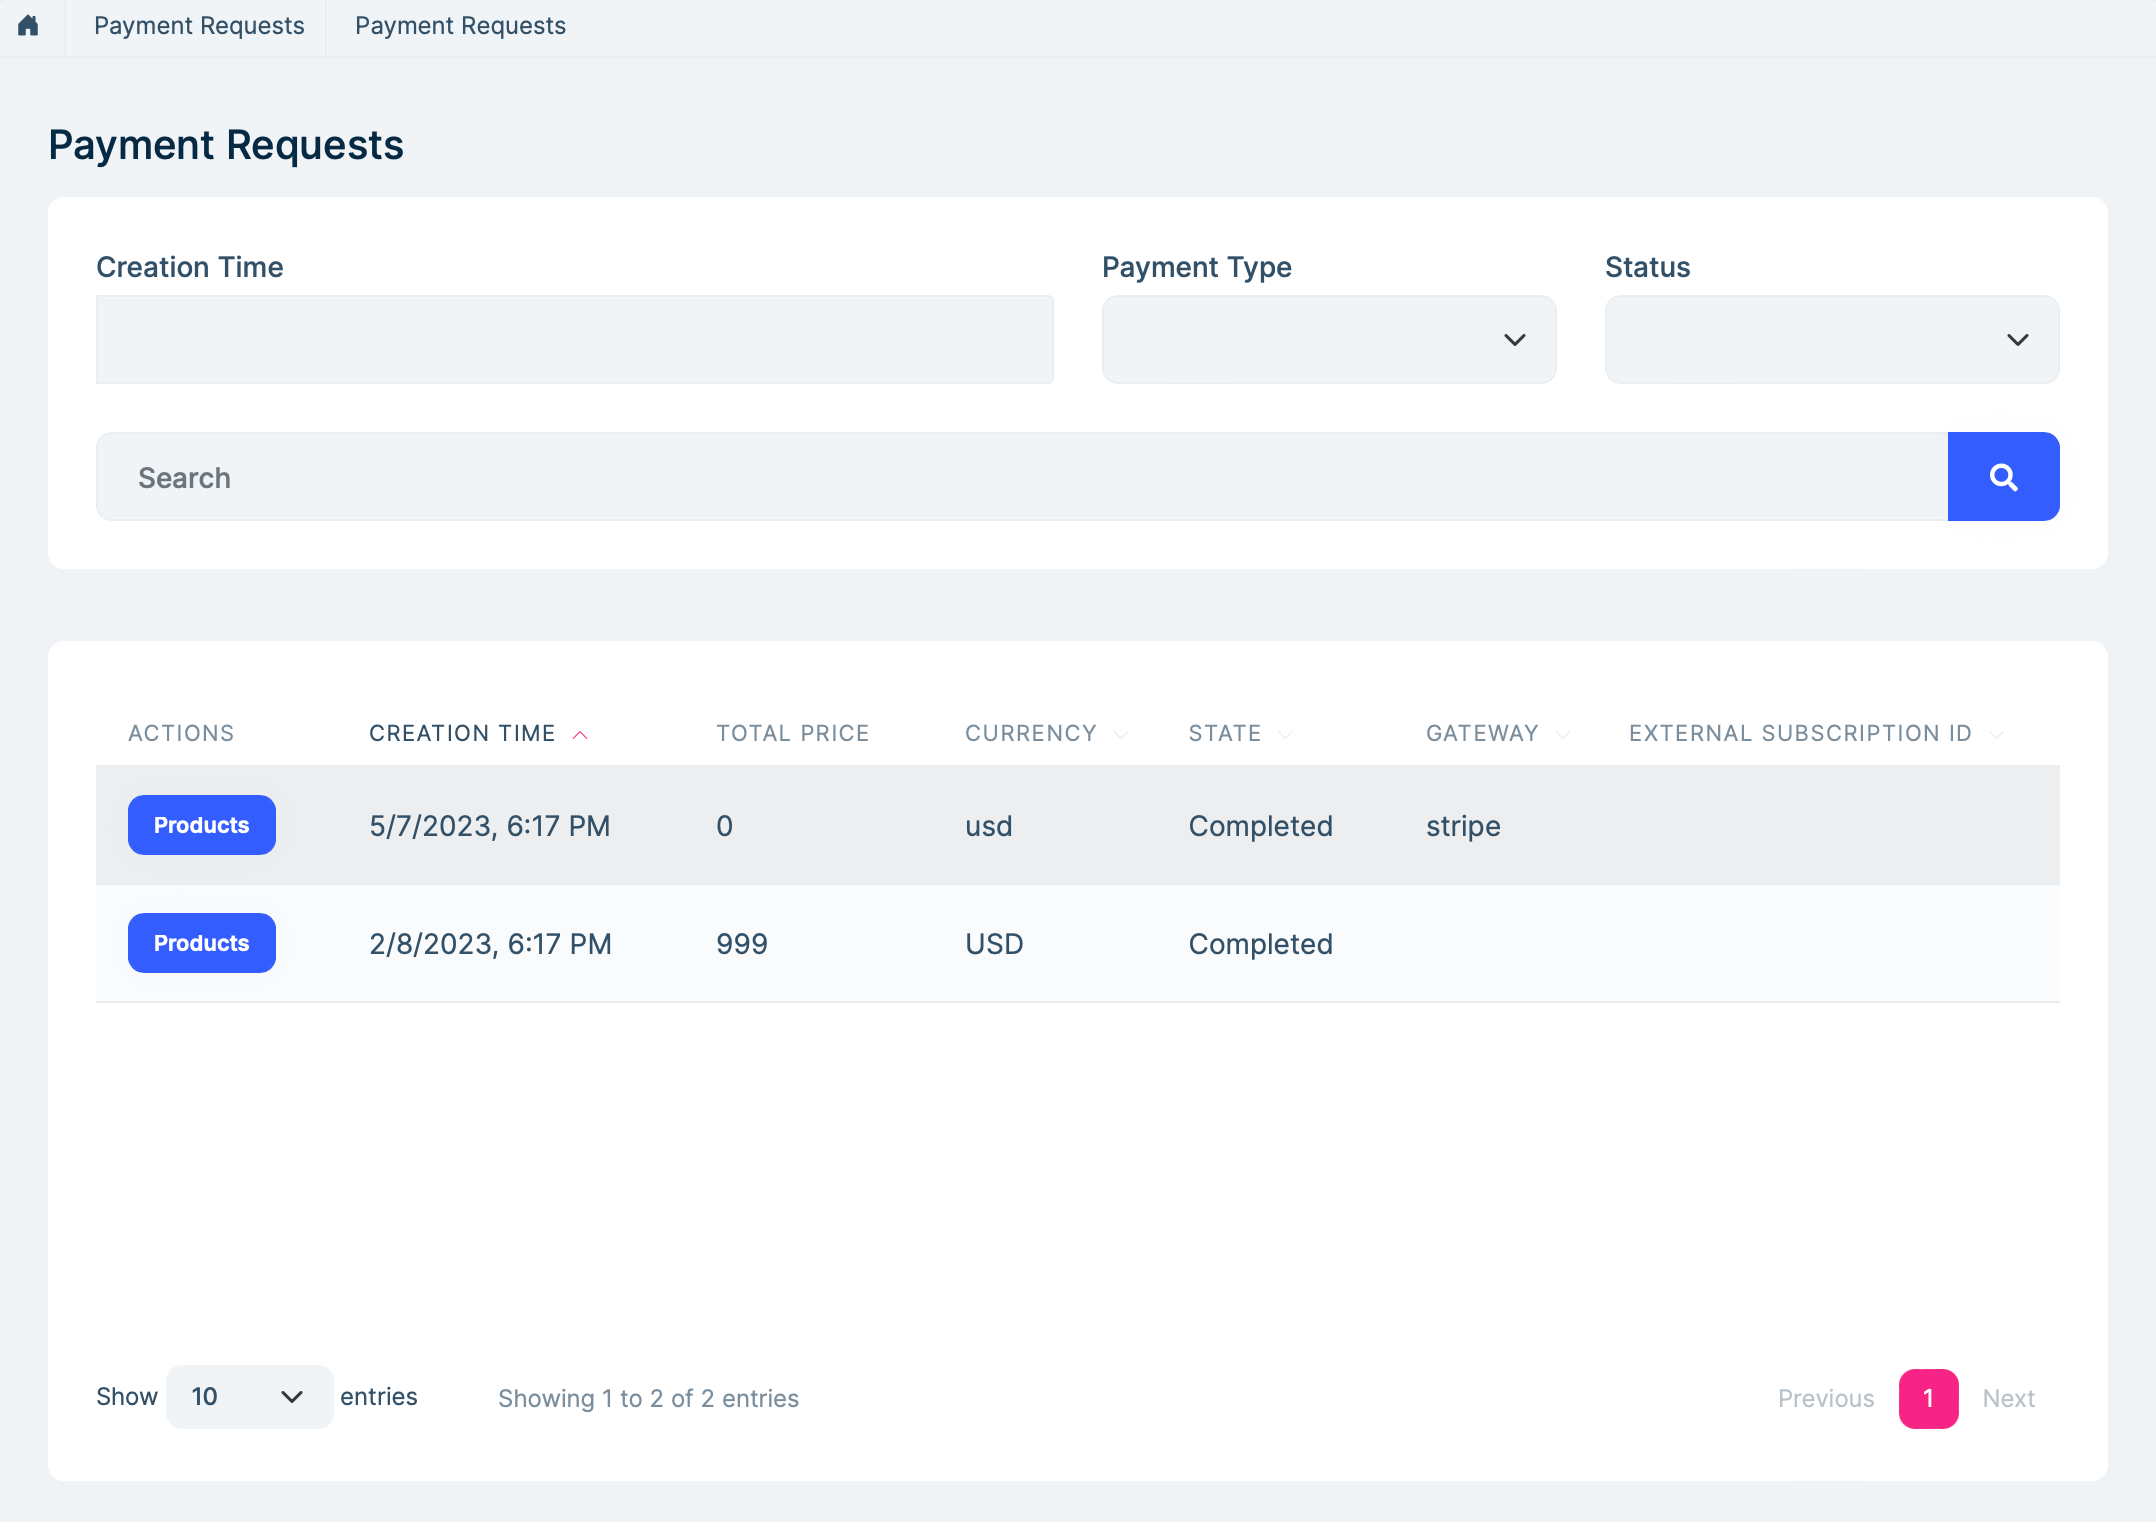
Payment Request List
This page lists all the payment request operations in the application.
Options
PaymentOptions
PaymentOptions is used to store list of payment gateways. You don't have to configure this manually for existing payment gateways. You can, however, add a new gateway like below;
Configure<PaymentOptions>(options =>
{
	options.Gateways.Add(
		new PaymentGatewayConfiguration(
			"MyPaymentGatewayName",
			new FixedLocalizableString("MyPaymentGatewayName"),
			typeof(MyPaymentGateway)
		)
	);
});
AbpIdentityAspNetCoreOptions properties:
PaymentGatewayConfigurationDictionary: List of gateway configuration.Name: Name of payment gateway.DisplayName: DisplayName of payment gateway.PaymentGatewayType: type of payment gateway.Order: Order of payment gateway.
PaymentWebOptions
PaymentWebOptions is used to configure web application related configurations.
CallbackUrl: Final callback URL for internal payment gateway modules to return. User will be redirected to this URL on your website.RootUrl: Root URL of your website.GatewaySelectionCheckoutButtonStyle: CSS style to add Checkout button on gateway selection page. This class can be used for tracking user activity via 3rd party tools like Google Tag Manager.PaymentGatewayWebConfigurationDictionary: Used to store web related payment gateway configuration.Name: Name of payment gateway.PrePaymentUrl: URL of the page before redirecting user to payment gateway for payment.PostPaymentUrl: URL of the page when user redirected back from payment gateway to your website. This page is used to validate the payment mostly.Order: Order of payment gateway for gateway selection page.Recommended: Is payment gateway recommended or not. This information is displayed on payment gateway selection page.ExtraInfos: List of informative strings for payment gateway. These texts are displayed on payment gateway selection page.
PaymentBlazorOptions
PaymentBlazorOptions is used to configure Blazor application related configurations. This is the Blazor equivalent of PaymentWebOptions.
CallbackUrl: Final callback URL for internal payment gateway modules to return. User will be redirected to this URL on your website after a successful payment.RootUrl: Root URL of your Blazor application.GatewaySelectionCheckoutButtonStyle: CSS style to add to the Checkout button on the gateway selection page. This class can be used for tracking user activity via 3rd party tools like Google Tag Manager.PaymentGatewayBlazorConfigurationDictionary: Used to store Blazor related payment gateway configuration.Name: Name of payment gateway.PrePaymentUrl: URL of the Blazor page before redirecting user to payment gateway for payment.PostPaymentUrl: URL of the Blazor page when user is redirected back from payment gateway to your website.Order: Order of payment gateway for gateway selection page.Recommended: Is payment gateway recommended or not. This information is displayed on payment gateway selection page.ExtraInfos: List of informative strings for payment gateway. These texts are displayed on payment gateway selection page.
PayuOptions
PayuOptions is used to configure PayU payment gateway options.
Merchant: Merchant code for PayU account.Signature: Signature of Merchant.LanguageCode: Language of the order. This will be used for notification email that are sent to the client, if available.CurrencyCode: Currency code of order (USD, EUR, etc...).VatRate: Vat rate of order.PriceType: Price type of order (GROSS or NET).Shipping: A positive number indicating the price of shipping.Installment: The number of installments. It can be an integer between 1 and 12.TestOrder: Is the order a test order or not (true or false).Debug: Writes detailed log on PAYU side.
PayuWebOptions
PayuWebOptions is used to configure PayU payment gateway web options.
Recommended: Is payment gateway recommended or not. This information is displayed on payment gateway selection page.ExtraInfos: List of informative strings for payment gateway. These texts are displayed on payment gateway selection page.PrePaymentCheckoutButtonStyle: CSS style to add to the Checkout button on the PayU prepayment page. This class can be used for tracking user activity via 3rd party tools like Google Tag Manager.
PayuBlazorOptions
PayuBlazorOptions is used to configure PayU payment gateway Blazor options.
Recommended: Is payment gateway recommended or not. This information is displayed on payment gateway selection page.ExtraInfos: List of informative strings for payment gateway. These texts are displayed on payment gateway selection page.PrePaymentCheckoutButtonStyle: CSS style to add to the Checkout button on the PayU prepayment page.
TwoCheckoutOptions
TwoCheckoutOptions is used to configure TwoCheckout payment gateway options.
Signature: Signature of Merchant's 2Checkout account.CheckoutUrl: 2Checkout checkout URL (it must be set to https://secure.2checkout.com/order/checkout.php).LanguageCode: Language of the order. This will be used for notification email that are sent to the client, if available.CurrencyCode: Currency code of order (USD, EUR, etc...).
TwoCheckoutWebOptions
TwoCheckoutWebOptions is used to configure TwoCheckout payment gateway web options.
Recommended: Is payment gateway recommended or not. This information is displayed on payment gateway selection page.ExtraInfos: List of informative strings for payment gateway. These texts are displayed on payment gateway selection page.
TwoCheckoutBlazorOptions
TwoCheckoutBlazorOptions is used to configure TwoCheckout payment gateway Blazor options.
Recommended: Is payment gateway recommended or not. This information is displayed on payment gateway selection page.ExtraInfos: List of informative strings for payment gateway. These texts are displayed on payment gateway selection page.
StripeOptions
StripeOptions: is used to configure Stripe payment gateway options.
PublishableKey: Publishable Key for Stripe account.SecretKey: Secret Key for Stripe account.WebhookSecret: Used for handling webhooks. You can get if from Stripe Dashboard. If you don't use subscription & recurring payment it's not necessary.Currency: Currency code of order (USD, EUR, etc..., see Stripe docs for the full list). Its default value is USD.Locale: Language of the order. Its default value is 'auto'.PaymentMethodTypes: A list of the types of payment methods (e.g., card) this Checkout session can accept. See https://stripe.com/docs/payments/checkout/payment-methods. Its default value is 'card'.
StripeWebOptions
StripeWebOptions is used to configure Stripe payment gateway web options.
Recommended: Is payment gateway recommended or not. This information is displayed on payment gateway selection page.ExtraInfos: List of informative strings for payment gateway. These texts are displayed on payment gateway selection page.
StripeBlazorOptions
StripeBlazorOptions is used to configure Stripe payment gateway Blazor options.
Recommended: Is payment gateway recommended or not. This information is displayed on payment gateway selection page.ExtraInfos: List of informative strings for payment gateway. These texts are displayed on payment gateway selection page.
PayPalOptions
PayPalOptions is used to configure PayPal payment gateway options.
ClientId: Client Id for the PayPal account.SecretSecret for the PayPal account.CurrencyCode: Currency code of order (USD, EUR, etc...).Environment: Payment environment. ("Sandbox" or "Live", default value is "Sandbox")Locale: PayPal-supported language and locale to localize PayPal checkout pages. See https://developer.paypal.com/docs/api/reference/locale-codes/.
PayPalWebOptions
PayPalWebOptions is used to configure PayPal payment gateway web options.
Recommended: Is payment gateway recommended or not. This information is displayed on payment gateway selection page.ExtraInfos: List of informative strings for payment gateway. These texts are displayed on payment gateway selection page.
PayPalBlazorOptions
PayPalBlazorOptions is used to configure PayPal payment gateway Blazor options.
Recommended: Is payment gateway recommended or not. This information is displayed on payment gateway selection page.ExtraInfos: List of informative strings for payment gateway. These texts are displayed on payment gateway selection page.
IyzicoOptions
IyzicoOptions is used to configure Iyzico payment gateway options.
BaseUrl: Base API URL for the Iyzico (ex: https://sandbox-api.iyzipay.com).ApiKeyApi key for the Iyzico account.SecretKeySecret for the Iyzico account.Currency: Currency code for the order (USD, EUR, GBP and TRY can be used).Locale: Language of the order.InstallmentCount: Installment count value. For single installment payments it should be 1 (valid values: 1, 2, 3, 6, 9, 12).
IyzicoWebOptions
IyzicoWebOptions is used to configure Iyzico payment gateway web options.
Recommended: Is payment gateway recommended or not. This information is displayed on payment gateway selection page.ExtraInfos: List of informative strings for payment gateway. These texts are displayed on payment gateway selection page.PrePaymentCheckoutButtonStyle: CSS style to add to the Checkout button on the Iyzico prepayment page. This class can be used for tracking user activity via 3rd party tools like Google Tag Manager.
IyzicoBlazorOptions
IyzicoBlazorOptions is used to configure Iyzico payment gateway Blazor options.
Recommended: Is payment gateway recommended or not. This information is displayed on payment gateway selection page.ExtraInfos: List of informative strings for payment gateway. These texts are displayed on payment gateway selection page.PrePaymentCheckoutButtonStyle: CSS style to add to the Checkout button on the Iyzico prepayment page.
AlipayOptions
AlipayOptions is used to configure Alipay payment gateway options。 Alipay gateway only supports CNY currency.
Protocol:Protocol for the Alipay (ex: https).GatewayHost: Gateway host for the Aliapy.SignType: Sign type for the Alipay.AppId: AppId for the Alipay account.MerchantPrivateKey: Merchant private key of the Alipay account.MerchantCertPathMerchant cert path of the Alipay account.AlipayCertPath: Alipay cert path of the Alipay account.AlipayRootCertPath: Alipay root cert path of the Alipay account.AlipayPublicKey: Alipay public key of the Alipay account.NotifyUrl: Notify url of the Alipay.EncryptKey: Encrypt key of the Alipay.
AlipayWebOptions
Recommended: Is payment gateway recommended or not. This information is displayed on payment gateway selection page.ExtraInfos: List of informative strings for payment gateway. These texts are displayed on payment gateway selection page.PrePaymentCheckoutButtonStyle: CSS style to add to the Checkout button on the Alipay prepayment page. This class can be used for tracking user activity via 3rd party tools like Google Tag Manager.
AlipayBlazorOptions
AlipayBlazorOptions is used to configure Alipay payment gateway Blazor options.
Recommended: Is payment gateway recommended or not. This information is displayed on payment gateway selection page.ExtraInfos: List of informative strings for payment gateway. These texts are displayed on payment gateway selection page.PrePaymentCheckoutButtonStyle: CSS style to add to the Checkout button on the Alipay prepayment page.
You can check the Alipay document for more details.
Instead of configuring options in your module class, you can configure it in your appsettings.json file like below;
"Payment": {
    "Payu": {
      "Merchant": "TEST",
      "Signature": "SECRET_KEY",
      "LanguageCode": "en",
      "CurrencyCode": "USD",
      "VatRate": "0",
      "PriceType": "GROSS",
      "Shipping": "0",
      "Installment": "1",
      "TestOrder": "1",
      "Debug": "1"
    },
    "TwoCheckout": {
      "Signature": "SECRET_KEY",
      "CheckoutUrl": "https://secure.2checkout.com/order/checkout.php",
      "LanguageCode": "en",
      "CurrencyCode": "USD",
      "TestOrder": "1"
    },
    "PayPal": {
      "ClientId": "CLIENT_ID",
      "Secret": "SECRET",
      "CurrencyCode": "USD",
      "Environment": "Sandbox",
      "Locale": "en_US"
    },
    "Stripe": {
      "PublishableKey": "PUBLISHABLE_KEY",
      "SecretKey": "SECRET_KEY",
      "PaymentMethodTypes": ["alipay"]
    },
    "Iyzico": {
      "ApiKey": "API_KEY",
      "SecretKey": "SECRET_KEY",
      "BaseUrl": "https://sandbox-api.iyzipay.com",
      "Locale": "en",
      "Currency": "USD"
    },
    "Alipay": {
      "AppId": "APP_ID",
      "GatewayHost": "openapi.alipaydev.com",
      "AlipayPublicKey": "ALIPAY_PUBLIC_KEY",
      "MerchantPrivateKey": "MERCHANT_PRIVATE_KEY"
    }
  }
Internals
Domain layer
Aggregates
This module follows the Entity Best Practices & Conventions guide.
PaymentRequest
A payment request represents a request for a payment in the application.
PaymentRequest(aggregate root): Represents a payment request in the system.Products(collection): List of products for payment request.State: State of payment request (can be Waiting, Completed, Failed or Refunded).Currency: Currency code of payment request (USD, EUR, etc...).Gateway: Name of payment gateway used for this payment request.FailReason: Reason for failed payment requests.
Plan
A plan is used for subscription payments. Contains PlanGateway list to configure each gateway.
Plan(aggregate root): Represents a plan for recurring payments.PlanGateways(collection): List of gateway plans.Name: An optional name of plan.
GatewayPlan(entity): Represents a gateway configuration for a plan.PlanId: Represents a plan belong to.Gateway: Represents a gateway belong to. It has to be unique.ExternalId: Stores a unique configuration of gateway for subscrtiption, such as priceId, planId, subscriptionId or productId etc.
Repositories
This module follows the Repository Best Practices & Conventions guide.
Following custom repositories are defined for this module:
IPaymentRequestRepositoryIPlanRepository
Application layer
Application services
PaymentRequestAppService(implementsIPaymentRequestAppService): Used to create payment requests and access payment request details.GatewayAppService(implementsIGatewayAppService): Used to provide payment gateway list to UI.PlanAppService(implementsIPlanAppService): Used to manage Subscription Plans.
Database providers
Common
Table / collection prefix & schema
All tables/collections use the Pay prefix by default. Set static properties on the PaymentDbProperties class if you need to change the table prefix or set a schema name (if supported by your database provider).
Connection string
This module uses AbpPayment for the connection string name. If you don't define a connection string with this name, it fallbacks to the Default connection string.
See the connection strings documentation for details.
Entity Framework Core
Tables
- PayPaymentRequests
- AbpRoleClaims
- PayPaymentRequestProducts
- AbpRoleClaims
- PayPlans
- PayGatewayPlans
MongoDB
Collections
- PayPaymentRequests
- PayPlans
Entity Extensions
Module entity extension system is a high-level extension system that allows you to define new properties for existing entities of the dependent modules. It automatically adds properties to the entity, database, HTTP API and user interface in a single point.
To extend entities of the payment module, open your YourProjectNameModuleExtensionConfigurator class inside of your DomainShared project and change the ConfigureExtraProperties method like shown below.
public static void ConfigureExtraProperties()
{
    OneTimeRunner.Run(() =>
    {
        ObjectExtensionManager.Instance.Modules()
            .ConfigurePayment(payment =>
            {
                payment.ConfigurePlan(plan => // extend the Plan entity
                {
                    plan.AddOrUpdateProperty<string>( //property type: string
                      "PlanDescription", //property name
                      property => {
                        //validation rules
                        property.Attributes.Add(new RequiredAttribute()); //adds required attribute to the defined property

                        //...other configurations for this property
                      }
                    );
                });

              payment.ConfigureGatewayPlan(gatewayPlan => // extend the GatewayPlan entity
                {
                    gatewayPlan.AddOrUpdateProperty<string>( //property type: string
                      "GatewayPlanDescription", //property name
                      property => {
                        //validation rules
                        property.Attributes.Add(new RequiredAttribute()); //adds required attribute to the defined property
                        property.Attributes.Add(
                          new StringLengthAttribute(MyConsts.MaximumDescriptionLength) {
                            MinimumLength = MyConsts.MinimumDescriptionLength
                          }
                        );

                        //...other configurations for this property
                      }
                    );
                });
            });
    });
}
ConfigurePayment(...)method is used to configure the entities of the payment module.payment.ConfigurePlan(...)is used to configure the Plan entity of the payment module. You can add or update your extra properties of the Plan entity.payment.ConfigureGatewayPlan(...)is used to configure the GatewayPlan entity of the payment module. You can add or update your extra properties of the GatewayPlan entity.You can also set some validation rules for the property that you defined. In the above sample,
RequiredAttributeandStringLengthAttributewere added for the property named "GatewayPlanDescription".When you define the new property, it will automatically add to Entity, HTTP API and UI for you.
- Once you define a property, it appears in the create and update forms of the related entity.
- New properties also appear in the datatable of the related page.
Distributed Events
Volo.Payment.PaymentRequestCompleted(PaymentRequestCompletedEto): Published when a payment is completed.Id: Represents PaymentRequest entity Id.Gateway: Represents the gateway which payment was done with.Currency: Represents the currency of payment.Products(collection): Represents which products are included in PaymentRequest.
Volo.Payment.SubscriptionCanceled(SubscriptionCanceledEto): Published when a subscription is stopped or canceled.PaymentRequestId: Represents PaymentRequest entity Id.State: Represents state of PaymentRequest, such asWaiting,Completed,FailedorRefunded.Currency: Represents the currency of payment.Gateway: Represents the gateway which payment was done with.FailReason: Represents a fail reason which is provided by gateway.ExternalSubscriptionId: Represents subscription Id of Gateway.PeriodEndDate: Represents end date of subscription. Subscriptions may canceled but lasts until end of last period.
Volo.Payment.SubscriptionCreated(SubscriptionCreatedEto): Published when a subscription is created.PaymentRequestId: Represents PaymentRequest entity Id.State: Represents state of PaymentRequest, such asWaiting,Completed,FailedorRefunded.Currency: Represents the currency of payment.Gateway: Represents the gateway which payment was done with.ExternalSubscriptionId: Represents subscription Id of Gateway.PeriodEndDate: Represents end date of subscription. Subscriptions may canceled but lasts until end of last period.
Volo.Payment.RecurringPaymentUpdated(SubscriptionUpdatedEto): Published when a subscription is updated in application or in payment gateway dashboard. If subscription is updated from gateway dashboard, this event will be published right after webhook delivery.PaymentRequestId: Represents PaymentRequest entity Id.State: Represents state of PaymentRequest, such asWaiting,Completed,FailedorRefunded.Currency: Represents the currency of payment.Gateway: Represents the gateway which payment was done with.ExternalSubscriptionId: Represents subscription Id of Gateway.PeriodEndDate: Represents end date of subscription. Subscriptions may canceled but lasts until end of last period.
Couldn't find what you need? Check out the standard distributed events.
One-Time Payments
This module implements one-time payments;
You can get one-time payments from your customers using one or more payment gateways supported by the payment module. Payment module works in a very simple way for one-time payments. It creates a local payment request record and redirects customer to payment gateway (PayPal, Stripe etc...) for processing the payment. When the customer pays on the payment gateway, payment module handles the external payment gateway's response and validates the payment to see if it is really paid or not. If the payment is validated, payment module redirects customer to main application which initiated the payment process at the beginning.
Image below demonstrates the flow of a payment process;
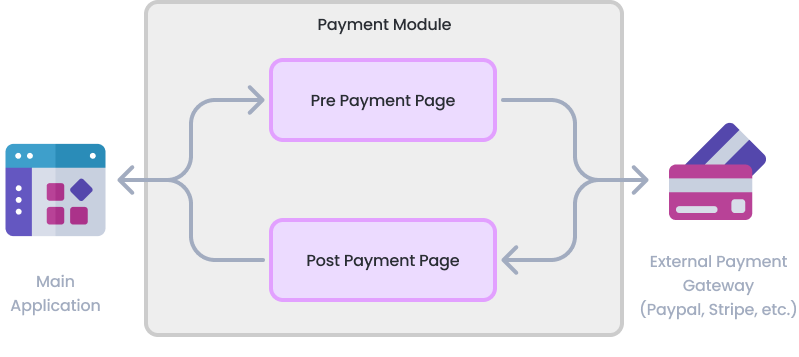
Each payment gateway implementation contains PrePayment and PostPayment pages.
PrePayment page asks users for extra information if requested by the external payment gateway. For example, 2Checkout doesn't require any extra information, so PrePayment page for 2Checkout redirects user to 2Checkout without asking any extra information.
PostPayment page is responsible for validation of the response of the external payment gateway. When a user completes the payment, user is redirected to PostPayment page for that payment gateway and PostPayment page validates the status of the payment. If the payment is succeeded, status of the payment request is updated and user is redirected to main application.
Note: It is the main application's responsibility to handle if a payment request is used more than once. For example, if the PostPayment page generates a URL like https://mywebsite.com/PaymentSucceed?PaymentRequestId={PaymentRequestId}, this URL can be visited more than once manually by end users. If you have already delivered your product for a given PaymentRequestId, you shouldn't deliver it when this URL is visited a second time.
Creating One-Time Payment
In order to initiate a payment process, inject IPaymentRequestAppService, create a payment request using it's CreateAsync method and redirect user to gateway selection page with the created payment request's Id. Here is a sample Razor Page code which starts a payment process on it's OnPost method.
Redirection of the gateway selection page has to be a POST request. If you implement it as a GET request, you will get an error. You can use
LocalRedirectPreserveMethodto keep the method as POST in the redirected request.
public class IndexModel: PageModel
{
    private readonly IPaymentRequestAppService _paymentRequestAppService;

    public IndexModel(IPaymentRequestAppService paymentRequestAppService)
    {
        _paymentRequestAppService = paymentRequestAppService;
    }

    public virtual async Task<IActionResult> OnPostAsync()
    {
        var paymentRequest = await _paymentRequestAppService.CreateAsync(new PaymentRequestCreateDto()
        {
            Currency = "USD",
            Products = new List<PaymentRequestProductCreateDto>()
            {
                new PaymentRequestProductCreateDto
                {
                    Code = "Product_01",
                    Name = "LEGO Super Mario",
                    Count = 2,
                    UnitPrice = 60,
                    TotalPrice = 200
                }
            }
        });

        return LocalRedirectPreserveMethod("/Payment/GatewaySelection?paymentRequestId=" + paymentRequest.Id);
    }
}
If the payment is successful, payment module will return to the configured PaymentWebOptions.CallbackUrl. The main application can take necessary actions for a successful payment (activating a user account, triggering a shipment start process, etc.).
Subscriptions
This module also implements recurring payments;
- Supports only Stripe for now.
You can start a subscription and get recurring payment from your customers using payment gateways supported by this module. It works different from one-time payment. Payment module works with events over webhooks of selected gateway. It creates a local payment request record like one-time payment, but it tracks that payment request in every period that customer pays and publishes events for cancels, updates and continues.
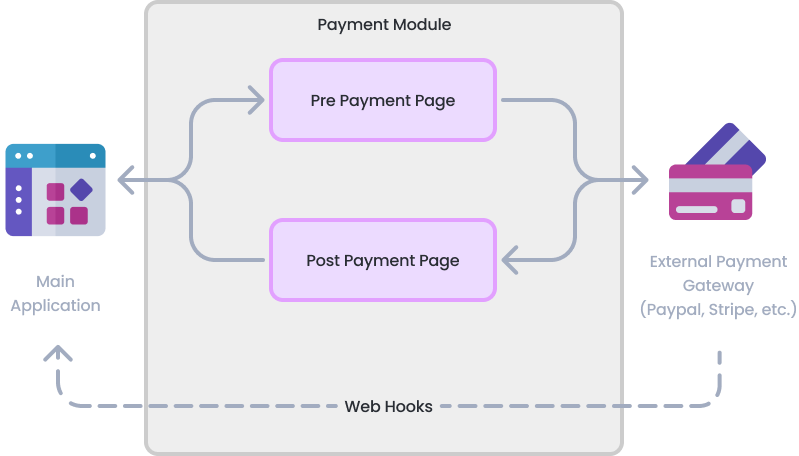
Enabling WebHooks
Configuring Web Hooks is highly important for subscriptions otherwise your application won't be able to get subscription changes, such as canceled or updated states. Each gateway has its own configuration:
Stripe
- Go to WebHooks on Stripe Dashboard
- Create a new webhook via using Add endpoint button.
- Endpoint URL:
yourdomain.com/api/payment/stripe/webhook - Events to send:
customer.subscription.createdcustomer.subscription.deletedcustomer.subscription.updatedcheckout.session.completed(optional) If you don't set this, payment will be proceed with callback.
- Endpoint URL:
- Stripe will create a webhook secret key. Copy that and configure it as
WebhookSecretunder StripeOptions.
Configuring Plans
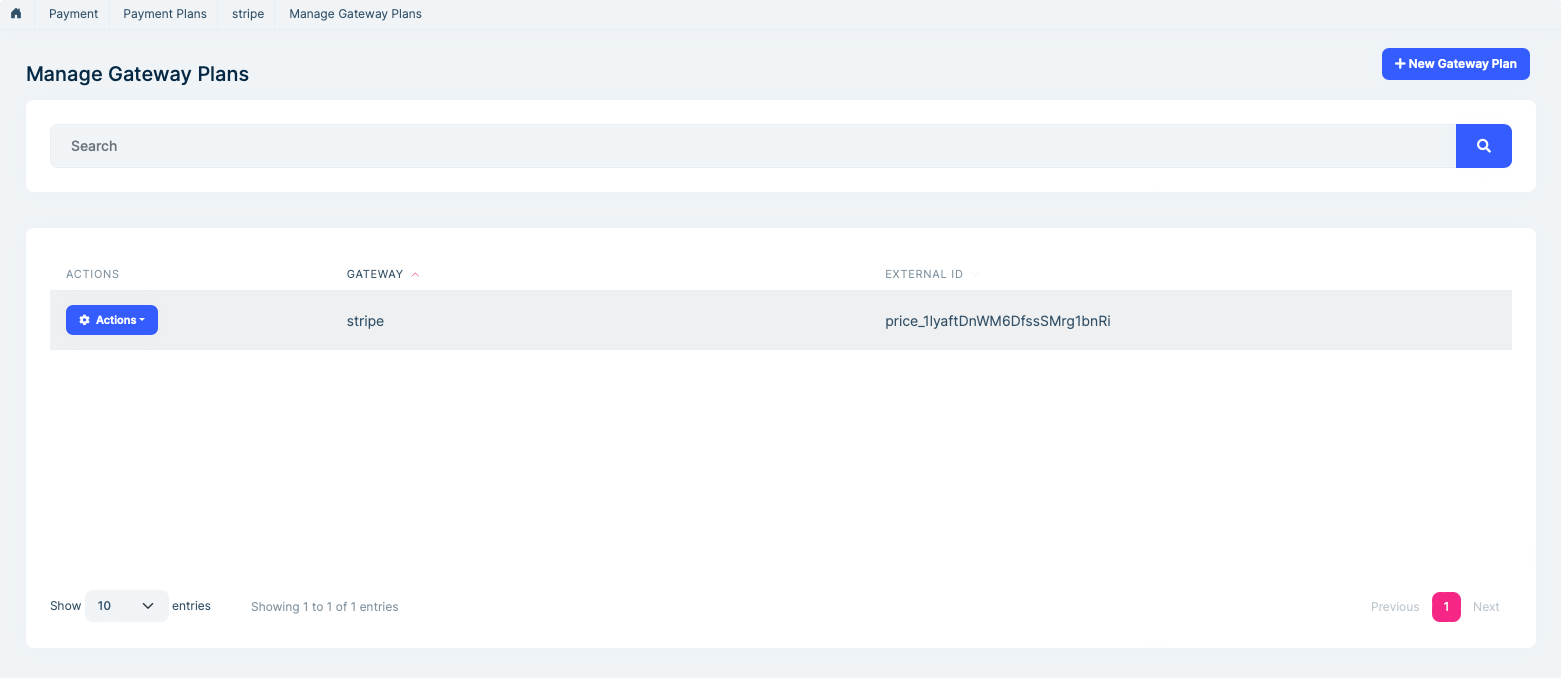
Before starting a recurring payment, Plan and GatewayPlan must be configured properly.
- Go to your payment gateway (Stripe) dashboard and create product & pricing.
- Create a Plan entity in your application.
- Go to 'Manage Gateway Plans' section and create a new GatewayPlan for gateway and paste price or product id as
ExternalId.
Creating a Tenant-Edition Subscription
Follow saas documentation.
Creating a Recurring Payment
Creating a recurring payment almost same as creating a payment. Setting PaymentType property as Recurring and passing PlanId are enough to start a recurring payment request. If given Plan has multiple GatewayPlan, user will be able to choose gateway to pay.
Redirection of the gateway selection page has to be a POST request. If you implement it as a GET request, you will get an error. You can use
LocalRedirectPreserveMethodto keep the method as POST in the redirected request.
public class SubscriptionModel : PageModel
{
    private IPaymentRequestAppService PaymentRequestAppService { get; }

    public SubscriptionModel(IPaymentRequestAppService paymentRequestAppService)
    {
        PaymentRequestAppService = paymentRequestAppService;
    }

    public virtual async Task<IActionResult> OnPostAsync()
    {
        var paymentRequest = await PaymentRequestAppService.CreateAsync(
            new PaymentRequestCreateDto()
            {
                Products =
                {
                    new PaymentRequestProductCreateDto
                    {
                        PaymentType = PaymentType.Subscription,
                        Name = "Enterprise Plan",
                        Code = "EP",
                        Count = 1,
                        // Place your created PlanId below.
                        PlanId = DemoAppData.Plan_2_Id,
                    }
                }
            });

        return LocalRedirectPreserveMethod("/Payment/GatewaySelection?paymentRequestId=" + paymentRequest.Id);
    }
}
To track that subscription is continuing or canceled, you should keep the SubscriptionId, all events contain it.

