


AI Management (Pro)
You must have an ABP Team or a higher license to use this module.
This module implements AI (Artificial Intelligence) management capabilities on top of the Artificial Intelligence Workspaces feature of the ABP Framework and allows managing workspaces dynamically from the application, including UI components and API endpoints.
How to Install
The AI Management Module is not included in the startup templates by default. However, when creating a new application with ABP Studio, you can easily enable it during setup via the AI Integration step in the project creation wizard. Alternatively, you can install it using the ABP CLI or ABP Studio:
Using ABP CLI:
abp add-module Volo.AIManagement
Using ABP Studio:
Open ABP Studio, navigate to your solution explorer, Right Click on the project and select Import Module. Choose Volo.AIManagement from NuGet tab and check the "Install this Module" checkbox. Click the "OK" button to install the module.
Adding an AI Provider
Important
The AI Management module requires at least one AI provider package to be installed. Without a provider, the module won't be able to create chat clients for your workspaces.
Install one of the built-in provider packages using the ABP CLI:
For OpenAI (including Azure OpenAI-compatible endpoints):
abp add-package Volo.AIManagement.OpenAI
For Ollama (local AI models):
abp add-package Volo.AIManagement.Ollama
Tip
You can install multiple provider packages to support different AI providers simultaneously in your workspaces.
If you need to integrate with a provider that isn't covered by the built-in packages, you can implement your own. See the Implementing Custom AI Provider Factories section for details.
Packages
This module follows the module development best practices guide and consists of several NuGet and NPM packages. See the guide if you want to understand the packages and relations between them.
You can visit AI Management module package list page to see list of packages related with this module.
AI Management module packages are designed for various usage scenarios. Packages are grouped by the usage scenario as Volo.AIManagement.* and Volo.AIManagement.Client.*. This structure helps to separate the use-cases clearly.
User Interface
This module provides UI integration for all three officially supported UI frameworks by ABP:
- MVC / Razor Pages UI
- Angular UI
- Blazor UI (Server & WebAssembly)
Menu Items
The AI Management Module adds the following items to the "Main" menu:
- AI Management: Root menu item for AI Management module. (
AIManagement)- Workspaces: Workspace management page. (
AIManagement.Workspaces)
- Workspaces: Workspace management page. (
AIManagementMenus class has the constants for the menu item names.
Pages
Workspace Management
Workspaces page is used to manage AI workspaces in the system. You can create, edit, duplicate, and delete workspaces.
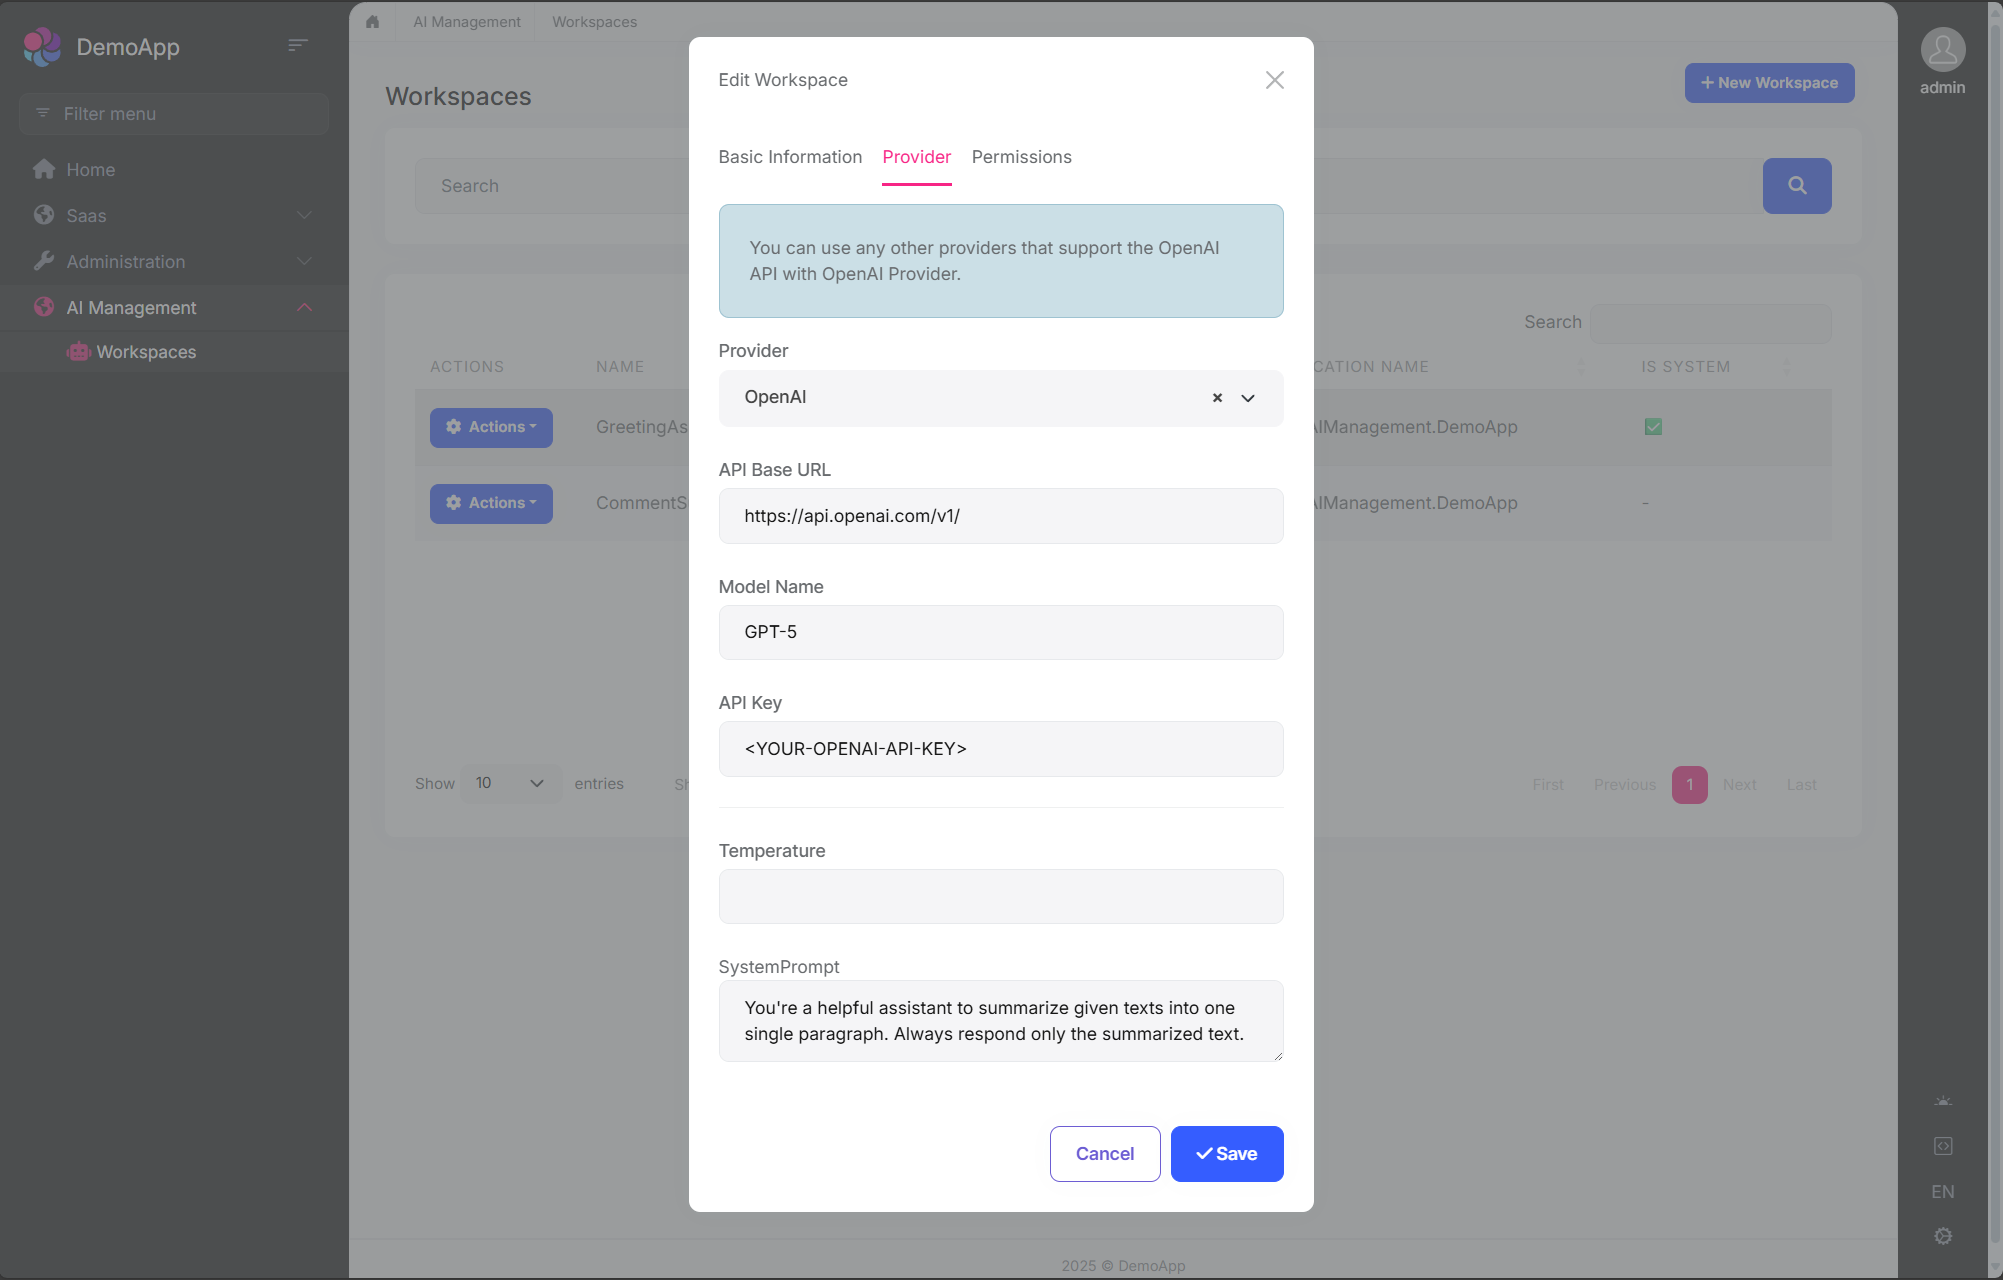
You can create a new workspace or edit an existing workspace in this page. The workspace configuration includes:
- Name: Unique identifier for the workspace (cannot contain spaces)
- Provider: AI provider (OpenAI, Ollama, or custom providers)
- Model: AI model name (e.g., gpt-4, mistral)
- API Key: Authentication key (if required by provider)
- API Base URL: Custom endpoint URL (optional)
- System Prompt: Default system instructions
- Temperature: Response randomness (0.0-1.0)
- Application Name: Associate with specific application
- Required Permission: Permission needed to use this workspace
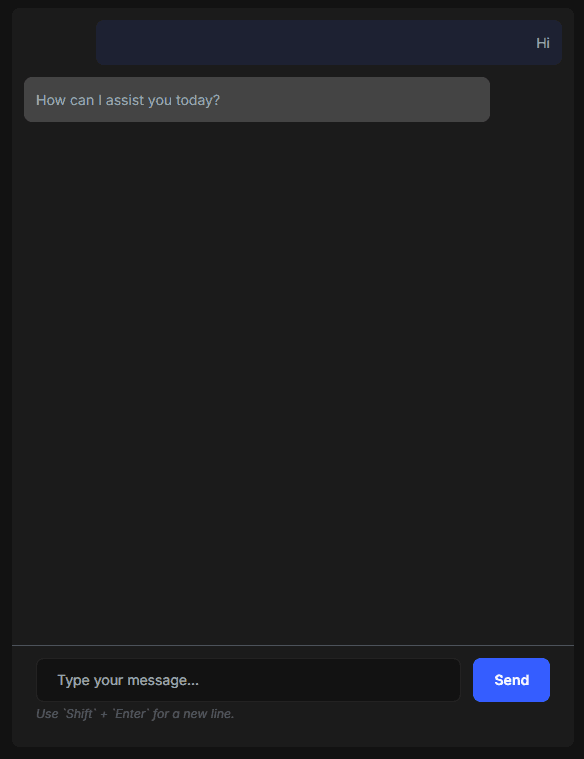
Chat Interface
The AI Management module includes a built-in chat interface for testing workspaces. You can:
- Select a workspace from available workspaces
- Send messages and receive AI responses
- Test streaming responses
- Verify workspace configuration before using in production
Access the chat interface at:
/AIManagement/Workspaces/{WorkspaceName}
Workspace Configuration
Workspaces are the core concept of the AI Management module. A workspace represents an AI provider configuration that can be used throughout your application.
Workspace Properties
When creating or managing a workspace, you can configure the following properties:
| Property | Required | Description |
|---|---|---|
Name |
Yes | Unique workspace identifier (cannot contain spaces) |
Provider |
Yes* | AI provider name (e.g., "OpenAI", "Ollama") |
ModelName |
Yes* | Model identifier (e.g., "gpt-4", "mistral") |
ApiKey |
No | API authentication key (required by some providers) |
ApiBaseUrl |
No | Custom endpoint URL (defaults to provider's default) |
SystemPrompt |
No | Default system prompt for all conversations |
Temperature |
No | Response randomness (0.0-1.0, defaults to provider default) |
Description |
No | Workspace description |
IsActive |
No | Enable/disable the workspace (default: true) |
ApplicationName |
No | Associate workspace with specific application |
RequiredPermissionName |
No | Permission required to use this workspace |
IsSystem |
No | Whether it's a system workspace (read-only) |
OverrideSystemConfiguration |
No | Allow database configuration to override code-defined settings |
*Not required for system workspaces
System vs Dynamic Workspaces
The AI Management module supports two types of workspaces:
System Workspaces
- Defined in code using
PreConfigure<AbpAIWorkspaceOptions> - Cannot be deleted through the UI
- Read-only by default, but can be overridden when
OverrideSystemConfigurationis enabled - Useful for application-critical AI features that must always be available
- Created automatically when the application starts
Example:
PreConfigure<AbpAIWorkspaceOptions>(options =>
{
    options.Workspaces.Configure<MyAssistantWorkspace>(configuration =>
    {
        configuration.ConfigureChatClient(chatClientConfiguration =>
        {
            chatClientConfiguration.Builder = new ChatClientBuilder(
                sp => new OpenAIClient(apiKey).GetChatClient("gpt-4")
            );
        });
    });
});
Dynamic Workspaces
- Created through the UI or programmatically via
ApplicationWorkspaceManagerandIWorkspaceRepository - Fully manageable - can be created, updated, activated/deactivated, and deleted
- Stored in database with all configuration
- Ideal for user-customizable AI features
Example (data seeding):
public class WorkspaceDataSeederContributor : IDataSeedContributor, ITransientDependency
{
    private readonly IWorkspaceRepository _workspaceRepository;
    private readonly ApplicationWorkspaceManager _applicationWorkspaceManager;
    public WorkspaceDataSeederContributor(
        IWorkspaceRepository workspaceRepository,
        ApplicationWorkspaceManager applicationWorkspaceManager)
    {
        _workspaceRepository = workspaceRepository;
        _applicationWorkspaceManager = applicationWorkspaceManager;
    }

    public async Task SeedAsync(DataSeedContext context)
    {
        var workspace = await _applicationWorkspaceManager.CreateAsync(
            name: "CustomerSupportWorkspace",
            provider: "OpenAI",
            modelName: "gpt-4");

        workspace.ApiKey = "your-api-key";
        workspace.SystemPrompt = "You are a helpful customer support assistant.";

        await _workspaceRepository.InsertAsync(workspace);
    }
Workspace Naming Rules
- Workspace names must be unique
- Workspace names cannot contain spaces (use underscores or camelCase)
- Workspace names are case-sensitive
Permissions
The AI Management module defines the following permissions:
| Permission | Description | Default Granted To |
|---|---|---|
AIManagement.Workspaces |
View workspaces | Admin role |
AIManagement.Workspaces.Create |
Create new workspaces | Admin role |
AIManagement.Workspaces.Update |
Edit existing workspaces | Admin role |
AIManagement.Workspaces.Delete |
Delete workspaces | Admin role |
Workspace-Level Permissions
In addition to module-level permissions, you can restrict access to individual workspaces by setting the RequiredPermissionName property:
var workspace = await _applicationWorkspaceManager.CreateAsync(
    name: "PremiumWorkspace",
    provider: "OpenAI",
    modelName: "gpt-4"
);
// Set a specific permission for the workspace
workspace.RequiredPermissionName = MyAppPermissions.AccessPremiumWorkspaces;
When a workspace has a required permission:
- Only authorized users with that permission can access the workspace endpoints
- Users without the permission will receive an authorization error
Usage Scenarios
The AI Management module is designed to support various usage patterns, from simple standalone AI integration to complex microservice architectures. The module provides two main package groups to support different scenarios:
Volo.AIManagement.*packages for hosting AI Management with full database and management capabilitiesVolo.AIManagement.Client.*packages for client applications that consume AI services
Scenario 1: No AI Management Dependency
Use this when: You want to use AI in your application without any dependency on the AI Management module.
In this scenario, you only use the ABP Framework's AI features directly. You configure AI providers (like OpenAI) in your code and don't need any database or management UI.
Required Packages:
Volo.Abp.AI- Any Microsoft AI extensions (e.g.,
Microsoft.Extensions.AI.OpenAI)
Configuration:
public class YourModule : AbpModule
{
    public override void ConfigureServices(ServiceConfigurationContext context)
    {
        PreConfigure<AbpAIWorkspaceOptions>(options =>
        {
            options.Workspaces.ConfigureDefault(configuration =>
            {
                configuration.ConfigureChatClient(chatClientConfiguration =>
                {
                    chatClientConfiguration.Builder = new ChatClientBuilder(
                        sp => new OpenAIClient(apiKey).GetChatClient("gpt-4")
                    );
                });
            });
        });
    }
}
Usage:
public class MyService
{
    private readonly IChatClient<TWorkspace> _chatClient;

    public MyService(IChatClient<TWorkspace> chatClient)
    {
        _chatClient = chatClient;
    }

    public async Task<string> GetResponseAsync(string prompt)
    {
        var response = await _chatClient.CompleteAsync(prompt);
        return response.Message.Text;
    }
}
See Artificial Intelligence documentation for more details about workspace configuration.
Scenario 2: AI Management with Domain Layer Dependency (Local Execution)
Use this when: You want to host the full AI Management module inside your application with database storage and management UI.
In this scenario, you install the AI Management module with its database layer, which allows you to manage AI workspaces dynamically through the UI or data seeding.
Required Packages:
Minimum (backend only):
Volo.AIManagement.EntityFrameworkCore(orVolo.AIManagement.MongoDB)Volo.AIManagement.OpenAI(or another AI provider package)
Full installation (with UI and API):
Volo.AIManagement.EntityFrameworkCore(orVolo.AIManagement.MongoDB)Volo.AIManagement.ApplicationVolo.AIManagement.HttpApiVolo.AIManagement.Web(for management UI)Volo.AIManagement.OpenAI(or another AI provider package)
Note:
Volo.AIManagement.EntityFrameworkCoretransitively includesVolo.AIManagement.DomainandVolo.Abp.AI.AIManagementpackages.
Workspace Definition Options:
Option 1 - System Workspace (Code-based):
public class YourModule : AbpModule
{
    public override void ConfigureServices(ServiceConfigurationContext context)
    {
        PreConfigure<AbpAIWorkspaceOptions>(options =>
        {
            options.Workspaces.Configure<MyCustomWorkspace>(configuration =>
            {
                configuration.ConfigureChatClient(chatClientConfiguration =>
                {
                    // Configuration will be populated from database
                });
            });
        });
    }
}
Option 2 - Dynamic Workspace (UI-based):
No code configuration needed. Define workspaces through:
- The AI Management UI (navigate to AI Management > Workspaces)
- Data seeding in your
DataSeederclass
Using Chat Client:
public class MyService
{
    private readonly IChatClient<MyCustomWorkspace> _chatClient;

    public MyService(IChatClient<MyCustomWorkspace> chatClient)
    {
        _chatClient = chatClient;
    }
}
Scenario 3: AI Management Client with Remote Execution
Use this when: You want to use AI capabilities without managing AI configuration yourself, and let a dedicated AI Management microservice handle everything.
In this scenario, your application communicates with a separate AI Management microservice that manages configurations and communicates with AI providers on your behalf. The AI Management service handles all AI provider interactions.
Required Packages:
Volo.AIManagement.Client.HttpApi.Client
Configuration:
Add the remote service endpoint in your appsettings.json:
{
  "RemoteServices": {
    "AIManagementClient": {
      "BaseUrl": "https://your-ai-management-service.com/"
    }
  }
}
Optionally define workspace in your module:
public class YourModule : AbpModule
{
    public override void ConfigureServices(ServiceConfigurationContext context)
    {
        PreConfigure<AbpAIWorkspaceOptions>(options =>
        {
            // Optional: Pre-define workspace type for type safety
            options.Workspaces.Configure<MyWorkspace>(configuration =>
            {
                // Configuration will be fetched from remote service
            });
        });
    }
}
Usage:
public class MyService
{
    private readonly IChatCompletionClientAppService _chatService;

    public MyService(IChatCompletionClientAppService chatService)
    {
        _chatService = chatService;
    }

    public async Task<string> GetAIResponseAsync(string workspaceName, string prompt)
    {
        var request = new ChatClientCompletionRequestDto
        {
            Messages = new List<ChatMessageDto>
            {
                new ChatMessageDto { Role = "user", Content = prompt }
            }
        };

        var response = await _chatService.ChatCompletionsAsync(workspaceName, request);
        return response.Content;
    }

    // For streaming responses
    public async IAsyncEnumerable<string> StreamAIResponseAsync(string workspaceName, string prompt)
    {
        var request = new ChatClientCompletionRequestDto
        {
            Messages = new List<ChatMessageDto>
            {
                new ChatMessageDto { Role = "user", Content = prompt }
            }
        };

        await foreach (var update in _chatService.StreamChatCompletionsAsync(workspaceName, request))
        {
            yield return update.Content;
        }
    }
}
Scenario 4: Exposing Client HTTP Endpoints (Proxy Pattern)
Use this when: You want your application to act as a proxy/API gateway, exposing AI capabilities to other services or client applications.
This scenario builds on Scenario 3, but your application exposes its own HTTP endpoints that other applications can call. Your application then forwards these requests to the AI Management service.
Required Packages:
Volo.AIManagement.Client.HttpApi.Client(to communicate with AI Management service)Volo.AIManagement.Client.Application(application services)Volo.AIManagement.Client.HttpApi(to expose HTTP endpoints)Volo.AIManagement.Client.Web(optional, for UI components)
Configuration:
Same as Scenario 3, configure the remote AI Management service in appsettings.json.
Usage:
Once configured, other applications can call your application's endpoints:
POST /api/ai-management-client/chat-completionfor chat completionsPOST /api/ai-management-client/stream-chat-completionfor streaming responses
Your application acts as a proxy, forwarding these requests to the AI Management microservice.
Comparison Table
| Scenario | Database Required | Manages Config | Executes AI | Exposes API | Use Case |
|---|---|---|---|---|---|
| 1. No AI Management | No | Code | Local | Optional | Simple apps, no config management needed |
| 2. Full AI Management | Yes | Database/UI | Local | Optional | Monoliths, services managing their own AI |
| 3. Client Remote | No | Remote Service | Remote Service | No | Microservices consuming AI centrally |
| 4. Client Proxy | No | Remote Service | Remote Service | Yes | API Gateway pattern, proxy services |
Client Usage
AI Management uses different packages depending on the usage scenario:
Volo.AIManagement.*packages: These contain the core AI functionality and are used when your application hosts and manages its own AI operations. These packages don't expose any application service and endpoints to be consumed by default.Volo.AIManagement.Client.*packages: These are designed for applications that need to consume AI services from a remote application. They provide both server and client side of remote access to the AI services.
MVC / Razor Pages UI
List of packages:
Volo.AIManagement.Client.ApplicationVolo.AIManagement.Client.Application.ContractsVolo.AIManagement.Client.HttpApiVolo.AIManagement.Client.HttpApi.ClientVolo.AIManagement.Client.Web
The Chat Widget
The Volo.AIManagement.Client.Web package provides a chat widget to allow you to easily integrate a chat interface into your application that uses a specific AI workspace named ChatClientChatViewComponent.
Basic Usage
You can invoke the ChatClientChatViewComponent Widget in your razor page with the following code:
@await Component.InvokeAsync(typeof(ChatClientChatViewComponent), new ChatClientChatViewModel
{
    WorkspaceName = "mylama",
})
Properties
You can customize the chat widget with the following properties:
WorkspaceName: The name of the workspace to use.ComponentId: Unique identifier for accessing the component via JavaScript API (stored in abp.chatComponents).ConversationId: The unique identifier for persisting and retrieving chat history from client-side storage.Title: The title of the chat widget.ShowStreamCheckbox: Whether to show the stream checkbox. Allows user to toggle streaming on and off. Default isfalse.UseStreaming: Default streaming behavior. Can be overridden by user whenShowStreamCheckboxis true.
@await Component.InvokeAsync(typeof(ChatClientChatViewComponent), new ChatClientChatViewModel
{
    WorkspaceName = "mylama",
    ComponentId = "mylama-chat",
    ConversationId = "mylama-conversation-" + @CurrentUser.Id,
    Title = "My Custom Title",
    ShowStreamCheckbox = true,
    UseStreaming = true
})
Using the Conversation Id
You can use the ConversationId property to specify the id of the conversation to use. When the Conversation Id is provided, the chat will be stored at the client side and will be retrieved when the user revisits the page that contains the chat widget. If it's not provided or provided as null, the chat will be temporary and will not be saved, it'll be lost when the component lifetime ends.
@await Component.InvokeAsync(typeof(ChatClientChatViewComponent), new ChatClientChatViewModel
{
    WorkspaceName = "mylama",
    ConversationId = "my-support-conversation-" + @CurrentUser.Id
})
JavaScript API
The chat components are initialized automatically when the ViewComponent is rendered in the page. All the initialized components in the page are stored in the abp.chatComponents object. You can retrieve a specific component by its ComponentId which is defined while invoking the ViewComponent.
@await Component.InvokeAsync(typeof(ChatClientChatViewComponent), new ChatClientChatViewModel
{
    WorkspaceName = "mylama",
    ComponentId = "mylama-chat"
})
You can then use the JavaScript API to interact with the component.
var chatComponent = abp.chatComponents.get('mylama-chat');
Once you have the component, you can use the following functions to interact with it:
// Switch to a different conversation
chatComponent.switchConversation(conversationId);

// Create a new conversation with a specific model
chatComponent.createConversation(conversationId, modelName);

// Clear the current conversation history
chatComponent.clearConversation();

// Get the current conversation ID (returns null for ephemeral conversations)
var currentId = chatComponent.getCurrentConversationId();

// Initialize with a specific conversation ID
chatComponent.initialize(conversationId);

// Send a message programmatically
chatComponent.sendMessage();

// Listen to events
chatComponent.on('messageSent', function(data) {
    console.log('Message sent:', data.message);
    console.log('Conversation ID:', data.conversationId);
    console.log('Is first message:', data.isFirstMessage);
});

chatComponent.on('messageReceived', function(data) {
    console.log('AI response:', data.message);
    console.log('Conversation ID:', data.conversationId);
    console.log('Is streaming:', data.isStreaming);
});

chatComponent.on('streamStarted', function(data) {
    console.log('Streaming started for conversation:', data.conversationId);
});

// Remove event listeners
chatComponent.off('messageSent', callbackFunction);
Best-practices:
- Don't try to access the component at the page load time, it's not guaranteed to be initialized yet. Get the component whenever you need it to make sure it's initialized and the latest state is applied.
❌ Don't do this
(function(){
    var chatComponent = abp.chatComponents.get('mylama-chat');
    $('#my-button').on('click', function() {
        chatComponent.clearConversation();
    });
});
✅ Do this
(function(){
    $('#my-button').on('click', function() {
        var chatComponent = abp.chatComponents.get('mylama-chat');
        chatComponent.clearConversation();
    });
});
Angular UI
Installation
In order to configure the application to use the AI Management module, you first need to import provideAIManagementConfig from @volo/abp.ng.ai-management/config to root application configuration. Then, you will need to append it to the appConfig array:
// app.config.ts
import { provideAIManagementConfig } from '@volo/abp.ng.ai-management/config';

export const appConfig: ApplicationConfig = {
  providers: [
    // ...
    provideAIManagementConfig(),
  ],
};
The AI Management module should be imported and lazy-loaded in your routing array. It has a static createRoutes method for configuration. It is available for import from @volo/abp.ng.ai-management.
// app.routes.ts
const APP_ROUTES: Routes = [
  // ...
  {
    path: 'ai-management',
    loadChildren: () =>
      import('@volo/abp.ng.ai-management').then(m => m.createRoutes(/* options here */)),
  },
];
Services / Models
AI Management module services and models are generated via generate-proxy command of the ABP CLI. If you need the module's proxies, you can run the following command in the Angular project directory:
abp generate-proxy --module aiManagement
Remote Endpoint URL
The AI Management module remote endpoint URLs can be configured in the environment files.
export const environment = {
  // other configurations
  apis: {
    default: {
      url: 'default url here',
    },
    AIManagement: {
      url: 'AI Management remote url here',
    },
    // other api configurations
  },
};
The AI Management module remote URL configurations shown above are optional.
If you don't set the
AIManagementproperty, thedefault.urlwill be used as fallback.
The Chat Widget
The @volo/abp.ng.ai-management package provides a ChatInterfaceComponent (abp-chat-interface) that you can use to embed a chat interface into your Angular application that communicates with a specific AI workspace.
Example: You can use the abp-chat-interface component in your template:
<abp-chat-interface
  [workspaceName]="'mylama'"
  [conversationId]="'my-conversation-id'"
/>
workspaceName(required): The name of the workspace to use.conversationId: The unique identifier for persisting and retrieving chat history from client-side storage. When provided, the chat history is stored in the browser and restored when the user revisits the page. Ifnull, the chat is ephemeral and will be lost when the component is destroyed.providerName: The name of the AI provider. Used for displaying contextual error messages.
Blazor UI
Remote Endpoint URL
The AI Management module remote endpoint URLs can be configured in your appsettings.json:
"RemoteServices": {
  "Default": {
    "BaseUrl": "Default url here"
  },
  "AIManagement": {
    "BaseUrl": "AI Management remote url here"
  }
}
For Blazor WebAssembly, you can also configure the remote endpoint URL via AIManagementClientBlazorWebAssemblyOptions:
Configure<AIManagementClientBlazorWebAssemblyOptions>(options =>
{
    options.RemoteServiceUrl = builder.Configuration["RemoteServices:AIManagement:BaseUrl"];
});
If you don't set the
BaseUrlfor AIManagement, theDefault.BaseUrlwill be used as fallback.
The Chat Widget
The Volo.AIManagement.Client.Blazor package provides a ChatClientChat Blazor component that you can use to embed a chat interface into your Blazor application that communicates with a specific AI workspace.
Example: You can use the ChatClientChat component in your Blazor page:
<ChatClientChat WorkspaceName="mylama"
                ConversationId="@("my-conversation-" + CurrentUser.Id)"
                ShowStreamCheckbox="true"
                OnFirstMessage="HandleFirstMessageAsync" />
WorkspaceName(required): The name of the workspace to use.ConversationId: The unique identifier for persisting and retrieving chat history from client-side storage. When provided, the chat history is stored in the browser's local storage and restored when the user revisits the page. If not provided ornull, the chat is ephemeral and will be lost when the component is disposed.Title: The title displayed in the chat widget header.ShowStreamCheckbox: Whether to show a checkbox that allows the user to toggle streaming on and off. Default isfalse.OnFirstMessage: AnEventCallback<FirstMessageEventArgs>that is triggered when the first message is sent in a conversation. It can be used to determine the chat title after the first prompt like applied in the chat playground. The event args containConversationIdandMessageproperties.
<ChatClientChat WorkspaceName="mylama"
                ConversationId="@("my-support-conversation-" + CurrentUser.Id)"
                Title="My Custom Title"
                ShowStreamCheckbox="true"
                OnFirstMessage="@HandleFirstMessage" />
Using Dynamic Workspace Configurations for custom requirements
The AI Management module allows you to access only configuration of a workspace without resolving pre-constructed chat client. This is useful when you want to use a workspace for your own purposes and you don't need to use the chat client.
The IWorkspaceConfigurationStore service is used to access the configuration of a workspace. It has multiple implementations according to the usage scenario.
public class MyService
{
    private readonly IWorkspaceConfigurationStore _workspaceConfigurationStore;
    public MyService(IWorkspaceConfigurationStore workspaceConfigurationStore)
    {
        _workspaceConfigurationStore = workspaceConfigurationStore;
    }

    public async Task DoSomethingAsync()
    {
        // Get the configuration of the workspace that can be managed dynamically.
        var configuration = await _workspaceConfigurationStore.GetAsync("MyWorkspace");

        // Do something with the configuration
        var kernel =  Kernel.CreateBuilder()
            .AddAzureOpenAIChatClient(
                config.ModelName!,
                new Uri(config.ApiBaseUrl),
                config.ApiKey
            )
            .Build();
    }
}
Implementing Custom AI Provider Factories
While the AI Management module provides built-in support for OpenAI through the Volo.AIManagement.OpenAI package, you can easily add support for other AI providers by implementing a custom IChatClientFactory.
Understanding the Factory Pattern
The AI Management module uses a factory pattern to create IChatClient instances based on the provider configuration stored in the database. Each provider (OpenAI, Ollama, Azure OpenAI, etc.) needs its own factory implementation.
Creating a Custom Factory
Here's how to implement a factory for Ollama as an example:
Step 1: Install the Provider's NuGet Package
First, install the AI provider's package. For Ollama:
dotnet add package OllamaSharp
Step 2: Implement the IChatClientFactory Interface
Create a factory class that implements IChatClientFactory:
using Microsoft.Extensions.AI;
using OllamaSharp;
using Volo.AIManagement.Factory;
using Volo.Abp.DependencyInjection;

namespace YourNamespace;

public class OllamaChatClientFactory : IChatClientFactory, ITransientDependency
{
    public string Provider => "Ollama";

    public Task<IChatClient> CreateAsync(ChatClientCreationConfiguration configuration)
    {
        // Create the Ollama client with configuration from database
        var client = new OllamaApiClient(
            configuration.ApiBaseUrl ?? "http://localhost:11434",
            configuration.ModelName
        );

        // Return as IChatClient
        return Task.FromResult<IChatClient>(client);
    }
}
Step 3: Register the Factory
Register your factory in your module's ConfigureServices method:
public override void ConfigureServices(ServiceConfigurationContext context)
{
    Configure<ChatClientFactoryOptions>(options =>
    {
        options.AddFactory<OllamaChatClientFactory>("Ollama");
    });
}
Tip
For production scenarios, you may want to add validation for the factory configuration.
Available Configuration Properties
The ChatClientCreationConfiguration object provides the following properties from the database:
| Property | Type | Description |
|---|---|---|
Name |
string | Workspace name |
Provider |
string | Provider name (e.g., "OpenAI", "Ollama") |
ApiKey |
string? | API key for authentication |
ModelName |
string | Model identifier (e.g., "gpt-4", "mistral") |
SystemPrompt |
string? | Default system prompt for the workspace |
Temperature |
float? | Temperature setting for response generation |
ApiBaseUrl |
string? | Custom API endpoint URL |
Description |
string? | Workspace description |
IsActive |
bool | Whether the workspace is active |
IsSystem |
bool | Whether it's a system workspace |
RequiredPermissionName |
string? | Permission required to use this workspace |
Example: Azure OpenAI Factory
Here's an example of implementing a factory for Azure OpenAI:
using Azure.AI.OpenAI;
using Azure;
using Microsoft.Extensions.AI;
using Volo.AIManagement.Factory;
using Volo.Abp.DependencyInjection;

namespace YourNamespace;

public class AzureOpenAIChatClientFactory : IChatClientFactory, ITransientDependency
{
    public string Provider => "AzureOpenAI";

    public Task<IChatClient> CreateAsync(ChatClientCreationConfiguration configuration)
    {
        var client = new AzureOpenAIClient(
            new Uri(configuration.ApiBaseUrl ?? throw new ArgumentNullException(nameof(configuration.ApiBaseUrl))),
            new AzureKeyCredential(configuration.ApiKey ?? throw new ArgumentNullException(nameof(configuration.ApiKey)))
        );

        var chatClient = client.GetChatClient(configuration.ModelName);
        return Task.FromResult(chatClient.AsIChatClient());
    }
}
Using Your Custom Provider
After implementing and registering your factory:
Through UI: Navigate to the AI Management workspaces page and create a new workspace:
- Select your provider name (e.g., "Ollama", "AzureOpenAI")
- Configure the API settings
- Set the model name
Through Code (data seeding):
var workspace = await _applicationWorkspaceManager.CreateAsync(
    name: "MyOllamaWorkspace",
    provider: "Ollama",
    modelName: "mistral"
);
workspace.ApiBaseUrl = "http://localhost:11434";
workspace.Description = "Local Ollama workspace";
await _workspaceRepository.InsertAsync(workspace);
Tip: The provider name you use in
AddFactory<TFactory>("ProviderName")must match the provider name stored in the workspace configuration in the database.
Internals
Domain Layer
The AI Management module follows Domain-Driven Design principles and has a well-structured domain layer.
Aggregates
- Workspace: The main aggregate root representing an AI workspace configuration.
Repositories
The following custom repositories are defined:
IWorkspaceRepository: Repository for workspace management with custom queries.
Domain Services
ApplicationWorkspaceManager: Manages workspace operations and validations.WorkspaceConfigurationStore: Retrieves workspace configuration with caching. ImplementsIWorkspaceConfigurationStoreinterface.ChatClientResolver: Resolves the appropriateIChatClientimplementation for a workspace.
Integration Services
The module exposes the following integration services for inter-service communication:
IAIChatCompletionIntegrationService: Executes AI chat completions remotely.IWorkspaceConfigurationIntegrationService: Retrieves workspace configuration for remote setup.IWorkspaceIntegrationService: Manages workspaces remotely.
Integration services are exposed at
/integration-apiprefix and marked with[IntegrationService]attribute.
Application Layer
Application Services
WorkspaceAppService: CRUD operations for workspace management.ChatCompletionClientAppService: Client-side chat completion services.AIChatCompletionIntegrationService: Integration service for remote AI execution.
Caching
Workspace configurations are cached for performance. The cache key format:
WorkspaceConfiguration:{ApplicationName}:{WorkspaceName}
HttpApi Client Layer
IntegrationWorkspaceConfigurationStore: Integration service for remote workspace configuration retrieval. ImplementsIWorkspaceConfigurationStoreinterface.
The cache is automatically invalidated when workspaces are created, updated, or deleted.
See Also
- Artificial Intelligence Infrastructure: Learn about the underlying AI workspace infrastructure
- Microsoft.Extensions.AI: Microsoft's unified AI abstractions
- Microsoft Agent Framework: Microsoft's Agent Framework
- Semantic Kernel: Microsoft's Semantic Kernel integration

