Layered Solution: Helm Charts and Kubernetes
You must have an ABP Business or a higher license to be able to use the Kubernetes features.
This document explains how to deploy the layered solution to a Kubernetes cluster using Helm charts. The layered solution template includes Helm charts for each application and infrastructure (Redis, RabbitMQ, etc). You can use these charts to deploy the solution to a Kubernetes cluster. You can see the Helm charts in the etc/helm folder of the solution.
Folder Structure
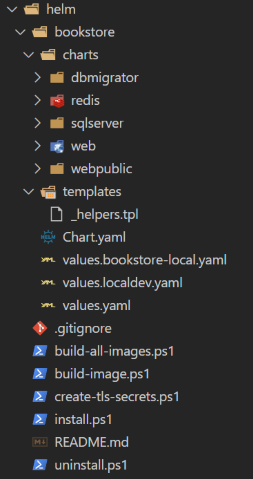
The folder structure of the Helm charts is as follows:

You might have different charts based on the solution template options you selected while creating the solution.
- bookstore: The Helm chart for the
Bookstoresolution. The folder name should be the same as your project name.- charts: The sub-charts of the solution. Each application and infrastructure has its own chart.
- templates: The templates of the solution. It includes the ingress host URLs.
- Chart.yaml: The chart metadata.
- values.bookstore-local.yaml: The override values file for the Kubernetes profile. It should follow the naming convention for your project name.
- values.yaml: The default values file for the chart.
- build-all-images.ps1: A PowerShell script to build all Docker images of the solution.
- build-image.ps1: A PowerShell script to build a Docker image of a specified project.
- create-tls-secrets.ps1: A PowerShell script to create local TLS secrets for the ingress controller. It's important when you try to intercept a service and run it locally.
- install.ps1: A PowerShell script to install the solution to a Kubernetes cluster. You can override the default argument values.
- uninstall.ps1: A PowerShell script to uninstall the solution from a Kubernetes cluster. You can override the default argument values.
Installing the Helm Charts
You can install the solution to a Kubernetes cluster using the install.ps1 script. The script has the following arguments:
- ChartName: Default value is the project name. You can create different charts and specify the chart name. In ABP Studio Kubernetes Main Chart Install Chart(s) command automatically sets the chart name.
- Namespace: The namespace to install the Kubernetes resources. Default value is the project name with the
-localsuffix. - ReleaseName: The release name of the Helm chart. Default value is the project name with the
-localsuffix. - DotnetEnvironment: The environment to run the application. Default value is
Staging. - User: The user responsible for installing the Kubernetes resources. The application will automatically set the user name if you configure it under Specify the User.
Before running the script, you need to build the Docker images of the solution. You can use the build-all-images.ps1 script to build all Docker images of the solution. Afterwards, make sure that you have a Kubernetes TLS secret for the ingress controller. It is automatically created when you create the solution; however, if you clone the solution from a repository, you need to create it manually. You can use the create-tls-secrets.ps1 script to create the TLS secret. Then you can run the install.ps1 script to install the solution to a Kubernetes cluster.
Uninstalling the Helm Charts
You can uninstall the solution from a Kubernetes cluster using the uninstall.ps1 script. The script has the following arguments:
- Namespace: The namespace to uninstall the helm chart. Default value is the project name with the
-localsuffix. - ReleaseName: The release name of the Helm chart. Default value is the project name with the
-localsuffix. - User: The user responsible for uninstalling the Kubernetes resources. The application will automatically set the user name if you configure it under Specify the User.
You can run the uninstall.ps1 script to uninstall the solution from a Kubernetes cluster.
./uninstall.ps1
Additionally, in ABP Studio Kubernetes feature, you can do the same operations more easily. You can use the Install Chart(s) and Uninstall Chart(s) commands to install and uninstall the solution to a Kubernetes cluster. Also, use the Build Docker Image(s) command to build the Docker images of the solution.


